2 New Mega Trees

Pircy

Full time elf
Joined
Aug 23, 2010
Messages
167
Location
Clontarf (North of Brisbane)
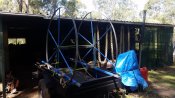
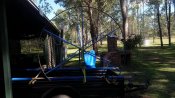
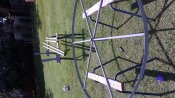
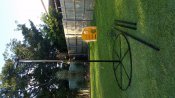
So it is art in the making I guess and I'm told anything good is worth the wait. After giving the plans to my Dad months ago right after Christmas , today I picked up the frames for my mega trees. (Incidentally it only took him 2 days to make, but he was a bit caught up restoring his Triumph 3 wheeler). I think the frame looks great.

So next job is painting, ordering pixels, controllers and power. Funnily enough whilst waiting at a set of lights I was asked where the cart was that the wagon wheels attach to!
 

Attachments

  • 20150410_113856.jpg
    20150410_113856.jpg
    896.4 KB · Views: 161
  • 20150410_113840.jpg
    20150410_113840.jpg
    2.7 MB · Views: 129

Pircy

Full time elf
Joined
Aug 23, 2010
Messages
167
Location
Clontarf (North of Brisbane)
I realised in my sleepy haze last night when I first posted my message that I should have acknowledged that it was Ruprect's design that I used. So it is roughly 3.5m from base ring to top ring. The design differs a little in that the base ring starts about 1.2m above the ground. This is because I have a lovely 1.2m fence and I wanted to clear that so cars could view it in its entirety. Will also appear to be taller than it really is. Yes the old fart does some good work. He's a fitter and turner / boiler maker by trade so very handy with metal. Honestly he can literally almost build anything made of metal. Almost 70 Y.O. but goes hard. He also built the trailer it is sitting in. So for the price of materials (about $700) I got 2 megatree frames and a brand new trailer. They also took the kids for the weekend so the wife and I could have a night away and play up. All in all a weekend to remember really!
 

fasteddy

I have C.L.A.P
Global moderator
Joined
Apr 26, 2010
Messages
6,648
Location
Albion Park NSW
Sounds like a big win all around for you. I look forward to seeing your trees in action this Christmas
 

Pircy

Full time elf
Joined
Aug 23, 2010
Messages
167
Location
Clontarf (North of Brisbane)
Got a good days work in. All the metal has been primed and painted. Hopefully the seeming litres of grey cold galv paint I applied will keep these babies rust free for years. Finished them in black gloss. Next job, drilling all those pesky holes to attach the light strings.
 

Attachments

  • 20150413_112851.jpg
    20150413_112851.jpg
    1.6 MB · Views: 93
  • 20150413_163740.jpg
    20150413_163740.jpg
    3.2 MB · Views: 86

mborg10

Michael Borg
Joined
Dec 28, 2011
Messages
1,446
Location
claremont meadows
I drilled all my holes on the drill press. Good can of wd40 and the drill bit went straight thru the 3mm plate to make a 12mm hole for my m10 bolts.
 

Pircy

Full time elf
Joined
Aug 23, 2010
Messages
167
Location
Clontarf (North of Brisbane)
I'm going to drill 8mm holes. At the top I'm going to use hooks to hold the pixel strips, at the bottom I'm going to use springs to maintain what will hopefully be an appropriate amount of tension. Will see how this works when the pixel strips arrive next month.
 

Baf05

Full time elf
Joined
Dec 15, 2012
Messages
249
Location
Canberra
I too am using a modified version of this, my base ring was made in two halves for storage, I also pre drilled 95% of the holes with a drill press before having the metal rolled to shape.

I have punched the strapping and put in all 1344 eyelets, waiting for the D rings to arrive (should have put those in as I was pressing).

Cant thank Ruprect enough for putting his instructions up.
 
Top