Newbie thinks he's doomed

So we are facing two issues - 1. FPP install on the controller, and 2. xLights configuration.

For 1. FPP - you dont want the Debian image. That's just a blank base linux install, and will not include the the FPP software you need to drive the board.
You will need to grab the software from the FPP repository - https://github.com/FalconChristmas/fpp/releases/tag/6.3 - specifically FPP-v6.3-BBB.img.zip
This is an IMG file which just gets written using Balena, Win32DiskImager, Raspberry Pi Imager (yes works with bbb too) or some other tool like that - use Balena as you have that already.
That image will have the complete package ready to go - operating system, services, applications, etc.
Once that is written, place it into the BBB, and let it boot, with the BBB attached to the LAN. Give it a few minutes to start up.
Now, if the EEPROM is written on your HE123 already, the OLED screen should come up saying it's running, but if it's not programmed then it will remain blank.
Either way - after a few minutes, try going to http://fpp.local/ on your computer.
From there you can continue the configuration.

For 2. xLights - You need to configure the controller on the "Controllers" section, before trying to allocate a prop to it.

I'm happy to walk you through it tonight if you have some time after 8.30pm Sydney time - can jump on Zoom if you like?
 
I wonder - do you have a router or switch you could plug the BB into instead of directly into the mac?
 
When I loose track of my FPP instances I will go to tools - FPP connect. This will scan your network and look for instances of FPP. It might not be showing up on the IP you think it should be.
 
Can you pop of screenshots of your network setup page when you are configuring/changing your IP in FPP.
 
Thanks so much for the advice everyone!
@Skymaster I'm so sorry I didn't see this till today. I stupidly missed the fact that there was a page 2 with replies on this thread! Gah.
Anyway, progress is being made! I downloaded and wrote the IMG file you recommended. I've attached the board to our wireless router and I can FINALLY access the configuration screen of the FPP on the web browser at fpp.local and when typing in the IP address. What a relief!
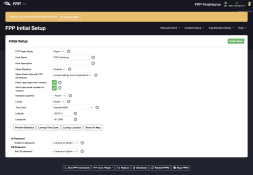
Now, there are settings which I'm unsure of the correct option to select in the initial setup.

It's asking whether there is any installed cape/hat, and I'm wondering if there's one I need to select for the HE123?
Screen Shot 2023-01-25 at 11.58.04 am.png

I've left the cape/hat version as "none" for the moment. After I finished initial setup, I selected the "Grow Filesystem" option in storage setup options when prompted about the unused space on the card. I also selected to Flash the onboard EMMC with the FPP software, and it's currently doing that now.

Apart from possibly selecting a cape/hat that's been installed, is there anything else I need to do in settings before I try using the board in xLights again? And after this setup/install process complete, will I be able to use the HE123 a controller by just configuring is as a USB connection in xLights? I'd rather not be carrying around network cables and an ethernet router and stuff, as I plan on using this setup outside of the house (need it portable).

Thanks for persevering everyone! You're all so supportive and helpful!
 
Fantastic - Ok, so selecting no cape is the right way to go as the HE123 is not yet in the default image for FPP.

Now, go to my EEPROM generator - https://apps.mortonlights.com/he123-unsigned and create a new EEPROM
Then head to Help -> Cape Info page, and there will be a place that will let you upgrade the EEPROM
Point it to the supplied file, and let it go - then once it's rebooted, the OLED should be working on the board, and you should see the HE123 in the Input/Output Setup / Channel Outputs section.

Personally I wouldn't flash to the onboard emmc - the reason being is that it's only 4GB in size, and FPP is getting to be about that big and it may be difficult to upgrade down the track. No worry for the moment though. There are many people that run from the onboard eMMC without hassles.

You will set it up as an Ethernet controller in xLights, irrespective of how it's going to run down the track. USB is for when you have a specific USB dongle (such as DMX etc) attached to the PC and it'll play from the PC, which is not what's going on here.
Ethernet is how it'll be uploading sequences etc to it - even if you use the USB port - as that just appears like a USB network card to the PC.

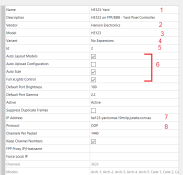
The important things on the controller tab in xLights
1. Give the controller a name - this is what you'll see when associating models
2. Select Hanson Electronics as the venodr
3. Select the HE123 as the Model
4. Select the variant (none, 1 or 2 expansions) based on what boards you have added to the HE123
5. Give the controller an ID - 1 is a good choice for the first controller
6. Set the tickboxes as I have shown here.
7. Type in the IP address that you have on the FPP instance. This can be the USB address if that's how you've connected
8. Select DDP as the protocol.

Then press the red SAVE button on the left hand side of the screen.
1674614361440.png

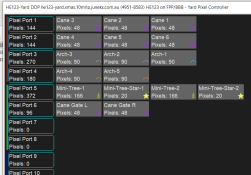
Once that's done, the visualiser button should appear at the bottom, if you press that, you then get a screen where you can drag props from the right onto controller ports on the left
1674614519581.png

And once you have your props mapped, hit the Upload Output button at the bottom with the controller connected and available. This will push the config to the HE123.
 
Back
Top