Having been wanting to step away from solar lights from Bunnings and BigW the last two years, but being a bit anxious of the cost and time sink musical RGB displays seemed to take, I finally took the plunge this year after an unexpected bonus at work left me some disposable income, and COVID with the time to invest.
This post is basically just a blog post of my experiences (successes and failures) for products I’ve looked at and tried for others who are thinking of dipping their toes in in 2021.
Firstly, read the 101 manual.
Then try to watch as many behind the scences (BTS) videos as possible on Youtube. Living Light Shows; Canispater Christmas; Lawrence Drive Lights are all my go to’s.
I still find myself going back to both manual and youtube weekly.
The Budget
Plan was initially (roof outline only) a budget of below $2,000AUD. In all, I think this blew out to about $2,600 by November.
The Controller
Advatek Pixlite 16 Plug & Play
8 * Advatek 4 core female pigtails
8 * Advatek female screw in connectors
2 * 5m Advatek 4 core extension leads
In 2020 there are many different controllers available. I had no interest in Light-o-Rama or DMX displays. Reading through the forum vendors I narrowed my choices down to a Falcon16 or an Advatek PixLite16 Plug and Play simply because I was too overwhelmed by the other options.
Being in QLD I wasn’t overly confident when starting that I could manufacture a control box using a Falcon, so I opted for the safe weatherproof design of the PixLite P&P. Supporting an Australian (Melbourne based) business was also appealing during COVID.
This controller is setup with a meanwell 12v 320w RSP power supply, inbuilt Ethernet, fully cabled to the control boards. 16 pre-installed 4amp outputs, with 4 core wiring allowing for newer pixel varieties; and the option to config the 4th clock wire as a second data output to double the pixel capacity. All this sounded great on the brochure – and provides a very simple, easy entry point to the hobby.
However, as I’ve gone through my build and learnt more and more, this choice is the single limiting factor in growth for future years. The PixLite16 P&P has two really constraining features:
Show Computer
Running everything from my PC in my office, I have 20m and 30m runs of Ethernet out the office window into the front yard. 20m run is to the pixel controller. 30m run carries HDMI to the projector.
Didn’t see the need for a separate RPi since I wanted to output video to projector as well as having everything automated.
Pixels
500 * WS2811 Rexin 12v Bullet Nodes (50 nodes per)
500 * ETop Lighting 12v bullet nodes (50 nodes per)
2 * 5m WS2811 (Slow) Strip from Amazon (30led p/m)
2 * 5m WS2811 (Fast) Strip from RayWu(30 led p/m)
I really just wanted to dip my toe into the hobby this year. I started out buying 500 WS2811 bullet node pixels from Rextin off Amazon AU to do some house outlines and a roll of pixel strip (boscoyo knock off) from Alan. I went with 12v on the controller and pixels to avoid power injection, noting my roof outline would mean ~6-9meter cable runs + outline length.
Upon receipt I learnt that the Rextin pixels were only 7.5cm (3 inch) apart, while RayWu and others are typically 10cm (4inch). While the Rextin could still work at 3 hole spacing in the pixel strip, it was hard on the hands J
Walking around Bunnings looking for inspiration on how best to attach the pixel strip to my colourbond gutters, my curiousity kicked in and I started to dream up other props (for future years as I told my wife).
I came across 180degree plant trainers https://www.bunnings.com.au/whites-1350mm-grip-and-grow-curve-vegie-frame-plant-trainer_p0054574 that I thought would be great for mini trees. 64 pixels and 4*1.2m strips of pixel plastic each, how can I pivot to still do the house and the mini trees?
Enter ETop lighting promotion on Alibaba for free shipping on another 500 pixels, and 20m of 3 core lighting cable for extension leads from Bunnings.
Next up, I found a post relating to air-seeder hose alternatives for arches suggesting the use of an 8m run of pool vacuum hosing from Bunnings. Cut down into 4 * 2m section with 32mm conduit inspection tees at each end, these can work nicely as 1m diameter arches.
This led to the purchase of 2 * 5050 led WS2811 strips from Amazon. However upon receipt I struggled to get them working. In my haste I cut off the installed JST connectors and replaced with advatek pigtails, thinking they could be the fault.
Further investigation led to the discovery that WS2811 strips come in two speeds – 400khz and 800khz, with the difference being a single pin on the ICB before each section of leds. As the P16 P&P can only control one variety of pixels across the entire range of outputs, these were useless without a second controller. And being IP67 sealed, I didn’t really feel like spending the time prying up a pin on each ICB, so those are now spares for 2021 or beyond.
Lesson learnt, I replaced those with 2 * WS2811 strips from Ray who confirmed the speed before purchase.
Now I had the outline, the mini trees and the arches I wanted – with ~400 pixels spare.
Lessons learnt:
Props
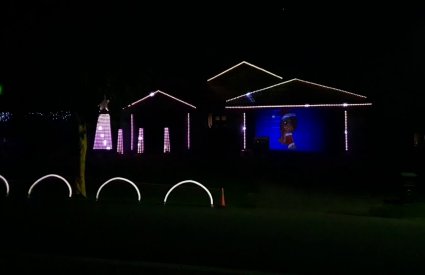
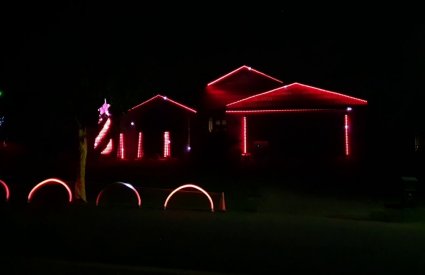
Vertical Walls
2m section of 25mm grey conduit, bullet node holes drilled in with 12.5mm drill bit. Set onto wall using a metal piece glued to side of house, and magnet attached to conduit clip. Also supported by S hooks hanging from eye screws in the awning.
Dutch Gables
Sections of 25mm grey conduit, bullet nodes drilled in. Attached to metal gable with magnet attached to conduit clips.
Garage Roof
Horizontal section uses boscoyo type pixel strip zip tied to 25mm conduit sections, attached to gutter with magnets attached to conduit clips.
Vertical sections 25mm grey conduit, bullet nodes drilled in. Attached to roof with magnet attached to conduit clips.
Mini Trees
180 degree plant trainers, with 4 strips of 16 pixels on boscoyo type strip. Plant Trainers are self supporting hammered into front lawn.
Arches
4 * 2m (circumference – ~1m diameter) sections of translucent pool hose with 5m pixel strips pulled through. Each section supported by 2 * 32mm conduit inspection tees, 40mm pvc clips, threaded ground pins and a green metal stake.
This post is basically just a blog post of my experiences (successes and failures) for products I’ve looked at and tried for others who are thinking of dipping their toes in in 2021.
Firstly, read the 101 manual.
Then try to watch as many behind the scences (BTS) videos as possible on Youtube. Living Light Shows; Canispater Christmas; Lawrence Drive Lights are all my go to’s.
I still find myself going back to both manual and youtube weekly.
The Budget
Plan was initially (roof outline only) a budget of below $2,000AUD. In all, I think this blew out to about $2,600 by November.
The Controller
Advatek Pixlite 16 Plug & Play
8 * Advatek 4 core female pigtails
8 * Advatek female screw in connectors
2 * 5m Advatek 4 core extension leads
In 2020 there are many different controllers available. I had no interest in Light-o-Rama or DMX displays. Reading through the forum vendors I narrowed my choices down to a Falcon16 or an Advatek PixLite16 Plug and Play simply because I was too overwhelmed by the other options.
Being in QLD I wasn’t overly confident when starting that I could manufacture a control box using a Falcon, so I opted for the safe weatherproof design of the PixLite P&P. Supporting an Australian (Melbourne based) business was also appealing during COVID.
This controller is setup with a meanwell 12v 320w RSP power supply, inbuilt Ethernet, fully cabled to the control boards. 16 pre-installed 4amp outputs, with 4 core wiring allowing for newer pixel varieties; and the option to config the 4th clock wire as a second data output to double the pixel capacity. All this sounded great on the brochure – and provides a very simple, easy entry point to the hobby.
However, as I’ve gone through my build and learnt more and more, this choice is the single limiting factor in growth for future years. The PixLite16 P&P has two really constraining features:
- The control board can only support 170 pixels (510 channels) per data string. So while they can support up to 96 universes over the expanded 32 outputs, the actual pixel number the board outputs to is a fraction of what other competing boards can facilitate.
- The P16 P&P can only support one variety of pixels at a time. So all 16/32 outputs must be the exact same pixel type. I started with WS2811, so unless I changed the whole build, that’s what Im limited to – and as written later in the pixel type area, this impacted a poor pixel buy as well.
Show Computer
Running everything from my PC in my office, I have 20m and 30m runs of Ethernet out the office window into the front yard. 20m run is to the pixel controller. 30m run carries HDMI to the projector.
Didn’t see the need for a separate RPi since I wanted to output video to projector as well as having everything automated.
Pixels
500 * WS2811 Rexin 12v Bullet Nodes (50 nodes per)
500 * ETop Lighting 12v bullet nodes (50 nodes per)
2 * 5m WS2811 (Slow) Strip from Amazon (30led p/m)
2 * 5m WS2811 (Fast) Strip from RayWu(30 led p/m)
I really just wanted to dip my toe into the hobby this year. I started out buying 500 WS2811 bullet node pixels from Rextin off Amazon AU to do some house outlines and a roll of pixel strip (boscoyo knock off) from Alan. I went with 12v on the controller and pixels to avoid power injection, noting my roof outline would mean ~6-9meter cable runs + outline length.
Upon receipt I learnt that the Rextin pixels were only 7.5cm (3 inch) apart, while RayWu and others are typically 10cm (4inch). While the Rextin could still work at 3 hole spacing in the pixel strip, it was hard on the hands J
Walking around Bunnings looking for inspiration on how best to attach the pixel strip to my colourbond gutters, my curiousity kicked in and I started to dream up other props (for future years as I told my wife).
I came across 180degree plant trainers https://www.bunnings.com.au/whites-1350mm-grip-and-grow-curve-vegie-frame-plant-trainer_p0054574 that I thought would be great for mini trees. 64 pixels and 4*1.2m strips of pixel plastic each, how can I pivot to still do the house and the mini trees?
Enter ETop lighting promotion on Alibaba for free shipping on another 500 pixels, and 20m of 3 core lighting cable for extension leads from Bunnings.
Next up, I found a post relating to air-seeder hose alternatives for arches suggesting the use of an 8m run of pool vacuum hosing from Bunnings. Cut down into 4 * 2m section with 32mm conduit inspection tees at each end, these can work nicely as 1m diameter arches.
This led to the purchase of 2 * 5050 led WS2811 strips from Amazon. However upon receipt I struggled to get them working. In my haste I cut off the installed JST connectors and replaced with advatek pigtails, thinking they could be the fault.
Further investigation led to the discovery that WS2811 strips come in two speeds – 400khz and 800khz, with the difference being a single pin on the ICB before each section of leds. As the P16 P&P can only control one variety of pixels across the entire range of outputs, these were useless without a second controller. And being IP67 sealed, I didn’t really feel like spending the time prying up a pin on each ICB, so those are now spares for 2021 or beyond.
Lesson learnt, I replaced those with 2 * WS2811 strips from Ray who confirmed the speed before purchase.
Now I had the outline, the mini trees and the arches I wanted – with ~400 pixels spare.
Lessons learnt:
- slow v fast WS2811 pixel strips
- bullet nodes have an input and output end – if they don’t light up, change the end data is being inputted
- go with reputable vendors (a few bucks can save headaches)
Props
Vertical Walls
2m section of 25mm grey conduit, bullet node holes drilled in with 12.5mm drill bit. Set onto wall using a metal piece glued to side of house, and magnet attached to conduit clip. Also supported by S hooks hanging from eye screws in the awning.
Dutch Gables
Sections of 25mm grey conduit, bullet nodes drilled in. Attached to metal gable with magnet attached to conduit clips.
Garage Roof
Horizontal section uses boscoyo type pixel strip zip tied to 25mm conduit sections, attached to gutter with magnets attached to conduit clips.
Vertical sections 25mm grey conduit, bullet nodes drilled in. Attached to roof with magnet attached to conduit clips.
Mini Trees
180 degree plant trainers, with 4 strips of 16 pixels on boscoyo type strip. Plant Trainers are self supporting hammered into front lawn.
Arches
4 * 2m (circumference – ~1m diameter) sections of translucent pool hose with 5m pixel strips pulled through. Each section supported by 2 * 32mm conduit inspection tees, 40mm pvc clips, threaded ground pins and a green metal stake.
Last edited: