GE hattitude quartet

ermarquez

Apprentice elf
Joined
Apr 3, 2023
Messages
61
Hi All , just wondering if there someone who knows how to use the the singing faces within this prop using an imported sequence? If the imported sequence got the RGB singing bulb 1 and submodel of RGB singing bulb 1 /base, how can i use it to my hattitude? I have tried to just drag the rgb singing bulb ( of source sequence) to hattitude sun model : bulb outline with base but only have of light on bulb is showing and there is no eyes and mouth on the bulb. Please help . thanks
 
Put the singing face on the prop itself, select face definition quartet bulb.
Put the effects for bulb 1/base on the bulb base sun model.
Sounds like you haven’t selected the face definition as it wouldn’t be used in your import.
 
Put the singing face on the prop itself, select face definition quartet bulb.
Put the effects for bulb 1/base on the bulb base sun model.
Sounds like you haven’t selected the face definition as it wouldn’t be used in your import.
Hi Brando , thanks for you help at least i have now the singing on my sequence however as attached picture you can see a blue lights around the globe . with the source sequence, that blue line is within the bulb lines . i’m trying to find how that blue lights with be in the bulb layout - any ideas? thanks!
 
what picture ? i’m just dragging the effects from a source sequence to my hattitude prop . thanks
 
Sorry - thought this meant you had put a screenshot in here to show what you meant:

as attached picture you can see a blue lights around the globe .
 
ok , that picture is the current situation now of my singing face - with blue lights not within the bulb line as per original sequence - how can i bring in that blue lights in the bulb line . currently as you can see its white lights - should be blue . thanks
 

Attachments

  • 0FBFAD73-50FA-4331-B4D3-B72CC582B8F6.jpeg
    0FBFAD73-50FA-4331-B4D3-B72CC582B8F6.jpeg
    1 MB · Views: 30
Congrats on picking up one of the most versatile props on the market, but it is one that takes some tweaking compared to what the vendor gives you.

Your blue line sure looks like it follows the blob/ghost singing face definition. Let me give you a tip for the Hattitude that will save you a lot of grief. When the import can't find a face definition with the same name, it goes with the first one in alphabetical order. For a stock Hattitude, that would tend to be Blob/Ghost. This is never the one I want. Go into the faces dialog on the prop, select the face you want as default, clone it, and name it "0_Default" or something that will come first in alphabetical order. This will make it "just work" as a bulb in all but tricky situations.

The other thing you could do is just take someone else's work and borrow it. Instead of using the vendor model, use one like mine, I made a lot of fixes to the spinner etc.:
 
Hi merry , thanks again for answering . first question is where can i find this faces dialog lets say i want the bulb as my default face ? thanks
 
Ah yes,
Navigating xLights can take some getting used to.
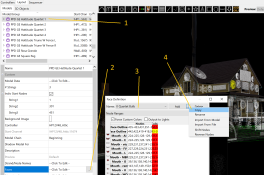
Start on the "Layout" Tab.
1. Click the Model to select it.
2. In the property grid go down to "Faces", and over to the right there is a "..." button, click it.
3. In the dialog that comes up, pick the face definition you want to set as default
4. Once it is selected, click the ... and choose copy
5. Rename the copy, from same menu as #4. You can see I called mine "0 Quartet Bulb", this zero will have the effect of making it default because it sorts first.

Feel free to ask more questions if you get stuck.
Another thing that I find I use a bit with singing faces is bulk edit. Once the basics are working, bulk edit is the next thing that can be a good friend to you for trickier sequences.

FacesNav.png
 
Ah yes,
Navigating xLights can take some getting used to.
Start on the "Layout" Tab.
1. Click the Model to select it.
2. In the property grid go down to "Faces", and over to the right there is a "..." button, click it.
3. In the dialog that comes up, pick the face definition you want to set as default
4. Once it is selected, click the ... and choose copy
5. Rename the copy, from same menu as #4. You can see I called mine "0 Quartet Bulb", this zero will have the effect of making it default because it sorts first.

Feel free to ask more questions if you get stuck.
Another thing that I find I use a bit with singing faces is bulk edit. Once the basics are working, bulk edit is the next thing that can be a good friend to you for trickier sequences.

View attachment 22990
yes!!!! got it many thanks!!
 
Ah yes,
Navigating xLights can take some getting used to.
Start on the "Layout" Tab.
1. Click the Model to select it.
2. In the property grid go down to "Faces", and over to the right there is a "..." button, click it.
3. In the dialog that comes up, pick the face definition you want to set as default
4. Once it is selected, click the ... and choose copy
5. Rename the copy, from same menu as #4. You can see I called mine "0 Quartet Bulb", this zero will have the effect of making it default because it sorts first.

Feel free to ask more questions if you get stuck.
Another thing that I find I use a bit with singing faces is bulk edit. Once the basics are working, bulk edit is the next thing that can be a good friend to you for trickier sequences.

View attachment 22990
Hi merry , can you tell me how to change the color of this bulb under this setting up ? i notice it first that the bulb got a purple and yellow colour which doesn’t match to the colours of sequence . so i got back to this steps and checked the “ force custom colors” the bulb becomes all white including the base . any ideas how can i change it ? thanks
 
Hi merry , can you tell me how to change the color of this bulb under this setting up ? i notice it first that the bulb got a purple and yellow colour which doesn’t match to the colours of sequence . so i got back to this steps and checked the “ force custom colors” the bulb becomes all white including the base . any ideas how can i change it ? thanks
hi merry , found it - clicking the force colour will make the bulb colour as all white but removing the check will make as per sequenced colour. just been thinking why it’s becomes purple and yellow the first time i go back and rendered my sequence . all good now ! thanks again
 
Oh, I see you figured it out, but I was mostly ready to give you some more tips so here they are anyway. Honestly when doing imports I spend a good bit of time touching up faces if the sequencer has done anything interesting. Seems inescapable.

The first approach is to let the singing prop color clash with the sequence color. This is my preferred approach and I've noticed a lot of people do this. I default each one to a different color. They stand out from the show that way, but sure, sometimes it looks silly/tacky. (Then again, singing bulb faces.)

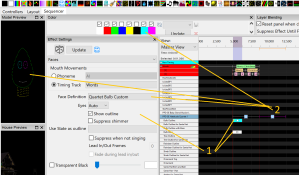
The second approach is to put effects on the outlines or other parts of the model that overlay on top of the face effect, see #1 below. Some of the sequencers do this, I recall particularly in the one sequence the singer is given outline colors to match Ariel in the Little Mermaid by applying effects to the outline and base. See #1 below... perhaps in conjunction with unchecking "show outline", effects are mapped / placed on the submodels of the singing prop. (Double click the prop to expand the submodels)
ChangingOutlineColor.png

The third approach is to override the colors. See #2 in the image. For reasons I may not fully appreciate, this is the least common method. I also have some props with multicolor state outlines for singing, and that's not gonna work well here. This is the approach you noted - uncheck "force custom colors" on a copy of the face definition, pick that one in the "Face Definition" field, and then the color palette controls different parts of the face.

(A 4th approach - rarest of all - make a special face definition just for the sequence. I do have Dave + Alvin, Simon, Theodore for the quartets, works well in 2 songs.)

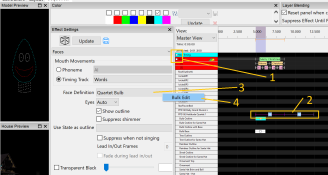
One other set of tips I'd give you, if you haven't already found it, is for bulk edit. Some vendors make a lot of face effects, even though with "suppress when not singing" you hardly need it these days. For that, use bulk edit.
1. Be sure no timing tracks are selected. Clear the buttons.
2. Drag around the effects to bulk edit. There has to be more than one
3. Right click the thing to edit, such as "Face Definition"
4. Click Bulk Edit. From that point, it is generally intuitive. But it has to be compatible with the other options on the first selected effect. (Like be sure you bulk edit and check "show outline" before you'd pick "Use state as outline".)
BulkEdit.png

Hope these tips help you later, even if you don't need them right now.
 
Oh, I see you figured it out, but I was mostly ready to give you some more tips so here they are anyway. Honestly when doing imports I spend a good bit of time touching up faces if the sequencer has done anything interesting. Seems inescapable.

The first approach is to let the singing prop color clash with the sequence color. This is my preferred approach and I've noticed a lot of people do this. I default each one to a different color. They stand out from the show that way, but sure, sometimes it looks silly/tacky. (Then again, singing bulb faces.)

The second approach is to put effects on the outlines or other parts of the model that overlay on top of the face effect, see #1 below. Some of the sequencers do this, I recall particularly in the one sequence the singer is given outline colors to match Ariel in the Little Mermaid by applying effects to the outline and base. See #1 below... perhaps in conjunction with unchecking "show outline", effects are mapped / placed on the submodels of the singing prop. (Double click the prop to expand the submodels)
View attachment 22991

The third approach is to override the colors. See #2 in the image. For reasons I may not fully appreciate, this is the least common method. I also have some props with multicolor state outlines for singing, and that's not gonna work well here. This is the approach you noted - uncheck "force custom colors" on a copy of the face definition, pick that one in the "Face Definition" field, and then the color palette controls different parts of the face.

(A 4th approach - rarest of all - make a special face definition just for the sequence. I do have Dave + Alvin, Simon, Theodore for the quartets, works well in 2 songs.)

One other set of tips I'd give you, if you haven't already found it, is for bulk edit. Some vendors make a lot of face effects, even though with "suppress when not singing" you hardly need it these days. For that, use bulk edit.
1. Be sure no timing tracks are selected. Clear the buttons.
2. Drag around the effects to bulk edit. There has to be more than one
3. Right click the thing to edit, such as "Face Definition"
4. Click Bulk Edit. From that point, it is generally intuitive. But it has to be compatible with the other options on the first selected effect. (Like be sure you bulk edit and check "show outline" before you'd pick "Use state as outline".)
View attachment 22992

Hope these tips help you later, even if you don't need them right now.
ok thanks maybe i can use that later will have a thorough reading and hopefully i can use that in the future . thanks!!
 
Back
Top