Icicles on a return gutter

Adam V

Apprentice elf
Joined
Nov 28, 2017
Messages
85
Hey all,
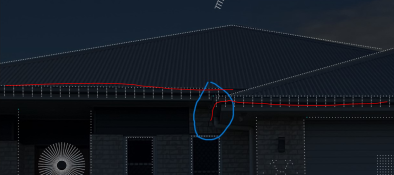
Adding some last minute Icicles to the display this year and im wondering how to handle them on the return gutter in xlights? Im sure someone has faced this issue before. If not i may leave them out.
Cheers
 

Attachments

  • 2022-11-06.jpeg
    2022-11-06.jpeg
    119.9 KB · Views: 28
Two options, depending on how you'd like it to render and the amount of fiddling you want to do:

1. For the most flexibility. Convert to 3D mode. Then you can set up camera angels etc, and render your effects appropriately for that view.
2. Draw it diagonal from bottom-left to top-right to link up your two existing icicles. Effect control won't be as great when you've got the whole house effects done, but it's the simplest.
Thanks yes I had thought 3D but not keen for the hassle. I worry option 2 won’t do a lot and the if it’s worth it. I’ll give it a try tho 😬
 
As a user of 3D mode, I can say that it is not great to have things that go straight in/out along Z axis. Any effects on groups end up lighting all pixels with the same x,y the same color, so the icicles that head straight in and out just look like streaks of color.

You *could* change the camera angle for each effect, yes, but there seems to be no default override and there I never have that kind of time because I just want to import a bunch of other people's sequences. So I took the somewhat extreme step of rotating my whole 3D layout 30 degrees around Y so that nothing points straight in/out (I used a script, could never calculate it out by hand). It's a marvelous upgrade, visually.

Another option I saw done in a zoom room once involved shadow models, shadow model was x/y oriented and mapped onto the bits of icicle. It worked, but yech.

So in short, I advise option #2 above, fudge the location in 2D until it looks good... unless you have a lot of free time.
 
For your scenario @Adam V , I would use the poly-line model to create the real representation of icicles and also have a shadow model in the sky.
Draw a poly-line around the roof, set the drop pattern and the model turns to icicles.
In segments you can define how many pixels are between each pivot point.

I'd do two separate poly-line models so there is some consistency.
1667968248711.png

Then a full horizontal lot of icicles in the sky and shadow model that to the icicles around the roof.
For whole house effects you would probably be using the poly-line icicle model with the gutter part returning, but for an effect like left/right bars would look best on the full-horizontal shadow model.


As a user of 3D mode, I can say that it is not great to have things that go straight in/out along Z axis. Any effects on groups end up lighting all pixels with the same x,y the same color, so the icicles that head straight in and out just look like streaks of color.

You *could* change the camera angle for each effect
It doesn't work for icicles, but a single line can be dealt with by selecting render method "as single line". Icicles are probably limited to a shadow model still.

I find similar issues when applying a strobe/twinkle effect to the whole house group. So I set it to render as a single line and adjust it to 3% or something.
 
thanks i might have a go when i get time next year,
 
Back
Top