- Thread starter
- #16
I've found other "build" threads quite useful so thought I'd update this one with my progress.
I picked up about 50 lengths of different type of conduit for free earlier this year off marketplace. After making a test arch I realised 12 arches would be too small to look nice, so I reduced it to 8. That makes each one 800mm high, and 1600 wide, totalling 12.8m out of 13.4m on the left-side of the driveway. Some of that will be spacing and there'll be a bit of dead space on the far end.
An 800mm radius gives around 2.5m arc, which (at 9cm spacing) makes around 28 pixels per arch. I'm going to make a test before drilling holes as this isn't very dense, but I have to ration my pixels!
I worked backward from arc length to radius as I had to know the pixel count first to divide by my arches. The formula (in case you're wondering) is:
diameter = arc*2/Pi. arc is the half-circle circumference you want to achieve.
I bent them using a 240V air gun that says 600 degrees! I found that heating about 20-30cm until it was just a bit soft, but still holding shape, was the right amount at a time. This took around 30-40s per section. I traced a half-circle in chalk on the ground using a string, and worked my way around that. Until my legs got sore and then moved to a table!
The first one kinked, so my father-in-law suggested using something like a pipe-spring inside. Not having anything that size, we settled on sprinkler poly pipe. I ran that through the middle before bending. It's naturally curved from the roll so I found the conduit starting curling itself once up to temp. This stopped the kinks.

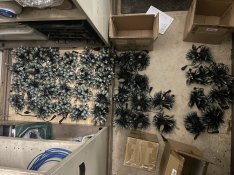
The bases were made from left-over sections of each conduit, and some right-angle joints from the hardware store. I used non-pressurised pipe dope which is holding fine. Turns out so long as you glue both inside and outside before joining, it doesn't matter if you forget which end you glued Spot the odd one out:

Painting was awkward because I wanted to cover the whole lot, yet you need to let it dry somewhere which means you need to leave an unpainted patch. I ended up hanging them inside the shed so all I had unpainted was a little bit in the middle. I've done a couple of coats. Next time I would sand them a lot more as paint doesn't like sticking to PVC so it's easy to chip off. Come to think of it, if I'd drilled the holes first, I could have hung them by one of the holes, but I thought that would make it harder to paint.

This weekend's job is to drill and push. I would be super-happy if I can get the plugged into a controller in the house just to see how they look...
I picked up about 50 lengths of different type of conduit for free earlier this year off marketplace. After making a test arch I realised 12 arches would be too small to look nice, so I reduced it to 8. That makes each one 800mm high, and 1600 wide, totalling 12.8m out of 13.4m on the left-side of the driveway. Some of that will be spacing and there'll be a bit of dead space on the far end.
An 800mm radius gives around 2.5m arc, which (at 9cm spacing) makes around 28 pixels per arch. I'm going to make a test before drilling holes as this isn't very dense, but I have to ration my pixels!
I worked backward from arc length to radius as I had to know the pixel count first to divide by my arches. The formula (in case you're wondering) is:
diameter = arc*2/Pi. arc is the half-circle circumference you want to achieve.
I bent them using a 240V air gun that says 600 degrees! I found that heating about 20-30cm until it was just a bit soft, but still holding shape, was the right amount at a time. This took around 30-40s per section. I traced a half-circle in chalk on the ground using a string, and worked my way around that. Until my legs got sore and then moved to a table!
The first one kinked, so my father-in-law suggested using something like a pipe-spring inside. Not having anything that size, we settled on sprinkler poly pipe. I ran that through the middle before bending. It's naturally curved from the roll so I found the conduit starting curling itself once up to temp. This stopped the kinks.
The bases were made from left-over sections of each conduit, and some right-angle joints from the hardware store. I used non-pressurised pipe dope which is holding fine. Turns out so long as you glue both inside and outside before joining, it doesn't matter if you forget which end you glued
Spot the odd one out:Painting was awkward because I wanted to cover the whole lot, yet you need to let it dry somewhere which means you need to leave an unpainted patch. I ended up hanging them inside the shed so all I had unpainted was a little bit in the middle. I've done a couple of coats. Next time I would sand them a lot more as paint doesn't like sticking to PVC so it's easy to chip off. Come to think of it, if I'd drilled the holes first, I could have hung them by one of the holes, but I thought that would make it harder to paint.
This weekend's job is to drill and push. I would be super-happy if I can get the plugged into a controller in the house just to see how they look...