BigKev
New elf
Hi All
I’ve been asked for some instructions, etc. for fabricating my design elements and that presents a bit of a problem because I don’t have any. You see as I indicated in my initial post this is all a theoretical exercise at my end, I’ve never actually made any of the designs.
Having said that I don’t reckon it would be too difficult. After all if you ignore the electronics it’s pretty much just an exercise in cut and glue.
The hard bit from my perspective would be the lighting side of things and I can’t give any advice at all on that side of things. But I bet there are plenty of Electrodes on this Forum who could if you only asked.
Anyway, for what it’s worth, I have put together some ramblings below on how I would go about it if I was going to actually get into the practical side of things. Just remember I am making this up as I go (which is usually how I go about doing things anyway) and I’ll happily stand corrected by anyone who actually knows what they’re doing.
My ramblings are really intended as a starting point for those who haven’t got a clue where to start. Before you do get started though I would suggest you peruse all the other posts about coro, there is some very handy advice hidden away amongst them (like how to “score” your coro to achieve sharp corners and smooth curves).
So let’s get started.
TERMINOLOGY:
First let’s get the terminology right so we all know what I’m talking about. (This is the technical stuff.)
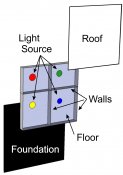
House = The display/design object we are building.
Roof = The face or top surface of the display/design object.
Walls = The side/upright bits of the display/design object.
Floor = The bottom internal surface of the display/design object on which the lights are mounted.
Foundation = The backing of the display/design object.
Room = Each individual colour area or light enclosure.
Note: The Foundation is probably optional. I thought it could be handy for mounting the display/design object while providing for light enclosure to the rear.
So for the purposes of the exercise here’s our display/design object.
[attachimg=1]
NOTIONAL STUFF:
Some stuff you might want to think about before you get started is –
Light source. What sort/colour. How are you going to mount them in the House and how are you going to control your lights. Don’t forget that you may want to get at your lights for repair/adjustment so give some thought to how you are going to do that once your House is all glued together. Individual LED’s embedded in holes in the floor wouldn’t be too difficult but modules etc. would be another matter. Why not think about cutting appropriately sized bases for each module out of the Floor, fix each module to its base then re-attach the bases (with lights attached) to the floor using something like gaffer tape or even Velcro as I’ve seen suggested elsewhere.
Display output. What colours, where and where do you want light (colour) to be visible. You’ll need to use transparent or translucent coro where you want to see light and have an opaque surface/membrane (coro, paint, vinyl sheet or whatever suits best) where you don’t want to see light or where you want to seperate different colours.
Diffusion. Light diffusion needs to be maximised so I would suggest the internal surfaces of the floor and walls should be white.
Wall Height. I reckon there are two major considerations here. The first is cosmetic, ie the visual effect you’re after and the second relates to the volume of the Room and the amount of available light in the Room. Obviously, just like in your home, the larger the Room the more light you will need to light it up. I would suggest minimising wall height so that you get an even light diffusion and don’t see outlines or shadowing of the individual light sources. A little bit of experimentation might be required to get it just how you want it. (I would be making up a little experimental box to fiddle with so you can get this the way you want it before commencing work on your display/design object and mucking the whole thing up because the Wall heights are not right.)
Size. How big do you want your display/design object to be.
SUPPLIES:
Coro. Don’t forget to ensure that it is transparent, translucent or opaque depending on what you’re wanting. (I phoned Mulford and was informed, rightly or wrongly, that all their product was opaque so make sure you get what you want.)
Cutting Implement. I know you can get a special coro cutter but I reckon I would be making do with my el-cheapo adjustable Stanley (generic) trimmer with hook blades.
Glue. To stick the coro bits together. I would be using silicone sealer (you know, that clear stuff in the tube you get from the hardware shop to fix the gutter or shower screen) for most of the gluing. It does take a while to set though so where I needed to hold something in place (curves, etc.) I would be “spot welding” with the glue gun. For those who haven’t used a glue gun, they are really cheap (you don’t need anything fancy), easy to use and the glue sets very quickly.
Marking Pens.
Coro Alternatives. Don’t forget that “necessity is the mother of invention” so think laterally. Whilst this thread is aimed at using coro if you can’t get any or you have a pile of some other sort of pliable “plastic” sheeting sitting in the back of your shed it may well do the job. Remember though that if you’re buying, coro will probably be your cheapest (and easiest) option
INSTRUCTIONS:
So here is how I would go about it after I had sorted out the Notional Stuff above.
1. Transfer the outlines onto the coro Floor and Roof as necessary at the size you want. There are a number of ways to do this and what you use will depend on what you have available and/or how much you want to spend. You could use a simple graph, print a tiled image of the outline at size, print the outline on a large format printer if you are lucky enough to have one and in which case you probably shouldn’t be wasting your time reading this, take the file to a printer and pay them to print it large format or print the outline on a transparency and use an overhead projector to enlarge it.
With regard to methods for enlarging your image. If you have the capacity to print out tiled images at home and your House is not too big then this is probably a relatively easy way to go. However if you’re fabricating a pretty large House then it can be a proverbial pain having to stick all those tiled images together. I reckon by far the easiest way is with an overhead projector but of course most of us don’t have one of those sitting in our workshop. There are plenty of places that do have them though. Such as schools, Government Departments, Community Centres and local community groups so why not give some thought to approaching them to see if you can take your transparency and coro along to their place and use their overhead projector.
2. If you’re going to embed individual LED’s for your lighting now would probably be a good time to drill/punch the necessary holes in the floor. (Don’t forget if you’re using a Foundation to drill/punch the same holes through that also.) Probably also a good time to cut out bases for your modules if that’s the way you’re going.
3. Mark and cut coro strips at the height you’ve determined for your walls. REMEMBER to cut your coro wall strips across the grain (flutes) as it will make for a stronger structure and I don’t reckon the coro will bend too easily if they are cut with the grain.
4. Glue the wall strips along the required outlines on your floor ensuring they stand up vertically. Laying one wall strip at a time I would run a bead of silicone along the outline for the length of one wall strip leaving about a 5/10mm gap every now and again. Place the wall strip (following the outline of course) and use some scrap wood blocks (or whatever) to hold it in place to avoid the strip flipping round and smearing silicone all over everything in sight. Once that wall strip is in place go along with your glue gun and “spot weld it in place”, ensuring the wall is nice and vertical. You’ll probably need to experiment a bit with the number of “spot welds” you’ll need for a given curve and length.
Don’t forget to glue each wall strip to the next using the same method.
5. Once you’ve finished all the walls and your silicone has set this would probably be a good time to get your lights sorted.
6. Lights all finished? Good, then now would be a good time to attach the Roof. I would be running a bead of silicon along the top edge of all the walls then plonk on the Roof, appropriately lined up of course. Shouldn’t be any need to “spot weld” the roof but you can if you want. I’d just put some weights on it to hold it in place while the silicone sets.
7. Once the silicone has set trim off any excess coro and I reckon you’re just about done with fabrication of the House.
8. Finally there are just the artistic touches which will depend on how artistic you are. If you’re like me and can’t draw a straight line with a ruler then there is probably not much you can do to enhance the appearance of your House (other than the lighting of course). There will be times though when you want some accent black lines (usually following the line of your Walls) on the Roof (face) of your House. I reckon you could add those in a number of ways. Paint or felt pen would probably work and be pretty easy to apply. Depending on what you are trying to achieve and the finish you’re looking for I would be giving self adhesive black vinyl sheet (that’s like the “Contact” stuff kids use to cover their school books and which is used to make signs) a go if you can get hold of some. You can often get very handy off cuts from sign makers. All you need to do is cut out the lines or shapes (such as eyes, etc.) and stick them on your roof.
9. So now finish off your lighting affects and you’re all done and ready to hang at Christmas.
One final suggestion. If it was me I would be fabricating a small House out of some scrap coro before I started, as a bit of a practise run. Better off to stuff up some scrap than the big project.
Good luck and I do hope all this was of some assistance. Don’t forget to post pictures of your finished product.
Regards
Kevin
I’ve been asked for some instructions, etc. for fabricating my design elements and that presents a bit of a problem because I don’t have any. You see as I indicated in my initial post this is all a theoretical exercise at my end, I’ve never actually made any of the designs.
Having said that I don’t reckon it would be too difficult. After all if you ignore the electronics it’s pretty much just an exercise in cut and glue.
The hard bit from my perspective would be the lighting side of things and I can’t give any advice at all on that side of things. But I bet there are plenty of Electrodes on this Forum who could if you only asked.
Anyway, for what it’s worth, I have put together some ramblings below on how I would go about it if I was going to actually get into the practical side of things. Just remember I am making this up as I go (which is usually how I go about doing things anyway) and I’ll happily stand corrected by anyone who actually knows what they’re doing.
My ramblings are really intended as a starting point for those who haven’t got a clue where to start. Before you do get started though I would suggest you peruse all the other posts about coro, there is some very handy advice hidden away amongst them (like how to “score” your coro to achieve sharp corners and smooth curves).
So let’s get started.
TERMINOLOGY:
First let’s get the terminology right so we all know what I’m talking about. (This is the technical stuff.)
House = The display/design object we are building.
Roof = The face or top surface of the display/design object.
Walls = The side/upright bits of the display/design object.
Floor = The bottom internal surface of the display/design object on which the lights are mounted.
Foundation = The backing of the display/design object.
Room = Each individual colour area or light enclosure.
Note: The Foundation is probably optional. I thought it could be handy for mounting the display/design object while providing for light enclosure to the rear.
So for the purposes of the exercise here’s our display/design object.
[attachimg=1]
NOTIONAL STUFF:
Some stuff you might want to think about before you get started is –
Light source. What sort/colour. How are you going to mount them in the House and how are you going to control your lights. Don’t forget that you may want to get at your lights for repair/adjustment so give some thought to how you are going to do that once your House is all glued together. Individual LED’s embedded in holes in the floor wouldn’t be too difficult but modules etc. would be another matter. Why not think about cutting appropriately sized bases for each module out of the Floor, fix each module to its base then re-attach the bases (with lights attached) to the floor using something like gaffer tape or even Velcro as I’ve seen suggested elsewhere.
Display output. What colours, where and where do you want light (colour) to be visible. You’ll need to use transparent or translucent coro where you want to see light and have an opaque surface/membrane (coro, paint, vinyl sheet or whatever suits best) where you don’t want to see light or where you want to seperate different colours.
Diffusion. Light diffusion needs to be maximised so I would suggest the internal surfaces of the floor and walls should be white.
Wall Height. I reckon there are two major considerations here. The first is cosmetic, ie the visual effect you’re after and the second relates to the volume of the Room and the amount of available light in the Room. Obviously, just like in your home, the larger the Room the more light you will need to light it up. I would suggest minimising wall height so that you get an even light diffusion and don’t see outlines or shadowing of the individual light sources. A little bit of experimentation might be required to get it just how you want it. (I would be making up a little experimental box to fiddle with so you can get this the way you want it before commencing work on your display/design object and mucking the whole thing up because the Wall heights are not right.)
Size. How big do you want your display/design object to be.
SUPPLIES:
Coro. Don’t forget to ensure that it is transparent, translucent or opaque depending on what you’re wanting. (I phoned Mulford and was informed, rightly or wrongly, that all their product was opaque so make sure you get what you want.)
Cutting Implement. I know you can get a special coro cutter but I reckon I would be making do with my el-cheapo adjustable Stanley (generic) trimmer with hook blades.
Glue. To stick the coro bits together. I would be using silicone sealer (you know, that clear stuff in the tube you get from the hardware shop to fix the gutter or shower screen) for most of the gluing. It does take a while to set though so where I needed to hold something in place (curves, etc.) I would be “spot welding” with the glue gun. For those who haven’t used a glue gun, they are really cheap (you don’t need anything fancy), easy to use and the glue sets very quickly.
Marking Pens.
Coro Alternatives. Don’t forget that “necessity is the mother of invention” so think laterally. Whilst this thread is aimed at using coro if you can’t get any or you have a pile of some other sort of pliable “plastic” sheeting sitting in the back of your shed it may well do the job. Remember though that if you’re buying, coro will probably be your cheapest (and easiest) option
INSTRUCTIONS:
So here is how I would go about it after I had sorted out the Notional Stuff above.
1. Transfer the outlines onto the coro Floor and Roof as necessary at the size you want. There are a number of ways to do this and what you use will depend on what you have available and/or how much you want to spend. You could use a simple graph, print a tiled image of the outline at size, print the outline on a large format printer if you are lucky enough to have one and in which case you probably shouldn’t be wasting your time reading this, take the file to a printer and pay them to print it large format or print the outline on a transparency and use an overhead projector to enlarge it.
With regard to methods for enlarging your image. If you have the capacity to print out tiled images at home and your House is not too big then this is probably a relatively easy way to go. However if you’re fabricating a pretty large House then it can be a proverbial pain having to stick all those tiled images together. I reckon by far the easiest way is with an overhead projector but of course most of us don’t have one of those sitting in our workshop. There are plenty of places that do have them though. Such as schools, Government Departments, Community Centres and local community groups so why not give some thought to approaching them to see if you can take your transparency and coro along to their place and use their overhead projector.
2. If you’re going to embed individual LED’s for your lighting now would probably be a good time to drill/punch the necessary holes in the floor. (Don’t forget if you’re using a Foundation to drill/punch the same holes through that also.) Probably also a good time to cut out bases for your modules if that’s the way you’re going.
3. Mark and cut coro strips at the height you’ve determined for your walls. REMEMBER to cut your coro wall strips across the grain (flutes) as it will make for a stronger structure and I don’t reckon the coro will bend too easily if they are cut with the grain.
4. Glue the wall strips along the required outlines on your floor ensuring they stand up vertically. Laying one wall strip at a time I would run a bead of silicone along the outline for the length of one wall strip leaving about a 5/10mm gap every now and again. Place the wall strip (following the outline of course) and use some scrap wood blocks (or whatever) to hold it in place to avoid the strip flipping round and smearing silicone all over everything in sight. Once that wall strip is in place go along with your glue gun and “spot weld it in place”, ensuring the wall is nice and vertical. You’ll probably need to experiment a bit with the number of “spot welds” you’ll need for a given curve and length.
Don’t forget to glue each wall strip to the next using the same method.
5. Once you’ve finished all the walls and your silicone has set this would probably be a good time to get your lights sorted.
6. Lights all finished? Good, then now would be a good time to attach the Roof. I would be running a bead of silicon along the top edge of all the walls then plonk on the Roof, appropriately lined up of course. Shouldn’t be any need to “spot weld” the roof but you can if you want. I’d just put some weights on it to hold it in place while the silicone sets.
7. Once the silicone has set trim off any excess coro and I reckon you’re just about done with fabrication of the House.
8. Finally there are just the artistic touches which will depend on how artistic you are. If you’re like me and can’t draw a straight line with a ruler then there is probably not much you can do to enhance the appearance of your House (other than the lighting of course). There will be times though when you want some accent black lines (usually following the line of your Walls) on the Roof (face) of your House. I reckon you could add those in a number of ways. Paint or felt pen would probably work and be pretty easy to apply. Depending on what you are trying to achieve and the finish you’re looking for I would be giving self adhesive black vinyl sheet (that’s like the “Contact” stuff kids use to cover their school books and which is used to make signs) a go if you can get hold of some. You can often get very handy off cuts from sign makers. All you need to do is cut out the lines or shapes (such as eyes, etc.) and stick them on your roof.
9. So now finish off your lighting affects and you’re all done and ready to hang at Christmas.
One final suggestion. If it was me I would be fabricating a small House out of some scrap coro before I started, as a bit of a practise run. Better off to stuff up some scrap than the big project.
Good luck and I do hope all this was of some assistance. Don’t forget to post pictures of your finished product.
Regards
Kevin