Starting Channels Questions

badger4543

Full time elf
Joined
Nov 7, 2019
Messages
171
Location
S.E Melbourne
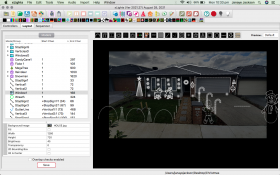
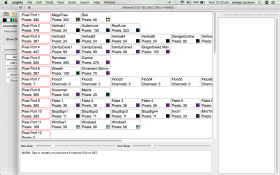
hey guys, i have my items all layed out in visualiser but believe i still have some mapping errors, i had a similar issue last year but cant remember how i cured the issue.
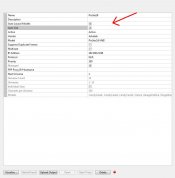
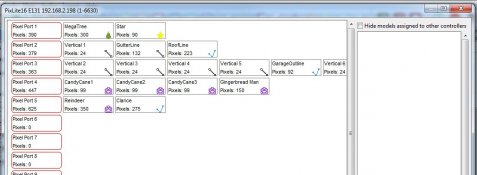
i think it may be the starting channels of each port, what should be selected here?? ive manually put in ports and starting location of all props i have daisy chained but unsure for the starting prop for each port.
 

Attachments

  • Screen Shot 2021-09-06 at 10.33.42 pm.png
    Screen Shot 2021-09-06 at 10.33.42 pm.png
    820.6 KB · Views: 21
  • Screen Shot 2021-09-06 at 10.33.22 pm.png
    Screen Shot 2021-09-06 at 10.33.22 pm.png
    200.8 KB · Views: 20
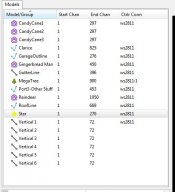
Your big problem is that you have a bunch props all starting on channel 1. That's different to them starting on universe 1, channel 1 and universe 2, channel 1 etc.
If you place props in order with 1 after the other rather than absolute channels then most of your problems will go away.
If you went to tools>check sequence it will throw up lots of errors.
 
They are the first props on each Port, so in the box that pops up when I push starting location I should select the universe option and work out which universe they all start at?
 
I'm not sure how you reconcile universes to outputs with xlights but the following "should" work.
Output 1
Megatree #1:1 (this indicates universe 1, start channel 1)
Star >Megatree (this indicates it starts after the megatree)
the megatree and star use 390 pixels which is 2 170 pixel universes and a bit so assign 3 to Out1
Output 2
Vertical1 #4:1 (uni 4, chan 1)
Gutterline >Vertical1
Roofline >Gutterline
Output 3
Vertical2 #7:1 (uni 7, chan 1)

and so on

Alternately you just put all the models as 1 after the other starting with the megatree and then you use the visualiser to move them to the desired outputs. This gets rid of channel gaps.
 
@badger4543
First thing I would suggest is FORGET ABOUT UNIVERSES ... With the Visualiser and starting out, you don't NEED to know about them.

With that said, here's what I've done to hopefully guide you through this. Note I am using Version 2021.27

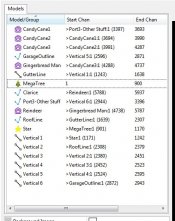
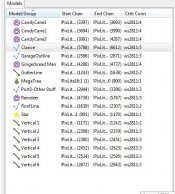
So I recreated the items for your first 5 ports, in the order they are connected to the controller and ports, and got this list.

Note the start channel showing the '>' symbol and a model name ... that just means 'After this model'.
Badger - Layout Start Channels.jpg

Then I changed all start channels to 1 to emulate the problem that you have...

Badger - Layout Start Channels as 1.jpg

From there go the controller page, select your controller and TURN ON 'Auto Layout Models' & 'Auto Size'.
I'm assuming you haven't changed anything else here other than setting number of universes to 96 initially.
Badger - Controller.jpg

I also assume you're using the PixLite II as I got an error placing more than 340 pixels on a port if using Pixlite, but I digress.

I didn't set any Manual ports or Daisy chaining on the models, so I can't verify that the Visualiser will retain your positioning after turning on the 'AUTOS' above, but I assume it will. Go into the Visualiser and check your model positions. If any models are out of position, simply drag them to the correct spot.
Badger - Controller Visualiser.jpg
Once you're done here
- Close the Visualiser
- PRESS SAVE if it is red.
- Go to the LAYOUT Page
- hopefully it will look like below - PRESS SAVE HERE ALSO (as the visualiser will have changed all starting and ending channels.)
Badger - Layout Start Channels - NEW.jpg

You will notice that the start/end channels here, will match the start/end channels of the very first pic I posted (with the exception of Clarice - as I had that one as 50 pixels instead of 275.

Anyway, I hope it helps.

Cheers and Good Luck.
 
  • Like
Reactions: AAH
I'm not sure how you reconcile universes to outputs with xlights but the following "should" work.
Output 1
Megatree #1:1 (this indicates universe 1, start channel 1)
Star >Megatree (this indicates it starts after the megatree)
the megatree and star use 390 pixels which is 2 170 pixel universes and a bit so assign 3 to Out1
Output 2
Vertical1 #4:1 (uni 4, chan 1)
Gutterline >Vertical1
Roofline >Gutterline
Output 3
Vertical2 #7:1 (uni 7, chan 1)

and so on

Alternately you just put all the models as 1 after the other starting with the megatree and then you use the visualiser to move them to the desired outputs. This gets rid of channel gaps.
I believe the way you explained it was they way I did it last year now that you've refreshed my mind.. how ever could you explain further on the alternative method as I've never really had this work for me without issues,

Are you saying tell vertical 1(first on port2) to start after the star(last on Port1) in the drop box under connections and so on for each Port and then the visualiser manages the rest?

I've always had some issues With the start of each Port and never understood why I can have all the props in order in visualiser but still get so many errors
 
@badger4543
First thing I would suggest is FORGET ABOUT UNIVERSES ... With the Visualiser and starting out, you don't NEED to know about them.

With that said, here's what I've done to hopefully guide you through this. Note I am using Version 2021.27

So I recreated the items for your first 5 ports, in the order they are connected to the controller and ports, and got this list.

Note the start channel showing the '>' symbol and a model name ... that just means 'After this model'.
View attachment 17943

Then I changed all start channels to 1 to emulate the problem that you have...

View attachment 17940

From there go the controller page, select your controller and TURN ON 'Auto Layout Models' & 'Auto Size'.
I'm assuming you haven't changed anything else here other than setting number of universes to 96 initially.
View attachment 17941

I also assume you're using the PixLite II as I got an error placing more than 340 pixels on a port if using Pixlite, but I digress.

I didn't set any Manual ports or Daisy chaining on the models, so I can't verify that the Visualiser will retain your positioning after turning on the 'AUTOS' above, but I assume it will. Go into the Visualiser and check your model positions. If any models are out of position, simply drag them to the correct spot.
View attachment 17942
Once you're done here
- Close the Visualiser
- PRESS SAVE if it is red.
- Go to the LAYOUT Page
- hopefully it will look like below - PRESS SAVE HERE ALSO (as the visualiser will have changed all starting and ending channels.)
View attachment 17944

You will notice that the start/end channels here, will match the start/end channels of the very first pic I posted (with the exception of Clarice - as I had that one as 50 pixels instead of 275.

Anyway, I hope it helps.

Cheers and Good Luck.
Ah I just replied for further information about the alternative method posted above but I belive you've covered it here thank you.
 
  • Like
Reactions: AAH
Back
Top