Whole house permanent led's install

tbm878

New elf
Joined
Dec 13, 2014
Messages
18
I recently installed 631 ws2811 12v pixels spaced 6" apart on the soffits & roof peaks using TrimLight aluminum lighting channel. I had been planning this project for well over a year and just recently completed it. When i was in the planning stages i found a lot of good info online, but it was scattered here and there on different forums. So i thought it would be a good idea to document my installation with all the info I've gathered so hopefully it might help someone in the future. Warning, this will be a long post with lots of pictures.
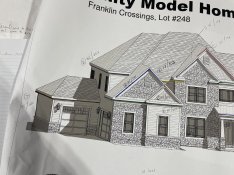
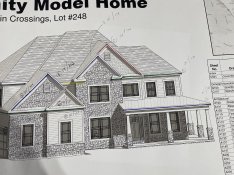
This was my plan...
20200510_031625.jpg

This is the end product (sorry not the best video)....


I drew this up in AutoCad showing my layout. The brown line is the outline of my house (tandem 3 car garage on the right side), magenta line is the led pixels, light blue is future wiring, green line is the power injection runs.
house layout.jpg

So i did a lot of extra work in preparation for this led install. Knowing that i would be adding a bunch of electrical circuits i changed out my mostly full 40 circuit electrical panel to a new Square-D QO 60 circuit panel.
20200602_101208.jpg

I had to run cat 6a network cables & power circuits from the basement up into the garage attic and also into the 2nd floor attic. So I installed four 1” data conduits and four 1” electrical conduits for the led lights and for future use.

Garage attic….
20211101_135133.jpg

2nd floor attic, the 2 junction boxes on the left are for these conduits, the junction box on the right is for the led pixels….
20211009_005111.jpg
 

tbm878

New elf
Joined
Dec 13, 2014
Messages
18
I setup a testing station earlier this year to see how it would all work. I knew that I would have to do a lot of power injection due to the long runs. I ended up running the 18-3 cables from the controller and I used 10-2 cable to power inject everything at the 1st pixel, the 100th pixel, and at the end of each run. I know I probably didn’t have to power inject at the ends of the runs, but I figured by doing so it would equalize the voltage across the whole pixel run (the pixel channels were 200, 205 & 226 pixels long).
20210725_193904.jpg

20210906_200004.jpg

20210906_200427 (1)2.jpg

I made up the volt/amp meters with the xConnect ends on them to do the testing. I found some great info on YouTube from the “Ni Family Lights” channel. He has a detailed video on wiring up these v/a meters, and a lot of other good videos too.

Screenshot_20210801-200534_Chrome.jpg

Screenshot_20210223-201304_YouTube.jpg
 

tbm878

New elf
Joined
Dec 13, 2014
Messages
18
So the next step was to decide on a location to mount the controller boxes. I chose to mount them in a closet on the 2nd floor. This would be a good central location for the planned 3 led controller channels for the permanent lights. Channel 1 (226 pixels) is for the front garage and porch and is about 15' from the controller. Channel 2 (200 pixels) is for the 2nd floor east & south roof line and is about 25' away. And channel 3 (205 pixels) is for the front 2nd floor roof peaks & west roof and is about 40’ away. On channels 2 & 3 I used a pix-a-boost null pixel 20' away from the controller to boost the data signal. I ordered mine from holidaycoro, but wired watts has a good one too. I made the backer boards out of 3/16" thick black hdpe board. I planned each box to have 2 sets of power supplies & fuse boxes & controllers & 120v relays with the controllers stacked on top of each other. In the pic I am only using 1 QuinLed Dig-quad controller as of now, but have plans for 4 total in these controller boxes. This may change if/when I add more lights for the halloween & christmas.
20211101_173939.jpg

I decided to use the Quin-Led Dig-quad controllers. I got the newer version 2 controllers that have an ethernet connection on the esp32 board, it is much more stable and reliable than wifi. I also chose this board because it comes pre-loaded with WLED software on it to control the led's. It looked to be easy to setup and configure, and would have a much easier learning curve for programming the led's. Also the wife & kids could use it too if they want. It does have e1.31 capabilities so I can program a show in xLights and it will work with this controller. Right now though I mainly wanted these permanent led's to be used for the holidays, kids birthdays, sporting team colors during games, etc. I can control them from the WLED app on my phone and it is very easy to set them up and change them. Plus (hopefully) no more climbing an extension ladder to put the lights up & take them down for christmas.
QuinLED-Dig-Quad v2.png


I also chose to install a switching relay that turns the 120v hot leg to the power supply on/off as needed. It works seamlessly thru the WLED app. I just needed to power the dig-quad with a separate 5v wall charger power supply. This way I won't have the big power supplies on all day every day. Without this relay if the power supply is powered on but the led's are off, the led's still use a little bit of electricity. So hopefully by using this relay it will prolong the life of the power supplies and draw less electricity when the led’s aren’t In use. I do still need to install a small 12v fan mounted on the controller box door (that’s what the red & black wires coiled up on the left side are for)
20211101_174042.jpg

20211101_174014.jpg

20210807_171923.jpg

20210829_190820.jpg
 
Last edited:

tbm878

New elf
Joined
Dec 13, 2014
Messages
18
In preparation of installing the TrimLight channels & led pixels I had to install a bunch of 18-3 control cables and 10-2 power injection wires in both of the attics. I thought I planned it good enough by doing this part in late September, but with the unseasonably warm 75-80° temperatures it still felt like it was 100° in the attic, this was definitely the worst part of this whole project. I used 1.25" diameter bridle rings to hold the cables and make for a cleaner installation. I used about 50 in the garage attic, and about 110 in the 2nd floor attic.
20211101_135224.jpg

20211101_135352.jpg

20211009_005200.jpg

20211009_005636.jpg


I planned to use a weeks vacation to install the TrimLight aluminum channels & led pixels. So I rented a boom lift and with help from my dad we installed about 325’ of the TrimLight aluminum channels and 631 total pixels. For my installation I chose to run the power injection cables in the attic, and do all of the splicing in the attic as well. I could have run these power injection cables in the TrimLight channels but I felt it would have been much more crowded in the channels and be a little more difficult to install. At the needed power injection locations i drilled a hole in the soffit, used a rubber grommet and then used 10' 18-3 pigtails to connect to the led pixels and ran them into the attic and spliced onto the 10-2 power injection cable. I did all of the splices with Wago connectors, this will make future maintenance and modifications much easier.
IMG_6080.jpg
 

tbm878

New elf
Joined
Dec 13, 2014
Messages
18
So this is the finish product. Hopefully the pixels should be hassle free for the next 5-10 years. I tried to install the led's to make future repairs easier, I'll have to wait and see if that works out. The TrimLight aluminum channel is barely visible from the street and it gives it a nice clean look. It wasn't the cheapest option, but it worked out well for me.
20211101_140123.jpg

20211101_140346.jpg

I found some great information and videos on TrimLight's website. It was very helpful for doing the bends & cutting correctly.

www.trimlight.com/access

Miscellaneous info pics….
Screenshot_20210730-232123_Chrome.jpg

815QNmxBejL._AC_SL1500_.jpg

Screenshot_20210706-194308_Chrome.jpg

Screenshot_20210706-194309_Chrome.jpg
 

OzAz

Senior elf
Global moderator
Joined
Dec 29, 2015
Messages
997
Location
Newcastle
Excellent write up and one of the neatest installations I've seen. 👍👍
 

RolyT

New elf
Joined
Oct 8, 2021
Messages
8
Hi there. Looks great and similar to what I'm looking at doing in 2022. I am struggling with how many pixels the digi quad can run. Are you running 600 off one controller? Do you know what the Max is? You must have big plans of you are going for 4 more controlllers..
 

tbm878

New elf
Joined
Dec 13, 2014
Messages
18
Quinled's website recommends 500-600 ws281x led's per channel max. I have about 200 pixels per channel on mine with no issues (so far). And yes, i am using 3 channels on 1 dig quad controller. Big plans yes, depends on if i have time to do all of it.
 

RolyT

New elf
Joined
Oct 8, 2021
Messages
8
Quinled's website recommends 500-600 ws281x led's per channel max. I have about 200 pixels per channel on mine with no issues (so far). And yes, i am using 3 channels on 1 dig quad controller. Big plans yes, depends on if i have time to do all of it.
Thanks. And to clarify, the quad has 4 channels so theoretically 2000 ish lights? That's probably way more than I need.. until the bug really bites..
 

Guinner16

New elf
Joined
Dec 4, 2022
Messages
2
I am planning a similar setup to yours except using permatrack with 2” spacing, and I have a garage that I can’t get enough access to and keep everything on the same system. I guess I could keep it all together but it would mean have some wires exposed outside. My question is can you have two completely separate systems that work together and still keep everything in synch when doing a light show. I have attached some pictures to show what I’m talking about. The house part I have access to but no way to connect into the garage unless I exposed wires outside.
 

Attachments

  • BC423F5B-8F7E-4399-8DAB-82304AA64436.jpeg
    BC423F5B-8F7E-4399-8DAB-82304AA64436.jpeg
    1.2 MB · Views: 3
  • 8A739664-0B16-4F71-859F-998BB02EEA0A.jpeg
    8A739664-0B16-4F71-859F-998BB02EEA0A.jpeg
    1.3 MB · Views: 3

Notenoughlights

400,000+ twinkly lights
Joined
Oct 16, 2016
Messages
649
Location
Christchurch, New Zealand
I am planning a similar setup to yours except using permatrack with 2” spacing, and I have a garage that I can’t get enough access to and keep everything on the same system. I guess I could keep it all together but it would mean have some wires exposed outside. My question is can you have two completely separate systems that work together and still keep everything in synch when doing a light show. I have attached some pictures to show what I’m talking about. The house part I have access to but no way to connect into the garage unless I exposed wires outside.
A lot of light shows you see will run more than one controller, these are usually network enabled via Ethernet connection and connect back in one way or another to a show player, i.e XSchedule, Vixen Scheduler, Falcon Player for example. This allows two, three, four+ etc controllers/systems to be synchronized together. Where ever possible use an ethernet connection for show data, wifi will work but can be highly unreliable.
 

Guinner16

New elf
Joined
Dec 4, 2022
Messages
2
A lot of light shows you see will run more than one controller, these are usually network enabled via Ethernet connection and connect back in one way or another to a show player, i.e XSchedule, Vixen Scheduler, Falcon Player for example. This allows two, three, four+ etc controllers/systems to be synchronized together. Where ever possible use an ethernet connection for show data, wifi will work but can be highly unreliable.
Thank you. That’s a huge help and kind of what I figured but wanted to make sure. I do have an Ethernet cable that go from my 3rd floor to the basement, and I could get an Ethernet cable from the garage to the basement. I would then have a power supply and controller located in the 3rd floor running one side of the house, and another power supply/controller located in the garage running the garage side. The only outside wire I would have in my set up is the the line of lights on the wrap around porch with the metal roof, but I don’t think I have another option for that.
 
Top