Low Brightness and gamma

Santacarl

New elf
Joined
Dec 13, 2012
Messages
7
Hello All,

Looks like there is not a lot of activity in this area lately but I thought I would post a question and see if I get a response.

I run WS2811 bullets at 20% brightness on my matrix (set at the Falcon f16v3 controller). Currently I do not use a gamma setting (set to zero). I am curious if I add gamma (probably 2.0) in the controller (not in a dimming curve) if I need to raise the brightness also. Or does gamma even impact brightness in that way? I ask because I was reading an old thread and there was some talk of higher gamma setting causing some colors to 'black' out.

SC
 
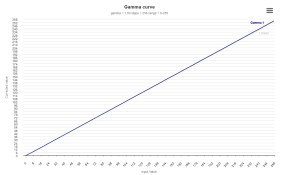
Here's an interesting graph that shows how gamma correction changes the brightness.
On the X axis, we have the input brightness, and on the Y axis there is the output brightness.
The higher the gamma number, the further the curve is bent down.

I note that when you say gamma is zero, that's not true, linear is gamma 1.0.

At 100% brightness, and gamma 1.0 the individual colours are being driven on a scale of 0-255, and this stays the same.

1710387573516.png


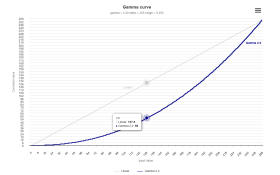
With gamma 2.2 however:
with 100% brightness - the top stays the same 100% - so 0-255, but the lower input levels produce even lower output levels.
You can see my mouse is hovered over 127 as an input value, and it's only outputting 56.

1710387624936.png

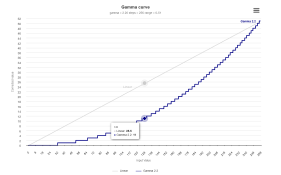
And 20% brightness, this limits our output to be between 0 and 51. So lets plug those in and look at the graph
As you can see it's much more choppy (there are only 51 output steps) - but with an input level of 128, it's now outputting only 11.

1710387704551.png


So upping the gamma definitely reduces the brightness.
But it changes the way the brightness ramps based on the input, which is more in step with how your eyes perceive the light.


The difference between whether you apply it at the dimming curve and the controller gamma is irrelevant. They are both applying the same mathematical calculation.
A few things to remember:

1. Doing it on the controller means you can NEVER exceed the maximum brightness specified. This can be a good or bad thing depending on your use case.
2. Not all controllers support gamma calculations, and not all support the same numbers - eg FPP based controllers can go in 0.1 steps, whereas Falcon can only be set to a few values 2.0, 2.3, etc. as per the dropdowns.
3. xLights dimming curve is ultimately rendered into your FSEQ, if you change it, you need to re-render. Controller changes do not require this as the FSEQ data has it at 100% / 1.0
4. If your show player is doing any form of brightness adjustment (fpp brightness plugin for example) you need to take this into account as well. Sometimes a linear reduction in the 100% 0-255 gamma 1.0 fseq data, followed by the controller doing gamma can be smoother, however,you can never up your show player brightness past 100%, it wont change anything
 
Skymaster basically showed the answer to the question of whether "higher gamma setting cause some colors to 'black' out", but didn't state it outright: Yes, yes it does. Take a look at how much of the bottom graph stays at 0 before stepping up to 1. All the colors dimmer than 32 (12% bright in the original) have become black. Furthermore, there is really an "off/on" all the way up to 50, meaning up to 20% brightness in the original input will be reduced to 1 of 8 hues - black, red, green, blue, magenta, cyan, yellow, or white, so after the blacking out, you'll see bands of primary colors. Some of the hardware just doesn't support dim colors very well; that's what makes some chips with more than 8 bits or built-in gamma correction somewhat interesting.

The difference between whether you apply it at the dimming curve and the controller gamma is irrelevant. They are both applying the same mathematical calculation.
That much is true, but I would caution that the order in which you apply brightness and gamma does matter.
Let's compare what happens to a full 100% value when you do gamma of 2 and brightness of 50% vs. doing it the other way around:
2.0 Gamma first: 100%->100%; then half brightness 100%->50%: 50% at the end.
50% Brightness first: 100%->50%; then 2.0 Gamma: 50%->25%: 25% at the end.

Typically, gamma is done first because that gives the result people intuitively expect. If you do these in different places (or multiple places) though, be aware of this.
 
That much is true, but I would caution that the order in which you apply brightness and gamma does matter.
Ahh yes absolutely. I was more referring to doing "brightness and gamma in the same place" - if one is done in one area, and the other is done elsewhere, then the cumulative effects and order of operation do certainly matter
 
Thanks for the responses Skymaster and Merryoncherry.

Wow, now my head is about to explode! Haha. I will need to ponder this to sort through it enough to understand. Hope you guys don't mind sharing a bit more information by fielding a few questions to help me further clarify my understanding. I apologize for the length I am about to show my ignorance and hope you can bear with me for a bit!

Skymaster, thanks for the explanation of Gamma 1. What was throwing me off is the fact that xL allows a <1 figure to be entered as a gamma value. I guess it defaults to 1. I have been running a default Gamma of 1 in the past and only when I started to tinker did I notice the <1 aspect. Also thanks for the graphs.

When you say "input brightness" I assume that is the brightness coming from the model or xLights and going into the controller. At the controller (I have Falcons and San Devices) what does the "Brightness" setting on the controller govern? Is that also considered "Input Brightness" and it attenuates/cuts down incoming signal or is that the brightness going OUT to the pixels? Or some combination?

Merryoncherry, thanks for the further explanation and examples. They bring some questions to mind:

If one sets the brightness and gamma at the controller, in my case an F16v3 or San Devices 682, does the controller apply the gamma first or brightness first?

When you say "2.0 Gamma first: 100%->100%; then half brightness 100%->50%: 50% at the end." What does that 50% represent, brightness or gamma?

Finally, to help me understand how this gamma influenced brightness might impact wattage for calculating power supply usage: If I were to set, at the controller, gamma to 2.0 and brightness to 20% what would the wattage of a string of 100 bullet pixels (WS2811) that draw .7 watts/pixel amount to? Just curious if the reduced brightness also reduces wattage (~14 watts using Gamma of 1 and 20% brightness) or is the wattage just switched from pushing brightness into supporting colors more vibrantly with the result ending up using about the same ~14 watts? Hope that makes sense.

I ask that last question because it occurs to me that in order to get out of the "black" I might have to increase brightness to compensate for adding more gamma . That could end up impacting my power supplies ratings.

Thanks for the help in understanding this. It appears a little more complicated, math wise, than I initially thought. You guys probably saved me from making a rookie mistake or three! I really don't have much of an eye when it comes to color differentiation so trying to come up with color/gamma settings by eye is frustrating at best. Understanding this topic can at least give me a good place to begin.

Carl
 
Went over this a few times and it's still a hodgepodge. Sorry.

OK, let's start with a few things. When I said "input value", I was thinking of the color value sent out by xLights as part of the sequence... those are 8-bit RGB values, 0-255, but sometimes I think in %, like 0-100%.

For the LEDs, they're pulse width modulated, 100% usually means that the light is just on all the time. Some people think that's too bright, at least for some kinds of LEDs, more on that in a bit.

For most of the LEDs, (the WS2811 and clones, but not newer things like GS8208), if you give them 50%, 128 value, they're on half the time. (Blinking on and off really fast.) So the xLights color in the sequence would come out directly as the % of time the LED is on. The dimmest they'll get is on ~1/250th of the time and off the rest of the time. The brightest is on 100% of the time.

Now, the human eye, it doesn't really perceive brightness linearly. Twice as much light doesn't look twice as bright. It looks a lot less than twice as bright. To make xLights colors look right, you have to do something about that, and that's what the gamma setting is trying to do.

Figuring out "the right" gamma / brightness exactly is difficult because the eye is very adjustable. So you have to have things right next to each other to see the difference. For gamma, the easiest way I've found to tell if it is right is to put an orange color in your sequence. A typical full orange is "100%" red and "50%" green, half as much green as red in xLights. But this 100%/50% is to be interpreted as the eye perceives it, not the absolute amount of light like a WS2811 gives. If the orange on your pixels looks a lot more yellow than the orange on your computer screen, then the gamma setting should be higher (say a bit over 2, instead of 1, for the WS2811 stuff).

The dimming curves, controller settings, etc., are there to fix the problem of things being too bright, or the colors not looking proper. If you think in terms of percentages, then the math is pretty easy.

Input value * brightness (percentage) -> output value. It's just a multiplication for the computer or controller against whatever pixel data it was given, vs. whatever it sends onward toward the next device or the lights. 100% input value * 50% brighness is 50% output value, 80% input value * 50% brightness = 40% output value, etc.

Gamma is an exponentiation operation. I use a gamma of 2 in the examples because it's an easy one to calculate with, square the number. .5^2 = .25, so 50% input value at a gamma of 2 is a 25% output value. 10% input value at a gamma of 2 is an output of only 1%.

The charts @Skymaster is showing are the mapping of what xLights colors were to what data gets sent to the LED by the controller, they reflect the changes caused by brightness (maximum value reached) and gamma (curviness). It can be affected by the xLights dimming curve, the player, the controller, at least. I don't have a San Devices, but every other controller does gamma first, then brightness. It's uncommon, but you'll always get that one person who did brightness in xLights (or xSchedule or FPP) and gamma on the controller at the last minute and it's super dark and they don't know why, if that happens to you stop and think about why.

If it looks good, it is good.

Yes, xLights allows a gamma of less than one, then the curve would be rounded up above a straight line, rather than down below. Never seen that be useful, but it'll let you.

Power used by the LED is proportional to how much of the time it is on.
I use a lot of the resistor pixels, those seem to use 2-3mA whether they are lit up or not, plus 25mA if they are on 100%. If you cut the brightness to 50%, they couldn't use more than about 15mA.
The gamma won't affect the peak power it can use, just the amount it would use on in-between colors. Like full yellow will use the same power with a gamma of 1 or 2 (because gamma doesn't change anything at all for this color). Orange will use just a little less power. Savings of ~15% there. (But most of your power is going to go to pixels that are dark, that's just the way it works out. Don't set gamma based on power consumption.)
For your example, of .7W for 100% white (I'm imagining a 12V regulated pixel here, the full 60mA at 12V) would probably use 3mA (standby) + 12mA = 15mA, <.2W at its peak.
This is where everyone else on here scowls at me... I like the 12V resistor pixels because they're dimmer to begin with, you get better color range at the same brightness/power level. Are you using 12V regulated pixels?

A corollary of all of this is that if you set your controller brightness to 50%, the power design need drops by almost 50%, but the audience will still see a show that seems 70-80% as bright to them.
 
Last edited:
Thanks for the response and explanation merryoncherry....,

Hodgepodge...Haha. Yeah, I was afraid of that. It's sort of hard to describe things logically when you're not familiar with some of the basics. It makes asking questions a chore since you're not even sure exactly what to ask.

Actually, I was referring to 12VDC resistor pixels and I follow what you're saying. As far as 'setting gamma based on power consumption' I was just curious if adding gamma itself makes enough difference to consider power where I'm already running up to 80% of my power supply's upper limit. I like to leave a cushion.

I knew about off/on cycles of LEDs but hadn't associated that with brightness (DUH!). Now that makes more sense.

I'm trying to soak all this in at a user level. Some simple general rules of thumb to follow that I'm picking up from you guys is great. I figure, once I settle on what looks good, I won't need so go through this learning curve again anytime soon. I'll keep your responses to refer to.

Thanks to you guys I now have at least an idea of what I'm trying to do and things to consider.

Thanks for your patience and willingness to share your knowledge. One thing, for sure, about this hobby is that you never quit learning something new and finding others willing to share knowledge is a big plus of the hobby.
 
Last edited:
Rules of thumb.... Well, I might have good news if you were worried at .7W per pixel. Your 12V resistor pixels max out at .36W at the absolute most (but more likely .25W each based on how they draw less power as the voltage drops, which it will). If you planned on .7W (as I did in a rookie move in 2021 based on incorrect vendor specs that led me to design for 100 pixels per port) you'll really overbuild on power and wiring, at some waste of time and money. (Or just say you did it to leave room for future expansion - worked for me.)

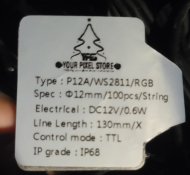
If you have 12V resistors that say .7W on the tag (as I did in rookie year), don't believe it, measure them. Now I do and I collect pictures of inaccurate tags for fun. (2023, it was still a thing, see below. A string of 100 of those uses under 30W if powered from one end at 100% white.)

So now, the rule of thumb for me with the resistors is 200 4" spaced per 5A port, 300-350 if power loops around to the far end of the string. 400 and I would power the far end from another port on the same PSU. More than that, I just split the prop and use another port. I don't dim, generally, except for a few things that stand out. It isn't as bright as it could be at 100% white due to voltage drop, but full white happens at only a few points in the show and it survives just fine. Should point out that this is based on 8 powered ports sharing a 350W PSU, in a cool climate, fall/winter, where the PSUs will perform at full rating.

Rule of thumb for pixel gamma (except GS and similar, which should be ~1) is 2-2.5, anything in that range is far better than the default of 1. To me, the WS chips look good at 2.1 or 2.2, some of the off-brand chips look better at 2.5-2.6, but most people wouldn't notice if you set it at 2 and left it.

There are still some 12V regulated pixels out there. Those will actually use .6W/pixel, they're a bit brighter too. I have encountered that design in icicles, peace stakes, etc., and have some of them that I sought out specifically to make the Chroma presents glow a little brighter. Still just running 100 of those off each port and calling it good.

So those are my rules of thumb... other people succeed with different rules of thumb. Plenty of people run a lot more pixels per port and just dim them, and they do fine too. A number of 5V users, those are a lot more efficient (err, a lot less inefficient) but use full current and generally get dimmed. The seed pixels are lower power, wide variety of voltages and spacings, some people dim them and some don't, and they often need power injection. A few GS users around, also a much more efficient design power-wise but tends to be bright enough to warrant dimming. So you'll get some other opinions / rules of thumb if you check around, for sure.

My last thought for you is to not worry too much. Keep a few safeguards in place, and have a few workarounds handy, and you'll make it work. You can just run this stuff at the "user level" these days and succeed.


20240314_201803.jpg
 
Thanks merryoncherry....

Rules of thumb are great to know.

Yeah...you're correct I over 'engineered' power for sure. I started using pixels even before 2021 so I've always gone with the old high wattage/amperages on pixels. But like you said it leaves me room to expand so I like that.

In fact I sort of winged it early on with how to set things up and haven't changed so that's why I'm just now tinkering with gamma. I'm from the old school of "If it ain't broke don't fix it" variety! Haha.

My "Old School" setups are as follows: In xLights I set the brightness in the sequence effect (I leave the model brightness in xL controller section and Gamma set to default.) I load the FSEQ onto a FPP (using defaults) and let the controller handle the brightness output to the pixels. (Brightness set to 20% on the F16v3 and 25% on the San devices. Gamma is defaulted to NONE for the F16v3's and 1.0 on the San Devices 682's).

So, hypothetical question: Given the FSEQ data only includes adjustments for brightness from time to time, if I set the gamma to 2.0 on my F16v3 what do you think would be the minimum brightness setting I can use before I go 'black' on pixels? Hope this question is a little easier to understand! Haha.

Carl
 
Last edited:
This is what I used to generate the graphs above.

Set the gamma appropriately.
Steps should be set to 256 (the number of input values, always 8 bit)
Max value should be set to the 255 * brightness.
You'll then see the input vs output.

At 20% brightness, any input from 0-26 will result in 0 as its output, so complete black. This at least gives you the "mathematical" calculation

As to what is actually visible in the lowest PWM values, this will be dependent on a number of physical properties, which are environmental & manufacturing dependent.

1. Viewing angle of LED - front on will be much more visible than side on.
2. LED turn-on percentage - sometimes really low numbers just appear off.
3. PWM rate of the pixel - Relates to (2) - a fast PWM rate may appear brighter or dimmer depending on how the LED responds
4. Background light level- Viewing LED in pitch black will show more brightness than with ambient light around

I am sure there are more aspects that havent come to me; but it's very much a "try it and see".

Also keep in mind that lowering brightness and/or increasing gamma significantly changes the dynamic range of the LEDs as well; so the brightness resolution will be diminished.
 
At 20% brightness, any input from 0-26 will result in 0 as its output, so complete black. This at least gives you the "mathematical" calculation

As to what is actually visible in the lowest PWM values, this will be dependent on a number of physical properties, which are environmental & manufacturing dependent.

1. Viewing angle of LED - front on will be much more visible than side on.
2. LED turn-on percentage - sometimes really low numbers just appear off.
3. PWM rate of the pixel - Relates to (2) - a fast PWM rate may appear brighter or dimmer depending on how the LED responds
4. Background light level- Viewing LED in pitch black will show more brightness than with ambient light around
Hi Skymaster,

Thanks for the response and link.

So, I guess I must be as dumb as a bag of rocks! :unsure: Haha.

I obviously still don't see the 'big picture' as to how some of the terms are defined or represent and used.

I just don't understand this: "any input from 0-26 will result in 0 as its output, so complete black."

Can you coach me a bit more as to what this 0-26 represents and where it comes from? Yeah, I know you said "input" but I'm totally confused as to what that word (input) refers to and how or where to adjust or change that "input" in order to get out of the 'black'.

As to the "environmental & manufacturing dependent" comment. Viewing angle and Background light level-I understand; Turn-on %, PWM rate I have no clue on as these pixels (12VDC resistor WS2811 bullets) are 3 or so years old and I long ago lost any data spec sheet that might have existed. So for now that leaves me with finding the 'sweet spot' between brightness and gamma calculations.

If I can get clear in my mind how to change the "0-26" calculation. I.E which factors to tweak to change the graphs at least I have a handle on that as a starting point.

I appreciate your patience with my slow learning "curve". Pun intended! Haha. 😁
 
Did you try the gamma lookup table generator? At gamma 2.0 it shows the output to be zero all the way up to 11. Move cursor right over the gamma line and it shows a little popup with the specific values.

So, if you tell your R,G,B pixel to output 11,11,11 you would expect a very light white. With gamma 2.0, you will get a zero output and it will be dark.

If you use the "hamburger" menu item top right of the graph, you can download a csv and put the values into your favorite spreadsheet.

Multiply the gamma value by whatever percent you are running your lights at. Depending on the specific rounding rule and how the math is being done on the particular controller anything up to 26 will output at maximum gamma value 2 and when you do 20% will yield .4 which will likely be set to zero. That is why you get zero up to 26.

If you are running at 20%, you likely don't care about the human eye effect that gamma is trying to correct. And furthermore, if you are using mostly the Christmas colors, red, blue, green, (and a bunch of other saturated colors) you don't really need to gamma change them as 20% will dim them way down. If you are concerned about ramps and fades, most human eyes will see the fade down to value 5 ( when 20% will drop the value to 0) just fine and you don't really need to adjust it using gamma.

Regardless of the software side, a further thing to test is your particular pixels. If you output R,G,B = 1,0,0 do your pixels light up at all? You should see red but I kind of doubt you will. This discussion has made me curious. Just what is the dimming curve of my pixels. I wish I had some pixels out to try it. Maybe I will dig some out this weekend just to play. Once you find where your pixels pick up and when you no longer perceive changes, you could build your own curve that would take care of the low end problem and also more smoothly reach the top end.
Hi Mike. Thanks for the response.

"Did you try the gamma lookup table generator? At gamma 2.0 it shows the output to be zero all the way up to 11. Move cursor right over the gamma line and it shows a little popup with the specific values."

Well I tinkered a bit but since I didn't understand what it was telling me that told me that I was missing something in my understanding.

"So, if you tell your R,G,B pixel to output 11,11,11 you would expect a very light white. With gamma 2.0, you will get a zero output and it will be dark."

That helped me more than you know. Now the table generator makes more sense. I hadn't understood the 'theory' you described so I was struggling to understand the 'theory' behind the relationship between brightness and gamma. I'm funny like that. Theory typically goes over my head until I see a specific example worked through. Then I get the ah haaaaa! Haha.


And, yes, I run mostly Christmas colors but just thought I might get a more 'robust or vibrant' color if I enhanced them with gamma. So that little fact is really good to know.

Thanks for helping me get to that point. An example was what I was looking for so that I could follow along from start to end, as it were.
 
Last edited:
Hi @Santacarl,

I meant to give some example images, to see if that helps your understanding of some of the things Sky said. (Just been busy with a volunteer job, is all.)

Maybe imagine this with sound instead of light. If you have a volume knob, it can turn the level of sound down. Loud sounds get quieter, and quiet sounds get quieter too. At some point, if you turn the sound down enough, it's completely quiet. First, the sounds that were quiet originally drop out, and eventually the loudest ones do too. It may actually be quiet, or, it may fade into the background noise such that you can't tell distinguish the sound any more. The same thing happens with brightness controls... it will turn the light level down until it either becomes dark, or can't be seen because other light sources drown it out.

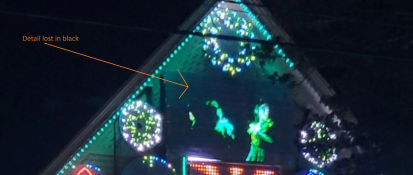
Here is an example from my 2022 show, if you look at my (rookie move) matrix, the picture there could have a lot more detail except that the detail was dim to begin with, and then I turned the brightness down to 40% (for power reasons) and the gamma up to 2.2 (for correct colors). You can see it gets blacked out a lot, and also that there's a lot of ambient light on this (which is white coro, and white strip in slightly milky outdoor tubes).
LostInTheBlack.png

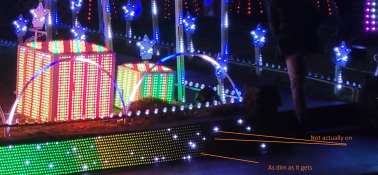
Then, there's a question about whether the eye can pick out a the difference between off - 0 out of 255, or on a minimal amount 1 out of 255. I believe absolutely you can, that a level of 1 is significantly brighter than the background light on WS2811 resistor pixels (and even more so on WS2811 5V and 12V regulated designs).
ColorBands.png

In this image you can see a horizontal gradient from full yellow to black. You can easily see where it transitions from dimmest possible yellow to black quite plainly, and I think in real life you can pretty easily tell the band between level 1 and 2 also. I don't have a photo, but in the lab you can easily make out 1,0,0 ; 0,1,0 ; and 0,0,1 from 0,0,0 colors.

Most concerningly, people stand around in front of the show discussing these deficiencies amongst themselves :-D
AudienceCaring.jpg
 
Hi @Santacarl,

I meant to give some example images, to see if that helps your understanding of some of the things Sky said. (Just been busy with a volunteer job, is all.)

Maybe imagine this with sound instead of light. If you have a volume knob, it can turn the level of sound down. Loud sounds get quieter, and quiet sounds get quieter too. At some point, if you turn the sound down enough, it's completely quiet. First, the sounds that were quiet originally drop out, and eventually the loudest ones do too. It may actually be quiet, or, it may fade into the background noise such that you can't tell distinguish the sound any more. The same thing happens with brightness controls... it will turn the light level down until it either becomes dark, or can't be seen because other light sources drown it out.

Here is an example from my 2022 show, if you look at my (rookie move) matrix, the picture there could have a lot more detail except that the detail was dim to begin with, and then I turned the brightness down to 40% (for power reasons) and the gamma up to 2.2 (for correct colors). You can see it gets blacked out a lot, and also that there's a lot of ambient light on this (which is white coro, and white strip in slightly milky outdoor tubes).
View attachment 25599

Then, there's a question about whether the eye can pick out a the difference between off - 0 out of 255, or on a minimal amount 1 out of 255. I believe absolutely you can, that a level of 1 is significantly brighter than the background light on WS2811 resistor pixels (and even more so on WS2811 5V and 12V regulated designs).
View attachment 25600

In this image you can see a horizontal gradient from full yellow to black. You can easily see where it transitions from dimmest possible yellow to black quite plainly, and I think in real life you can pretty easily tell the band between level 1 and 2 also. I don't have a photo, but in the lab you can easily make out 1,0,0 ; 0,1,0 ; and 0,0,1 from 0,0,0 colors.

Most concerningly, people stand around in front of the show discussing these deficiencies amongst themselves :-D
View attachment 25601
Thanks for the example Merryoncherry.

I'm a sound guy so your example, which I hadn't considered, made perfect sense. I often joke that I use my lights to attract people to listen to my music! 😁

In my rookie pixel year I ran everything at 100% brightness on my PMT. Haha. I kept scratching my head as to why colors washed out on my PMT until I saw someone comment on the same thing. I tinkered with brightness on my controllers instead of having to go back and change every effect and re-render all my sequences. I finally settled on 20% as being the best compromise. I'm guessing that I inadvertently blacked out some detail by doing so. You can't see and are not likely to miss what's not there unless you know specifically what to look for!

Now that the display is down my testing is limited so I'm just trying to find a 'sweet spot' as best I can until I can test with the full display in place. I don't want to make a radical change that degrades what already looks nice. If I can make it better then that's the goal. I might set up a small matrix just to tinker with to get some idea. Too bad there's not some sort of test pattern that helps you find the 'sweet spot'.

Thanks again for the pictures. Interesting indeed.

Carl
 
Back
Top