thewanderingpine
Senior elf
- Joined
- Mar 13, 2021
- Messages
- 530
So I added some new Seed Pixel outlines this year. I think they went really well - and wanted to share a couple of photos and a breakdown of the costs.
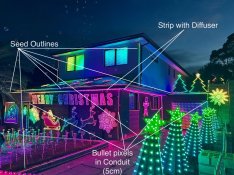
And my place ends up being a reasonable comparison - if you look at videos/photos of it - I have 5cm spaced bullet pixels in drilled out conduit, 30/m strip in channel with a diffuser, and 3cm seed pixels that I'll talk about below.
So my outlines I used 12v/3cm spaced/WS2815 seed pixels from knowshine. At the time of purchase - I ordered 100m (aka 3333 pixels) for $348.03 (including GST, delivery, etc). (Glancing at it now -- current price says $376). Link is here: https://www.aliexpress.com/item/1005006734381781.html (100m, 30mm spacing, Black Wire)
So that worked out to about $3.5/metre (where a metre was about 33 pixels)
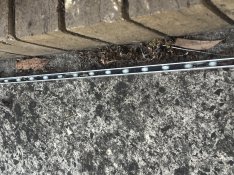
And then I paired that with these 10mm c-channel outlines from Capral. https://shop.capral.com.au/813710/. Which are $20.28 per 6.5m segment. So about $3.12/metre.
So for around $6.62/metre - I ended up with some pretty great outlines. (I guess you can add the cost of pigtails, and some hot glue to stick them together. So maybe fudge it up higher).
For comparison - the ip65/30/12V/ws2815 strip from BTF lighting is currently $6.37/metre. And I'd still want something to mount it on.
For pixels - At 5cm spacing (instead of 3) you're talking maybe $6-8 for pixels + $1.80 for chromatrim + $1.60 for conduit.
So how did it all work?
Here's some photos - and you can look at some videos I've posted (and more when I get around to editing them) of how they looked.


Here's my XLATW video for the year that gives perhaps a better view of how they all look.
tl/dr -- you should look at using seeds for your outlines. They worked great for me in 2024.
And my place ends up being a reasonable comparison - if you look at videos/photos of it - I have 5cm spaced bullet pixels in drilled out conduit, 30/m strip in channel with a diffuser, and 3cm seed pixels that I'll talk about below.
So my outlines I used 12v/3cm spaced/WS2815 seed pixels from knowshine. At the time of purchase - I ordered 100m (aka 3333 pixels) for $348.03 (including GST, delivery, etc). (Glancing at it now -- current price says $376). Link is here: https://www.aliexpress.com/item/1005006734381781.html (100m, 30mm spacing, Black Wire)
So that worked out to about $3.5/metre (where a metre was about 33 pixels)
And then I paired that with these 10mm c-channel outlines from Capral. https://shop.capral.com.au/813710/. Which are $20.28 per 6.5m segment. So about $3.12/metre.
So for around $6.62/metre - I ended up with some pretty great outlines. (I guess you can add the cost of pigtails, and some hot glue to stick them together. So maybe fudge it up higher).
For comparison - the ip65/30/12V/ws2815 strip from BTF lighting is currently $6.37/metre. And I'd still want something to mount it on.
For pixels - At 5cm spacing (instead of 3) you're talking maybe $6-8 for pixels + $1.80 for chromatrim + $1.60 for conduit.
So how did it all work?
- Well attaching the pigtails was fiddly - but I got it to work with @AAH's seedjoiners. (Side request Alan - can you make those any smaller? (especially shorter?))
- Attaching the pixels to the channel was incredibly simple and fast. In the end - I just hot-glued them. It worked pretty well - but not amazing. I might need to revisit next year. But *so* much easier than pushing hundreds of pixels (or drilling conduit).
- The pixels worked great. 0 failures, wire seems much better than what I had in 2023.
- The channel worked really well for protecting the ground outlines. At various points I (and others) stepped on the channel. But the pixels were fully protected inside.
- The house outlines worked really well. Very very happy with how all of the ones on the house looked.
- There is a reduced angle of visibility with the pixels being inside the channel. This is fine for all of the ones on the house (~8-15m away, pointing directly at the viewer). But it was more of a challenge for the ground ones (which I had pointing to the sky). The ones running parallel to the front fence were a bit hard to see.
- The channel did mean that I got dead straight lines. The one exception is where I had longer runs than 6.5metres. I didn't join them very well/at-all this year -- I've added a joiner piece of some larger c-channel and should resolve that issue next year.
- Packup was perhaps the best part.. I have some space under my house to store long thin stuff -- but bundling a few 1cm by 1cm channel it was simple to pass in and much easier to handle than the conduit drilled pixels. No wires hanging out to get snagged on things.
Here's some photos - and you can look at some videos I've posted (and more when I get around to editing them) of how they looked.


Here's my XLATW video for the year that gives perhaps a better view of how they all look.
tl/dr -- you should look at using seeds for your outlines. They worked great for me in 2024.


