2024 Journey - JohnnyBoy's 2nd year fun

Hey JohnnyBoy, how did you go about purchasing the SLF poppers? Shipping appears to be crazy to vic. In the realms of $US320
is that "Estimated shipping" I just clicked on it out of interest and it returned $258.96 for shipping BUT doesn't even know where I live / never asked
Shipping on theses were a little nuts. I was fortunate enough to get an early release on the STL file for these and just printed myself. I know SLF Designs have now released the file so you can purchase and print yourself. Quite a good product.
 
Halloween Props!

Due to the great black coro shortage, I wasn’t able to get many props in black and had to contend with white props, so I had to figure out a way to jazz them up a little. Who wants to have white spiders for Halloween?! Hopefully, with the recent announcement that Extreme Lighting Displays is back in business, black coro will be back in stock. Once you go black...

Spiders!
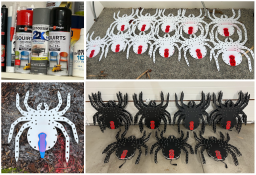
After reading some very informative posts here about painting props, I headed off to Bunnings to get some paint. Rustoleum is the most recommended brand, but at $18 per can, it’s quite expensive, so I tried a similar Squirt Paint + Prime product that was about $10 per can. It was right next to the Rustoleum section and seems to do the job; hopefully, it lasts a few years before needing a touchup. I went with black, red, and grey.

I did a quick Google search for red-back spiders and tried to find the most 'typical' spider look. I drew it out on some paper, made a template out of painter’s tape, and a quick spray gave me the red bits done. Another painter’s tape template to cover the red allowed me to paint the black and complete the look. I was very happy with how it came out

Pro tip: It’s better to paint and dry the prop flat—it prevents paint runs and gives a better finish. My first attempt had some runs I needed to clean up after I went a little heavy on the application.

1727252832152.png

Tombstones
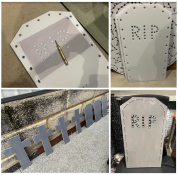
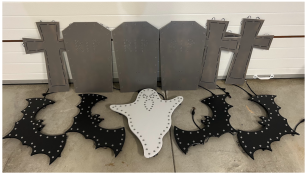
I originally wanted to get the MegaChromeStone RIP 100-node prop, but at $55 each, I didn’t really want to spend that kind of money for a display that would be up for only a week at most. So I found the standard ChromaStone 1 prop for $16.50 each and decided to modify them.

I drew out an RIP sign, printed it to scale, used a hole punch to centre the holes, and finally used a 12mm drill bit to fit the pixels. Drilling coro is approximate at best—if you try to drill near the fluting, the drill bit will push to the left or right of the flute, making it not quite straight. I’m sure it will look good enough from a distance, but I’ll know it’s not perfect!

Using a similar process as with the spiders, I applied a lighter coat of grey paint to give it a patchy, weathered look. Then, I used a black paint pen to connect the outer border pixels. After initially trying to just outline the RIP letters, I decided to colour them in black for a bolder look.

Making changes in xLights was straightforward—I added the RIP letters and made reasonable pixel orders to not exceed the standard 10cm spacing. I also created some sub-models to match the original MegaChromeStone RIP prop. I do miss the second outer layer in the original MegaStone prop, but for $16.50 each, it’s a good deal!
If anyone is interested in the xLights models/sub-models let me know :)
1727252858157.png

Singing Pumpkin
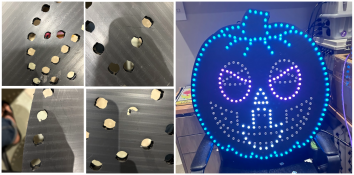
I hadn’t really looked at this prop since I got it and only noticed all the flaws when I started pushing pixels. It seems the prop moved during the manufacturing process, and most of the holes weren’t drilled or routed correctly. I did reach out to Extreme Lighting Displays but never heard back (it was the day before their original closure, so that’s likely why), so I knew it was up to me to correct.

Re-drilling 300 holes made a mountain of black coro dust, but it got the job done! It looks cool, though and my daughters loved seeing it singing in the lounge room.
1727252913187.png

Seeds
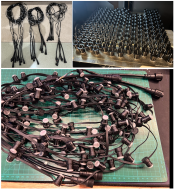
I purchased 3k 4-wire seeds this year at 10cm spacing, and they were super easy to work with. One concern is that with the pigtails being much thicker than the seed wiring, I should have gotten single-sheathed pigtails rather than the double-sheathed ones. The double sheathing tended to twist/pull on the seeds and, in some cases, dislodged the mounting popper backing plate. I ended up adding a few more holes in each prop so I could cable tie them in place. Problem solved—no more strain on the seed wires.

I found it was better to put on SLF Design’s pixel poppers before inserting them into the prop, but it's worth trying a few different methods to see what works best. They were very easy to print, and I could get around 150 per print.
1727252939658.png

And here’s one final photo of most of the props. I seem to be missing a tombstone and cross for some reason—still not sure why I didn’t add them in. Oh, and this photo was taken before coloring in the RIP in black.
1727252962909.png

Thanks for reading and lets get spooky!
 
Mini Update

More Coro Drilling
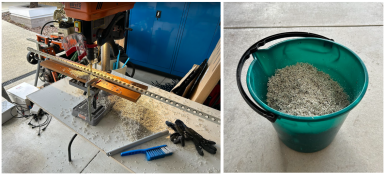
After drilling 2400 holes last year https://auschristmaslighting.com/threads/2023-journey-first-display-for-johnnyboy.15380/post-132480 I needed to drill more! A quick drip to bunnings for 6x4m lengths of 25mm electrical conduit and 900 holes later it was done. I didn’t procrastinate like last year and it was over in just a few short hours, much better than continually putting it off. So far I’ve pushed 400 pixels, with about 300ish pixels to go. I need to jump up on the roof to get the final measurements. These will add to the top roof ridges and garden front.

Boy does it make a mess!
1727253690308.png
I did 3D print and try the https://sfl-designs.com/STL-File-1-2-Standard-PVC-Pixel-Drilling-Jig-1-Spacing-p462885200 jig, but found my drill didn't have enough travel to go all the way through with the stepped drill bit. It would have worked fine with a forstner bit, but i've not had much luck getting a clean cut and wanted to stick with stepped bits. Even if it did work, i think my method was much faster.

Baldrick STL mounting plate
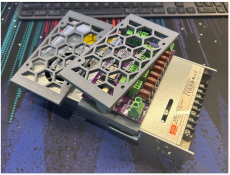
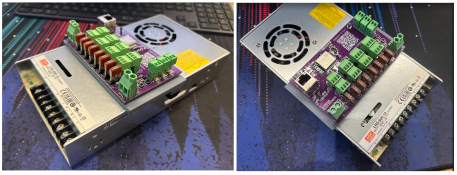
My 3D modelling skills are what you would call average, but I can generally modify someone else’s ok, and that’s exactly what I did! I took the excellent mount design from Greg Macaree https://www.baldrickboard.com/docs/baldrick8/baldrick8-stl-mounts and modified it to fit a LRS-600 PSU. It’s a super snug design and I gave it the ‘she’s not going anywhere wiggle’ and it passed with flying colours.

It took a few prints to get it right…..
1727254650755.png
1727254667721.png
For those wondering about the weird black/grey print colours. I ran out of grey and only had black to chuck in the printer. I kinda dig it.

If anyone would like the STL, just let me know. FYI it doesn’t fit the LRS-350 PSU, I’m hoping to make one in the next few months.

Now to go sequence some Halloween songs
 
Last edited:
Back
Top