3D Printer

andrewa

Full time elf
Joined
Dec 22, 2012
Messages
262
Location
Frankston North, Victoria
The Video files, all 14 of them are quite detailed, only found 1 thing missing, how to bolt down the logic board, but it was self explanatory.


I will see if i can get it working and follow the calibration procedures tomorrow
 

DrNeutron

Just starting in this crazy hobby
Joined
Oct 19, 2012
Messages
228
Location
Glace Bay
looking great so far Andrew.
Can't wait to see how it performs.
:D
 

fasteddy

I have C.L.A.P
Global moderator
Joined
Apr 26, 2010
Messages
6,648
Location
Albion Park NSW
Im looking forward to seeing the build results as this could be a great cheap option for many in this hobby.

Being able to design and build your own clips, brackets plates and so on will make the cheap cost of ownership well worth it
 

andrewa

Full time elf
Joined
Dec 22, 2012
Messages
262
Location
Frankston North, Victoria
Just got back to setting it up tonight, busy with work past 2 evenings.


Just finished plugging in all of the wires, and everything seems to be working, just about to start the calibration
 

AAH

I love blinky lights :)
Community project designer
Joined
Dec 27, 2010
Messages
4,190
Location
Eaglehawk
I wonder why no-one has thought of getting Ed to email manuals. Problems would have been solved much ealier if someone had thought of this :angel:

BensChristmasLights said:
can they not email you a manual??
 

andrewa

Full time elf
Joined
Dec 22, 2012
Messages
262
Location
Frankston North, Victoria
Success.


If I had bothered to watch the final video, I might have seen that The slicer settings needed changing.


Once I changed to using the recommended settings, things started working.
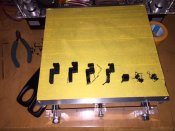
First 7 attempts.JPG


here is my first 7 attempts
right to left first 3 are of a cube, nothing seemed to stick to the bed


Kept making adjustments to print head height, temperatures and finally printed something
 

andrewa

Full time elf
Joined
Dec 22, 2012
Messages
262
Location
Frankston North, Victoria
thought it was time for an update on the progress of the Budjet 3D printer


Hot Bed is Software set at a max of 90 Degrees Celcius ( Is you know how to get into the audrino settings it can be changed


I have been unable to successfully print the P10 panels, due to excessive ABS Curling


Started printing Pixel Clips, then


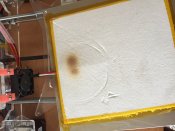
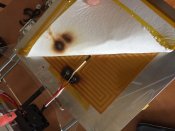
Smelt a burning smell, Hot Bed stopped working, Looked underneath and sawIMG_1120.JPG scortching


Undid the insulation and saw the Heating element had short circuited.IMG_1121.JPG


Luckily I saw earlier in the week a kit of spare parts that I purchased and had delivered on friday. The kit included a Mk2 Heat Bed, which I have installed along with a piece of Borosilicate Glass


So total cost is now AU 375 Plus $99 for spare parts, plus 54 for Glass total now $528


Just ordered a Mk 3 Heat Bed and Kapton Tape ($74) so up to $602 still no regrets
 
Top