Hi everyone,
I felt I wanted to do a post (my first one!) as this is my first year doing a display and using pixel lights. I thought it might be useful for any future newbies to know what I got to start out, things you need, and mistakes I made... I certainly has a steep learning curve but very rewarding.
So, being my first year I needed everything, this was my shopping list:
Hardware:
Tools:
Additional things I never knew I needed:
Things I never knew:
Pixel lights have a direction for data flow! - there are little arrows on the pixels which show the direction so when cutting and joining strings, check the direction matches. I was not aware of this, there is a lot about power injection and that power is not directional but the pixel lights are.
Other tips:
Watch lots of youtube videos, here are some of the ones I used:
Read the AusChristmasLighting 101 Manual
Read lots of threads on here to help
I have to say playing with the pixel lights and setting up sequences is such a fulfilling hobby. To all the people that have posted amazing displays, I am in awe and hope to get to even half the quality of what you all produce.
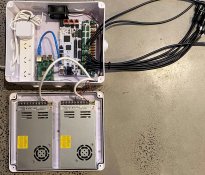
Here is a picture of my power box, and a video of my first setup (just something for the AFL Grand Final - GO DOGGIES!)

I felt I wanted to do a post (my first one!) as this is my first year doing a display and using pixel lights. I thought it might be useful for any future newbies to know what I got to start out, things you need, and mistakes I made... I certainly has a steep learning curve but very rewarding.
So, being my first year I needed everything, this was my shopping list:
Hardware:
- Falcon F16V3 (purchased direct)
- Raspberry Pi and power supply (Amazon) plus 16Gb mini SD
- Two meanwell 12V 350W power supplies (Ray Wu)
- ABS case (or similar) for all the electronics (I got 300mm x 250mm x 120mm, this just fits everything) (ebay)
- 12V Cooling fan (ebay)
- 50m 3-pin 18AWG cable (Ray Wu)
- 50m plastic pixel node strip (Ray Wu)
- 3-core 50cm male/female pigtails (Ray Wu)
- Two 500 continuous strand 12V pixels (Ray Wu)
- 2x50W audio amplifier (AliExpress)
- Full range car stereo wired speakers (AliExpress)
- Perspex sheet and screws for mounting electronics (Bunnings)
Tools:
- Soldering iron kit
- Helping hands
- Heat shrink tubing
- Wire strippers
Additional things I never knew I needed:
- Pixel pliers
- A piece of timber with 12mm holes drilled at 5cm spaces
Things I never knew:
Pixel lights have a direction for data flow! - there are little arrows on the pixels which show the direction so when cutting and joining strings, check the direction matches. I was not aware of this, there is a lot about power injection and that power is not directional but the pixel lights are.
Other tips:
Watch lots of youtube videos, here are some of the ones I used:
- http://www.brianhensley.net/2017/10/network-setup-falcon-player-fpp-falcon-f16v3-controller.html
View: https://www.youtube.com/watch?v=-7E1FxpC27M
- https://falconchristmas.github.io/FPP_Manual.pdf
- https://learnchristmaslighting.com/how-to-use-the-falcon-player-fpp/
Read the AusChristmasLighting 101 Manual
Read lots of threads on here to help
I have to say playing with the pixel lights and setting up sequences is such a fulfilling hobby. To all the people that have posted amazing displays, I am in awe and hope to get to even half the quality of what you all produce.
Here is a picture of my power box, and a video of my first setup (just something for the AFL Grand Final - GO DOGGIES!)


