burner said:Is that silicon on the 2nd pic? If so, what type is it?
yes it is Silicon, for use on Bricks and Tiles purchased from Bunnies. I bought black to match the colour of the tiles.
Jon
Follow along with the video below to see how to install our site as a web app on your home screen.
Note: This feature may not be available in some browsers.

burner said:Is that silicon on the 2nd pic? If so, what type is it?
Wombat said:I got a heap of large wooden cutouts (7) Painted with bright colours from a garage sale for $40 bargain. now I have to work out how i'm going to mount them on the roof. might need something a bit stronger than that though. these might just pull the tiles off with them.
Wombat
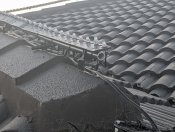
The silicon is an outdoor rated sealent style rather than a construction adhesive in black to match the black roof but you can a product called sicaflex that is an outdoor rated adhesive.JPB said:burner said:Is that silicon on the 2nd pic? If so, what type is it?
yes it is Silicon, for use on Bricks and Tiles purchased from Bunnies. I bought black to match the colour of the tiles.
Jon
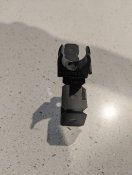
JPB, is that 2nd picture above still working for you? the twisted wire with loop siliconed onto the ridge cap?Attached are photos of three fixing methods I use.
One is a tie down point for frames, The first is a base for 3D see saw frame that I need to keep level the middle one is a tie down point for rope lights and the last is a tie down point for wire frames.
The tie down points stay up all year.
Jon

 www.bunnings.com.au
 www.bunnings.com.au
hi any images are appreciated, the more the merrier, closeups and different angles etcHi Lanas. I've put lights on my tiled roof for the first time this year.
I used Selleys Roof and Gutter Silicone Sealant - Black. It seems to have worked really well so far. I tested for 2 week before using by attaching a bracket and then removing it. Was still holding well after 2 weeks and the cleanup just required a stanley knife to get the silicon off. Make sure you clean the tile with turps before attaching.
Selleys 310g Roof And Gutter Silicone Sealant - Black
Find Selleys 310g Roof And Gutter Silicone Sealant - Black at Bunnings Warehouse. Visit your local store for the widest range of paint & decorating products.www.bunnings.com.au
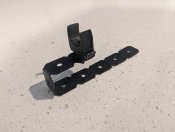
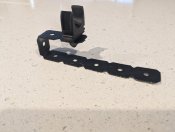
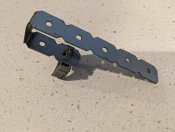
For the bracket I used the Carinya 20x600x1mm Flat Make-A-Bracket. I would fold it so that 3 segments are on top. 1 segment for height and about 4 segments on the bottom to be siliconed to the roof tiles. I bolted a 25mm conduit clip to the top of these because all my ridgeline lights are Coro strips attached to 25mm electrical conduit.
Carinya 20 x 600 x 1mm Flat Make-a-Bracket - single
Find Carinya 20 x 600 x 1mm Flat Make-a-Bracket - single at Bunnings. Visit your local store for the widest range of products.
I'll talk a photo of a leftover bracket when I get home from work tonight.
Hope this helps.
Here you go. I had one left over. Tried to get a shot of the roof too but hard without a ladder.