info on making window frames for pixels

bert-nc

Apprentice elf
Joined
Jan 8, 2012
Messages
62
Location
central North Carolina
Was hoping to add some vertical effects to my display for 2025
and was thinking about making window frames to mount pixels to.
Watched a bunch of you tube videos and tried drilling holes into pvc pipe.
That did not work as well as I was hoping.
Would like to know what method you might be using.
Methods you may have tried that did not work as hoped.
Ideas you may be thinking about trying for 2025 display.


Bert-nc
 
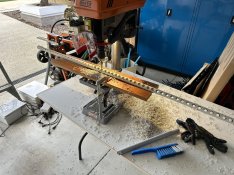
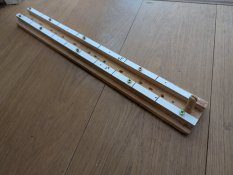
I did the drill method, but made a special jig to hold the conduit, with a locator pin to prevent it from rotating and moving. It had marks every 2" so I knew where to drill for spacing.
 
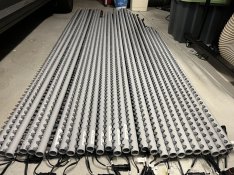
I’ve drilled a lot of holes in conduit. I think I’m at just 3400pixels at 1inch spacing.

My process
- layout a bunch of pipe on the ground, I normally do 6-8 lengths of conduit. (Needs to be an even number)
- block of wood at each as well as at regular internals along the length to stop it all moving.
- run a pencil / marker between two lengths of pipe to get a line to drill on. Repeat ever second one
- rotate the pipe so line is facing up
- tap measure extended out full length
- set square or similar against the conduit
- using a pencil / marker, mark at the spacing you want.
- I made up a jig, with a bit of old board and two longer pieces of wood screwed together so that there is a gap slightly narrower than a bit of conduit (just to hold it steady)
- clamp the jig to a drill press (I wouldn’t recommend hand drilling)
- use a 12mm stepped bit (some people use forstner bits, but they never worked for me and left big gouges in the conduit)
- drill at every mark all the way through so it punches through the other side
- turn it over and drill using a 20mm forstner bit, drill to only to about 16mm. Any deeper and the 12mm bullet side will get widened. I use the drill press stop to measure so I don’t have to think about it. Try on a bit of scrap before and push some pixel in
- push those pixels!
- I make each length of conduit 50 or 100 pixels if I can to save on soldering.
- to join length of conduit together I either use the nature joint thing on the conduit (if it will be joined), or use store bought couplers and drill those out as well. Pushing pixels through couplers is quite a bit harder and I end up overriding the coupler drill holes

Doing this method I marked and drilled my latest batch of pipe for 1000 pixels in around 4hours.

I’ve tried the 3D printed jig from SFL Designs but it was slower and not as easy to use.

Hope that helps :)
 

Attachments

  • IMG_6130.jpeg
    IMG_6130.jpeg
    1.2 MB · Views: 33
  • IMG_3237.jpeg
    IMG_3237.jpeg
    1.2 MB · Views: 33
I’ve drilled a lot of holes in conduit. I think I’m at just 3400pixels at 1inch spacing.

My process
- layout a bunch of pipe on the ground, I normally do 6-8 lengths of conduit. (Needs to be an even number)
- block of wood at each as well as at regular internals along the length to stop it all moving.
- run a pencil / marker between two lengths of pipe to get a line to drill on. Repeat ever second one
- rotate the pipe so line is facing up
- tap measure extended out full length
- set square or similar against the conduit
- using a pencil / marker, mark at the spacing you want.
- I made up a jig, with a bit of old board and two longer pieces of wood screwed together so that there is a gap slightly narrower than a bit of conduit (just to hold it steady)
- clamp the jig to a drill press (I wouldn’t recommend hand drilling)
- use a 12mm stepped bit (some people use forstner bits, but they never worked for me and left big gouges in the conduit)
- drill at every mark all the way through so it punches through the other side
- turn it over and drill using a 20mm forstner bit, drill to only to about 16mm. Any deeper and the 12mm bullet side will get widened. I use the drill press stop to measure so I don’t have to think about it. Try on a bit of scrap before and push some pixel in
- push those pixels!
- I make each length of conduit 50 or 100 pixels if I can to save on soldering.
- to join length of conduit together I either use the nature joint thing on the conduit (if it will be joined), or use store bought couplers and drill those out as well. Pushing pixels through couplers is quite a bit harder and I end up overriding the coupler drill holes

Doing this method I marked and drilled my latest batch of pipe for 1000 pixels in around 4hours.

I’ve tried the 3D printed jig from SFL Designs but it was slower and not as easy to use.

Hope that helps :)
Thanks for the detailed procedure
I have been following your posts and have learned a lot
Will give it another try
 
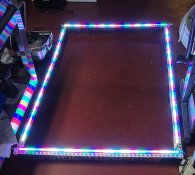
If you're not wedded to bullets then this option seems good to me...

 
Mine have strip too, because I was indecisive. (Ignore that it doesn't go all the way around, limitation of that particular tester.)

Later, I also got some of the pixel pipe, which is available in the US. Seems nice, but I never finished that project... yet.
 

Attachments

  • 20250110_220919.jpg
    20250110_220919.jpg
    304.9 KB · Views: 18
  • 20250110_220849.jpg
    20250110_220849.jpg
    292.5 KB · Views: 18
If you're not wedded to bullets then this option seems good to me...

I'll note that the 3cm spacing is going to make corners *hard* with that approach. I haven't tried to do anything that isn't a straight line with them. 5cm spacing and you might be better off - but still work out a plan for a corner. (In reality - you may be better off using unsupported pixels (without the c-channel) for things like windows). I'm open to idea/s suggestions.
 
I’ve drilled a lot of holes in conduit. I think I’m at just 3400pixels at 1inch spacing.

My process
- layout a bunch of pipe on the ground, I normally do 6-8 lengths of conduit. (Needs to be an even number)
- block of wood at each as well as at regular internals along the length to stop it all moving.
- run a pencil / marker between two lengths of pipe to get a line to drill on. Repeat ever second one
- rotate the pipe so line is facing up
- tap measure extended out full length
- set square or similar against the conduit
- using a pencil / marker, mark at the spacing you want.
- I made up a jig, with a bit of old board and two longer pieces of wood screwed together so that there is a gap slightly narrower than a bit of conduit (just to hold it steady)
- clamp the jig to a drill press (I wouldn’t recommend hand drilling)
- use a 12mm stepped bit (some people use forstner bits, but they never worked for me and left big gouges in the conduit)
- drill at every mark all the way through so it punches through the other side
- turn it over and drill using a 20mm forstner bit, drill to only to about 16mm. Any deeper and the 12mm bullet side will get widened. I use the drill press stop to measure so I don’t have to think about it. Try on a bit of scrap before and push some pixel in
- push those pixels!
- I make each length of conduit 50 or 100 pixels if I can to save on soldering.
- to join length of conduit together I either use the nature joint thing on the conduit (if it will be joined), or use store bought couplers and drill those out as well. Pushing pixels through couplers is quite a bit harder and I end up overriding the coupler drill holes

Doing this method I marked and drilled my latest batch of pipe for 1000 pixels in around 4hours.

I’ve tried the 3D printed jig from SFL Designs but it was slower and not as easy to use.

Hope that helps :)
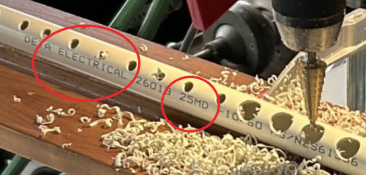
What size of conduit are you using ?
Tried expanding the picture but unable to read the markings on the pipe
Is this electrical pvc conduit or pvc water pipe
Thanks
 
That would be 25mm / 1" outer diameter conduit. I believe thats what is referred to as 3/4" in the US as it's measured as inner diameter there.
It's electrical PVC.
Markings are on the first picture - the 25MD means 25mm medium duty.
1736719168326.png

The other option used is 20mm, however given @Johnnyboy drilled the rear with a 20mm bit, there'd be nothing left of it if he used that size conduit ;)
 
Back
Top