Navigation
Install the app
How to install the app on iOS
Follow along with the video below to see how to install our site as a web app on your home screen.
Note: This feature may not be available in some browsers.
More options
-
2026 Mini Christmas Light Expos - RSVP Now
Melbourne Mini: 4 July | Sydney Mini: 4-5 July | Brisbane Mini: 26 July -

You are using an out of date browser. It may not display this or other websites correctly.
You should upgrade or use an alternative browser.
You should upgrade or use an alternative browser.
Latest project
- Thread starter logandc99
- Start date
Bird
LOR user
That is so good some people are going to think it is rear projection.
That concept has got a lot of potential for so many things.
Hope your doing a 'how-to' when your finished.")
That concept has got a lot of potential for so many things.
Hope your doing a 'how-to' when your finished.
- Thread starter
- #18
In a way, it is a bit like rear projection as the lights on the inside of the head project onto the front piece of coro.
I used 5mm coro for the back and front parts of the head and the side walls for strength. The partitions in the middle to make the mouth, nose and eye shapes are 3mm coro so they don't show up quite as much when the head is lit up.
I drew out the face on the back sheet of the head and lay out the lights and mouth partitions with blutak as a temporary measure to make sure it was all going to look ok.

Then once happy, I glued in the lights and the dividers for the the mouth, nose and eyes.


The front sheet of Coro is effectively blank acting like a screen for the face shapes. I am attaching the twigs for his head onto the back of the head with that clear strong velcro. I have also attached the front sheet of coro for the head to the side walls by clear velcro as I don't necessarily need it to be water proof as Olaf will be under the carport. Also means I can get to the lights easily if there are any problems.

I'm using WS2811 rectangular modules with power injection at the beginning and end and run by a P2.
I used 5mm coro for the back and front parts of the head and the side walls for strength. The partitions in the middle to make the mouth, nose and eye shapes are 3mm coro so they don't show up quite as much when the head is lit up.
I drew out the face on the back sheet of the head and lay out the lights and mouth partitions with blutak as a temporary measure to make sure it was all going to look ok.
Then once happy, I glued in the lights and the dividers for the the mouth, nose and eyes.
The front sheet of Coro is effectively blank acting like a screen for the face shapes. I am attaching the twigs for his head onto the back of the head with that clear strong velcro. I have also attached the front sheet of coro for the head to the side walls by clear velcro as I don't necessarily need it to be water proof as Olaf will be under the carport. Also means I can get to the lights easily if there are any problems.
I'm using WS2811 rectangular modules with power injection at the beginning and end and run by a P2.
- Thread starter
- #20
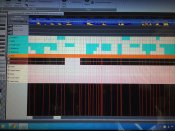
I am using LSP for the programming. The whole head is composed of 66 rectangular modules all in one long line. In LSP I just divided the parts of the head into elements so I could control them individually (see picture below). There are several parts labelled as head or lower head etc in the picture below because the continuous string of modules runs from part of the head, through the nose, back onto the head, through right eye, then head, then left eye etc. You can simplify things by having a more logical path I guess.
Eye blinking is a little different in this setup as you close his eyes by turning lights on (as opposed to turning off in traditional singing faces). Also, because his face is white, as his mouth moves, it's not just a case of turning mouth parts on or off.... you have to make parts of his mouth blue when singing a note, but then turned white when they are not being used so they blend with the rest of his lit up head. So a full open mouth would have almost all parts of the mouth on blue, his tooth on white and his O mouth shape also on white to keep the whole tooth white as the O is within the tooth. When you want to have just the O mouth singing a note, all the mouth parts are switched from blue to white so they blend in with the rest of the head to make it look like his mouth is only an O shape (make sense? hmmmm sounds confusing when I read it back to myself )
During the song, you can change all sorts of things like blink only one eye (a wink), blush his cheeks, give him a full tan etc.
Next I have to make the body and legs which should be a little more simple as there are no mouth parts to sequence.
Although the sequencing of the mouth looks complicated, you get used to it quite quickly flicking parts of the mouth white and blue. I still have one error to fix near the end of the song that you can see in the video where I forgot to turn his oval mouth to blue during a open mouth note so his tooth suddenly and briefly gets quite big ???
EDIT: you will notice that some of the head parts in the LSP sequence pic are light pink and some are white... that was to compensate for the difference in the whites of the different strings. (some strings were a bluey white [head] and some were a pinky white [mouth] ).
Eye blinking is a little different in this setup as you close his eyes by turning lights on (as opposed to turning off in traditional singing faces). Also, because his face is white, as his mouth moves, it's not just a case of turning mouth parts on or off.... you have to make parts of his mouth blue when singing a note, but then turned white when they are not being used so they blend with the rest of his lit up head. So a full open mouth would have almost all parts of the mouth on blue, his tooth on white and his O mouth shape also on white to keep the whole tooth white as the O is within the tooth. When you want to have just the O mouth singing a note, all the mouth parts are switched from blue to white so they blend in with the rest of the head to make it look like his mouth is only an O shape (make sense? hmmmm sounds confusing when I read it back to myself
)During the song, you can change all sorts of things like blink only one eye (a wink), blush his cheeks, give him a full tan etc.
Next I have to make the body and legs which should be a little more simple as there are no mouth parts to sequence.
Although the sequencing of the mouth looks complicated, you get used to it quite quickly flicking parts of the mouth white and blue. I still have one error to fix near the end of the song that you can see in the video where I forgot to turn his oval mouth to blue during a open mouth note so his tooth suddenly and briefly gets quite big ???
EDIT: you will notice that some of the head parts in the LSP sequence pic are light pink and some are white... that was to compensate for the difference in the whites of the different strings. (some strings were a bluey white [head] and some were a pinky white [mouth] ).
Attachments

That looks fantastic and proves once again that you can be as creative as you want with corex. Thanks for sharing
algerdes
Al Gerdes
"I'm going to tell him."
"Don't you dare."
"Don't you dare."
talk2coxie
Full time elf
Sensational work Logan, the best corro design by a long way in my opinion.
Certainly makes the mind boggle with corro creations we will see in the future.
Thanks a bunch for the how to, helps other create their own masterpieces.
Can't wait to see it in action
Certainly makes the mind boggle with corro creations we will see in the future.
Thanks a bunch for the how to, helps other create their own masterpieces.
Can't wait to see it in action
- Thread starter
- #27
So Olaf is a little taller than expected ( and a lot taller than the "real" Olaf) but just fits in the carport..... just.
He now has arms and body stones ( 2nd photo).
To keep him vertical he has his segments stuck together with short strips of clear Velcro ( so he can be stored in pieces) and the hold body bound to black metal trellis (from Bunnings) again with Velcro. Hair and arms held on with Velcro. Hopefully won't get too much wind as he will sit against the wall in the carport.
ShellNZ
Senior elf
That is absolutely awesome Logan!!!!!
- Thread starter
- #30
Thanks. It's not a bad way of making singing objects and using the rectangular pixels I can change the appearance of the face somewhat ( eg blushing cheeks, sneezing a nose out, giving Olaf a tan etc). If I get time I plan to make a somewhat smaller singing christmas tree in the same method to replace my old, extremely heavy and non waterproof pegboard singing christmas tree.