DeeJai
Is that Magic Smoke?!?
Let me just start out by saying, this is not my design, nor idea, I have just adjusted the design so that those from the normal world who like the metric system can easily calculate it and added some extra's, like tabs.
For the guide i used, check out http://www.christmaswonders.com/Coro_Star.html
I will however demonstrate the way i have constructed mine and some tips so you dont make the same mistakes i may have!
Please feel free to offer any advice as this is realistically my first corro project apart from some listed here on ACL.
The first thing I have had to check was the sizes. Please note that The link above is utilising a large sheet of corro for the instructions. That being a 4'x8' sheets. ( 1220mmx2440mm) available in Australia ( check http://auschristmaslighting.com/forums/index.php/topic,847.30.html )
I then drew my stars using the template i adjusted

Please note, that you will have approximately 1cm left over at one end of the sheet. Dont cut this off. Its perfect for a tab to join the two ends of your star together.
Next, Using a ruler (the eye guage is not the best to use here) I marked the 1220mm x 620mm x5mm sheet accordingly and cut out the 2 pieces.

Next I scored what would be the inside of the star. The guide above only utilises a single score for the bends, but using Supermans tip here on each of the scores, will allow for a much nicer looking tips on the star. (I actually cut away 2 pieces of flute for the bends as this now allows a better bend past 90 degrees and helps for storage.)
Once the basic scoring is done, I marked out approximately 30mm from the bottom, and used a stanley knife to again score the corro accross the grain. Make sure you dont cut through the entire depth of the corro. Only the first layer and the flute walls themselves.
At the bottom of each of the verticle scores, I then used the blade again to cut through completely where the tabs are, and removed the small 3mm section this would create. (you can just cut the tabs from the score at 45 degrees at this stage)
then cut the 45 degrees to look like

Thats basically all the brain numbing stuff done. Now to the construction of it.
To make it easier for me, I made a template of a star, then marked drill holes both for the star and the base.
Ensure that all the scores allow for the correct bending and that the tabs at the bottom also bend enough.Using any kind of tape (I am using some weird almost non sticky tape which i found in the anuls of my shed), tape the star into the correct positions. (use a decent type of tape to hold the star ends together, ensure you tape on the outside of the star. You can paint over this later)
I have now adjusted the design so that this is held together by velcro now on all of the tabs. This allows for easy dissasemble and storage. Using glue, restricts the storage of this star to an area approximately 400x400x400mm)
There is no need to tape the star into a position. The only piece of tape required, is to hold the joine of the star together.

(I have used 3mm corro as the base, becuase it was spare, however, you can use any material you want. The guide above uses ply wood which i beleive is for weight on the bottom of the star.)
Next comes the painting. Choose your colour and style. I have used Black spray paint. Paint the star external sides and the base prior to assembly.
All you need to do now is choose what light you will use inside. I will be running cobles from thelower part of the large point base of the star and running 4 x 2801 pixels in each. dumb modules would be great in here, but alas, i am not running dumb lights this year. In total, the approximate cost of each star is AUD$7. Places in the US are selling a similar product for over USD$20 not including postage.
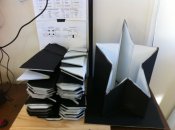
Storage of the velcro version of this is excellent. In the same size as the base, I can fit 3 folded stars, which only measure about 10cm high. GOLD!, Basically, in the space a constructed star would have taken up, i can fit approximately 15 stars.

For the guide i used, check out http://www.christmaswonders.com/Coro_Star.html
I will however demonstrate the way i have constructed mine and some tips so you dont make the same mistakes i may have!
Please feel free to offer any advice as this is realistically my first corro project apart from some listed here on ACL.
The first thing I have had to check was the sizes. Please note that The link above is utilising a large sheet of corro for the instructions. That being a 4'x8' sheets. ( 1220mmx2440mm) available in Australia ( check http://auschristmaslighting.com/forums/index.php/topic,847.30.html )
I then drew my stars using the template i adjusted
Please note, that you will have approximately 1cm left over at one end of the sheet. Dont cut this off. Its perfect for a tab to join the two ends of your star together.
Next, Using a ruler (the eye guage is not the best to use here) I marked the 1220mm x 620mm x5mm sheet accordingly and cut out the 2 pieces.
Next I scored what would be the inside of the star. The guide above only utilises a single score for the bends, but using Supermans tip here on each of the scores, will allow for a much nicer looking tips on the star. (I actually cut away 2 pieces of flute for the bends as this now allows a better bend past 90 degrees and helps for storage.)
Once the basic scoring is done, I marked out approximately 30mm from the bottom, and used a stanley knife to again score the corro accross the grain. Make sure you dont cut through the entire depth of the corro. Only the first layer and the flute walls themselves.
At the bottom of each of the verticle scores, I then used the blade again to cut through completely where the tabs are, and removed the small 3mm section this would create. (you can just cut the tabs from the score at 45 degrees at this stage)
then cut the 45 degrees to look like
Thats basically all the brain numbing stuff done. Now to the construction of it.
To make it easier for me, I made a template of a star, then marked drill holes both for the star and the base.
Ensure that all the scores allow for the correct bending and that the tabs at the bottom also bend enough.
I have now adjusted the design so that this is held together by velcro now on all of the tabs. This allows for easy dissasemble and storage. Using glue, restricts the storage of this star to an area approximately 400x400x400mm)
There is no need to tape the star into a position. The only piece of tape required, is to hold the joine of the star together.
(I have used 3mm corro as the base, becuase it was spare, however, you can use any material you want. The guide above uses ply wood which i beleive is for weight on the bottom of the star.)
Next comes the painting. Choose your colour and style. I have used Black spray paint. Paint the star external sides and the base prior to assembly.
All you need to do now is choose what light you will use inside. I will be running cobles from the
Storage of the velcro version of this is excellent. In the same size as the base, I can fit 3 folded stars, which only measure about 10cm high. GOLD!, Basically, in the space a constructed star would have taken up, i can fit approximately 15 stars.