SUCCESS 1 Tint tube arch

Henedce

Apprentice elf
Joined
Dec 28, 2010
Messages
69
Location
110 Wallace st
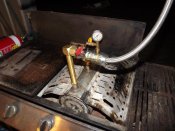
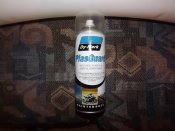
After much testing and many failures , I finally found a method to bend the tint tubes without collapsing or kinking .
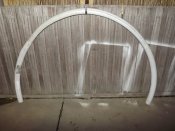
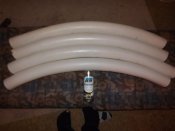
Here is a pic of the first of my 2012 arches. Still need to trim to size, clean the tubes up, glue the joins and treat with plastic protector. But I am so excited I had to share.

[attachimg=1]

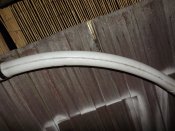
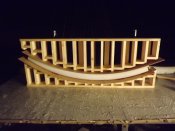
Picture of the form to show no kinks etc
[attachimg=2]

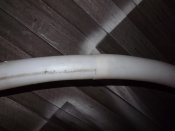
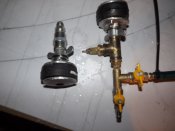
Picture of the lap joint. I didnt achieve this with every piece but I know how to consistently do it now.
[attachimg=3]

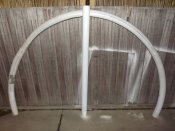
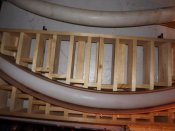
Picture with a 1.5 metre piece of tube to show height.
[attachimg=4]

Just need to go get some more tube now so I can complete another 2 of these. :D
 

Attachments

  • DSCF0846.JPG
    DSCF0846.JPG
    273.8 KB · Views: 560
  • DSCF0847.JPG
    DSCF0847.JPG
    313.8 KB · Views: 558
  • DSCF0848.JPG
    DSCF0848.JPG
    211.7 KB · Views: 564
  • DSCF0850.JPG
    DSCF0850.JPG
    272.4 KB · Views: 563

Henedce

Apprentice elf
Joined
Dec 28, 2010
Messages
69
Location
110 Wallace st
Short answer - Steam

Long Answer -
Steam pressure boiler on my BBQ.

[attachimg=1]

2 test bungs - 1 for steam inlet the other for air pressure and cold water . The ones I am using are NOT rated for steam.

[attachimg=2]

And a simple form using timber and drawer slides as well as some 3mm acrylic sheet for keeping the form.

[attachimg=3]
[attachimg=4]

Method
  • Fire up the boiler, it needs to reach around 30 PSI to get enough heat into the tint tubes.
  • On each end of the tube put a super clamp and tighten snugly, don't over tighten yet, just need enough to keep the tube at its normal size.
  • Insert the 2 bungs. Steam Inlet side is simple although I plan to add a tee piece and a ball valve tomorrow for water release (Tonight I was just cracking the steam pipe. Outlet side is fitted with a 2 tees fitted with a 5 PSI pressure relief valve (Extremely important) and 2 ball valves one for compressed air and the other for cold water.
  • Tighten the super clamps onto the tubes. They should be located over the bungs. (Again this is a safety measure to ensure the bungs hold tight)
  • Place assembled tube ready for forming into the form. I used ratchet clamps to close the form.
  • Hook up all hoses . Steam , Compressed air and cold water so you are ready. It starts slow but then all happens at once.
  • Once boiler is at 30 PSI open the ball valve to release the steam SLOWLY until the 5 PSI relief valve cracks (Dont stand near this valve it release EXTREMELY HOT steam. I had a3 metre piece of conduit over the whole assembly to vent away from where I was working.)
  • You will be able to feel when the tube is getting hot. When it is clamp the form slowly shut. The tube will flatten out, that's ok just make sure there are not get any kinks. If you do the tube is not hot enough.
  • When the boiler pressure drops to where the safety valve closes, turn off the steam ball valve and open the compressed air valve (again make sure the boiler valve is turned off so as to not pressurize the boiler accidently)
  • Once the tube has expanded to fit the form turn the cold water on a little. I open the valve about quarter of the way.
  • The tube will start cooling down slowly. Once its cooler (does'nt have to be cold) turn off the compressed air and turn the water on fully (The conduit off the 5PSI relief also keeps you dry during this stage). Once the tube has cooled (cold to touch) open the inlet end to allow the water to flow through the tube and finish the cooling process.
  • Turn off the water, remove the bungs and clamps and release the now bent tube from the form.
  • By the time that's finished the boiler should be close to pressure again , So rinse repeat.
SAFETY INFORMATION
  • Pressurized vessels can EXPLODE -- EVERYTHING in this project is under pressure and can explode.
  • Pressurized steam is EXTREMELY HOT at 30PSI boiling point of water in increased to approx 140 degrees C
  • Some parts used by myself are not rated for use with steam - Use at your own risk.
DISCLAIMER
I accept no responsibility for any accident or injury caused as a result of any information in this post. It is provided for reference only and should not be deemed as the correct method of working with steam. My pressure boiler was made by a professional boiler maker and tested to withstand 300 PSI before I attempted this project.
 

Attachments

  • DSCF0852.JPG
    DSCF0852.JPG
    220.6 KB · Views: 546
  • DSCF0858.JPG
    DSCF0858.JPG
    146.8 KB · Views: 543
  • DSCF0864.JPG
    DSCF0864.JPG
    194.9 KB · Views: 545
  • DSCF0862.JPG
    DSCF0862.JPG
    175.5 KB · Views: 544

Bevo

Let your Light Shine before men
Joined
Dec 30, 2010
Messages
313
Location
Caboolture QLD
Thanks for detailed info.


I didn't think that you would have to go to that much to bend these pipes but you have made an outstanding design.


Good Work and Thanks again.
 

fasteddy

I have C.L.A.P
Global moderator
Joined
Apr 26, 2010
Messages
6,648
Location
Albion Park NSW
So whats the secret, please share as I would love to make some smaller partial tint tube arches just like your top section of your arch.
Anyway looks great and hope your able to show some video of it in action

Edit: Thanks for sharing the info on how its done
 

hdracer

There is no rehab for the CLAP
Joined
Feb 17, 2012
Messages
176
Location
Sugar Land,Tx
Nice job Hendence! Thanks for sharing. Was wondering if I made a mold like that and have a hot water pressure washer for the bending process, or do they break easily from heat?
 

john_s_sub

Apprentice elf
Joined
Feb 18, 2012
Messages
59
Location
Sydney, Australia
What a great win!! Are you offering up a fee for service model to do other members tubes? ;) I would be keen and I think other members might be
 

angus40

Senior elf
Joined
Dec 23, 2011
Messages
539
looks great . i guess the injected steam's pressure helped maintain the shape ..

Could you elaborate on what you figure the cost involved to achieve this was ?

thanks
Richard
 

Henedce

Apprentice elf
Joined
Dec 28, 2010
Messages
69
Location
110 Wallace st
ԆцряєсϮ said:
Awesome job Henedce
I've got spare tubes if you need some.

Where are you located ? I could do with some more my source is running dry.

hdracer said:
Nice job Hendence! Thanks for sharing. Was wondering if I made a mold like that and have a hot water pressure washer for the bending process, or do they break easily from heat?

I found water at 100 deg C just wasn't hot enough to make the tubes pliable. My other concern would be most pressure washers pump out around 1600 psi plus , no relief valve will handle that volume to get back down to 5 psi. At 5 psi the tubes will expand to fit your form. I popped one tube at around 12 psi and certainly would not go above 5 - 6 psi for safety reasons.
The main key to bending these I found is being able to maintain constant pressure while forming and cooling.

john_s_sub said:
What a great win!! Are you offering up a fee for service model to do other members tubes? ;) I would be keen and I think other members might be

The biggest killer would be freight. I live in country Victoria and most couriers would charge you a cubic meter price for something so long. Australia post wont accept anything over 1.2 meters I believe. By the time you paid freight each way you could probably build your own unit.
Melbourne people I may be able to help as I have a freight network in place if you can get to certain areas. But then each form would have to be built to suit each individual size, Hmmm could become a daunting service. Not sure I have the time, my form took around 4 hours to complete. I do plan on building a form to do smaller arches next weekend to see just how tight I can bend the tubes.

angus40 said:
looks great . i guess the injected steam's pressure helped maintain the shape ..

Could you elaborate on what you figure the cost involved to achieve this was ?

thanks
Richard

Once hot the tube can collapse without any problems. Just reheat and pressurize to bring back to round. Sometimes it takes 2 go's to achieve a uniform shape anyway.

Costing to build depends on a lot of factors . My biggest advantage is I have access to wholesale pricing for most Industrial items.
Rough Rough pricing as I would charge at work

Inlet side
  • 1/2 BSP Tee $10.00
  • 1/2 BSP Nipple $5.00
  • 1/2 BSP Ball Valve $15.00
  • 1/2 BSP to 3/4 JIC nipple $12.00
  • Test Plug $30.00
  • Total $72.00
Outlet Side
  • 1/2 BSP Tee $10.00
  • 1/4 BSP Tee $8.00
  • 1/2 x 1/4 BSP Reducing Nipple $6.00
  • 1/2 x 1/4 BSP Reducing Bush $5.00
  • 1/4 BSP Nipple $3.00
  • 1/4 BSP M/F Ball Valve AGA Approved $12.00 x 2
  • 3/8 x 1/4 BSP Hose Tail $4.00
  • Test Plug $30.00
  • 5PSI Safety Valve (Custom Made and not sure anyone would do off the shelf) $30.00 for base valve
  • Total $120.00
Pressure Boiler
  • Guage $25.00
  • 1/4 BSP Tee $8.00
  • 1/4 M/F Ball Valve AGA Approved $12.00
  • 1/4 F/F BAll Valve AGA Approved $12.00
  • 1/2 BSP x 6" All Thread $15.00
  • 1/2 BSP R/A $8.00
  • 1/2 x 1/4 BSP Reducing Nipple $6.00
  • 1/4 BSP x 3/4 JIC Nipple $12.00
  • 35PSI Safety Valve 1/2 BSP $35.00
  • Total $133.00
Steam Hose
  • 3 metres of Teflon Lined Stainless Braided Hose $90.00
  • 3/4 JIC Female Fittings for Hose $22.00 x 2
  • Total $134.00
Overall total not including the pressure boiler tank
  • $459.00
Rough guess on the tank to be made
  • 2 Hours Labor for Boiler Maker $180.00
  • Stainless Pipe plus plate for end caps $50.00
  • Total $230.00
Brings the total to
  • $689.00
Thank god I pay wholesale :) and have lots of industrial industry friends.
 

fasteddy

I have C.L.A.P
Global moderator
Joined
Apr 26, 2010
Messages
6,648
Location
Albion Park NSW
Well looks like tube bending is out for me.

But you need to be commended for cracking it and being able to succesfully bend an arch, I look forward to seeing how they look in action.
 

mick8248

Full time elf
Joined
Feb 8, 2012
Messages
223
Location
Mildura
Arches look great Henedce, carn't wait to see em in action, you said you were going to treat the plastic for protection, what are you going to use? I have left a few (test) tubes out in the sun for a few months and they have gone a yellow colour.
 

Henedce

Apprentice elf
Joined
Dec 28, 2010
Messages
69
Location
110 Wallace st
mick8248 said:
you said you were going to treat the plastic for protection, what are you going to use?

I use this
[attachimg=1]

Here is a photo of the end result including the real dirty one from my form photo
[attachimg=2]

mick8248 said:
I have left a few (test) tubes out in the sun for a few months and they have gone a yellow colour.

Try a good cleaner as above on them the yellowing is dirt ingrained in the plastic according to the plastics experts I deal with . Should be an interesting test . Another product to try would be Dissol if it is still available.
 

Attachments

  • DSCF0871.JPG
    DSCF0871.JPG
    231.5 KB · Views: 432
  • DSCF0870.JPG
    DSCF0870.JPG
    133.8 KB · Views: 433
Top