Tips on getting power injection cables to locations around the house for strings

CarlosF

New elf
Joined
Sep 15, 2022
Messages
22
Hi Everyone,

Just getting my plans for my display together. First time running from a controller - super excited.

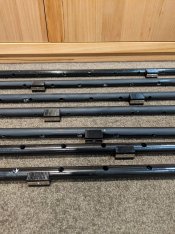
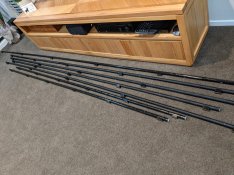
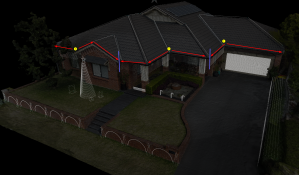
I'm running power injection to the strings around the gutters and two props on the lawn. The longest distance from my controller box in 20 meters. it's a big house! I have created a mud map to provide some direction on how I will execute this. I'm 5v bullets and I am popping them in the black flex tape. Going to use 6mm solar cable for my power injection. I'm running six strings 200pixels per string

Location description - Rendered external walls with flat colorbond gutters.

Questions

- Any tips on getting power injection cable from controller around to the furthest point in the property. I don't really want to run cable in the middle of the driveway where I will be coming in and our or the floor of the pathway to the front door.

- Any tips on mounting vertically the strips with the pixel bullets inserted that will run along the walls to frame the gutters. I was looking at inserting reo bar in the garden and inserting comms conduit on top running to the top as a "frame" and zippy tying the bullets - anyone can provide my and guidance. surely I'm not the first person to do this.

- Tips on mounting to flat gutters the bullets.

Attached house map of my ideas.

Any feedback to save me reinventing the wheel will be well received .

Cheers,
Carlos
 

Iain

Full time elf
Joined
Nov 13, 2018
Messages
242
Location
Darwin
I can’t see any attachments, but you might find it easier & cheaper to run 240V to your furthest outposts and have a 5V power supply. 6mm solar cable vs $25 for 25m Bunnings extension cable. I’m doing a similar thing as I have a front fence spanning 20+ metres and it’s 10+ metres back from the house and main box.

The downside is having live 240V around your garden 24/7, but there’s some supermarket timers in another thread that will switch it off for you.
 

Kent

Apprentice elf
Generous elf
Joined
Nov 21, 2020
Messages
71
Have a look at some clips from my display walkthrough. I'm using a combination of 4mm and 6mm solar cable I was able to obtain cheaply to run 24VDC everywhere, then drop to 5V at each smart receiver.
For new additions this year, I'm giving these DC/DC converters a go so that I can dissipate heat better (not that I ran into any issues with the boxes used in the video) : https://www.aliexpress.com/item/32794799601.html

As for mounting to the gutters, I've found magnets to work very well (at least for two years in a row so far) - see ~7mins into the video.


CarlosF

New elf
Joined
Sep 15, 2022
Messages
22
I can’t see any attachments, but you might find it easier & cheaper to run 240V to your furthest outposts and have a 5V power supply. 6mm solar cable vs $25 for 25m Bunnings extension cable. I’m doing a similar thing as I have a front fence spanning 20+ metres and it’s 10+ metres back from the house and main box.

The downside is having live 240V around your garden 24/7, but there’s some supermarket timers in another thread that will switch it off for you.
Hi Iain,

Thank you for your feedback and idea - there is merit


Thats a good idea regarding the location. Building on ur solution you can just add a wifi plug $15 (bunnings) to a weather proof box with the PS to provide smart phone functionality.

Gold standard would be to install a GPO at the furthest point to reduce the cable run. In my use case - I have an outdoor smart GPO about 10 meters in a ideal location I can run an extension cord that wont be in the way or look undesirable.

9630E9CE-6E7D-41BC-88AD-D5B186879529.jpeg
I found a rough mud map I had on hand. My controller is in the garage fat right hand side wall. All my strings sre in different colours I’m planning on running. The 20 point is in “red”
 

CarlosF

New elf
Joined
Sep 15, 2022
Messages
22
Have a look at some clips from my display walkthrough. I'm using a combination of 4mm and 6mm solar cable I was able to obtain cheaply to run 24VDC everywhere, then drop to 5V at each smart receiver.
For new additions this year, I'm giving these DC/DC converters a go so that I can dissipate heat better (not that I ran into any issues with the boxes used in the video) : https://www.aliexpress.com/item/32794799601.html

As for mounting to the gutters, I've found magnets to work very well (at least for two years in a row so far) - see ~7mins into the video.


Great feedback Ken - very insightful. I’ve just finished making a test plastic channel that I purchased at Bunnings and siliconed three magnets. Ill pop it up on the weekend see how it looks. How to the magnets fair in wind? I thought of magnets last year but didn't follow through. Additionally how in your opinion the go for tension?

Many Thanks !!
 

Kent

Apprentice elf
Generous elf
Joined
Nov 21, 2020
Messages
71
I didn't have any issues with wind. I don't recall there being much wind here last year, but there was a bit the year prior. As per the video, in the second year I was concerned if the magnets would hold as well so added the fishing line to catch the icicles in the case the magnets gave way, but they didn't. Note that in my mounting, there is no shear forces on the magnets that try to make them slide.

I don't quite understand the tension question.
 

CarlosF

New elf
Joined
Sep 15, 2022
Messages
22
Hi Ken,

Excellent detail in your video! Those small boxes next to the props really interest me. Could you share the detail in the hardware. I see you running CAT 5/6 to is. Im assuming thats running all the prop info from your main board in the garage?

Cheers
 

CarlosF

New elf
Joined
Sep 15, 2022
Messages
22
I didn't have any issues with wind. I don't recall there being much wind here last year, but there was a bit the year prior. As per the video, in the second year I was concerned if the magnets would hold as well so added the fishing line to catch the icicles in the case the magnets gave way, but they didn't. Note that in my mounting, there is no shear forces on the magnets that try to make them slide.

I don't quite understand the tension question.
I’v looked at thin conduit and its really flimsy compared to the more expensive rigid 20mm plus size. I was under the impression it would still be wobbly when trying to put the magnets and the lights on the gutters.

Did you glue or zippie tie the magnets to the conduit? How did you attach the magnets??
 

Kent

Apprentice elf
Generous elf
Joined
Nov 21, 2020
Messages
71
Note that there are many great display walkthrough videos around that give great ideas on how to get things done.

Correct on the cabling. Note that is RS485, not Ethernet. I have a single Falcon F48v4 in the garage (same as this, but with a second Ethernet port - https://pixelcontroller.com/store/pixel-controllers/81-f48v4-ns.html), with ports on that going to each of the smart receivers (https://pixelcontroller.com/store/featured/86-srx1.html). I'm running the V4 gear, but since then V5 has come out which has some nifty features like e-fuses (automatically will reset), and power monitoring.
 

Kent

Apprentice elf
Generous elf
Joined
Nov 21, 2020
Messages
71
The magnets I purchased have a countersunk hole in them. I 3D printed a bracket and used a self tapper into the conduit. There was a magnet every 80cm or so. See attached.
 

Attachments

  • PXL_20211202_132033403.jpg
    PXL_20211202_132033403.jpg
    694.8 KB · Views: 34
  • PXL_20211202_132024116.jpg
    PXL_20211202_132024116.jpg
    1.1 MB · Views: 31

CarlosF

New elf
Joined
Sep 15, 2022
Messages
22
The magnets I purchased have a countersunk hole in them. I 3D printed a bracket and used a self tapper into the conduit. There was a magnet every 80cm or so. See attached.
Great thank you this is an excellent starting point to have a great reference!
 

Iain

Full time elf
Joined
Nov 13, 2018
Messages
242
Location
Darwin
I bought some rare earth disc shaped magnets from Bunnings. I was going to silicone them to the conduit. The guy in Bunnings said Jaycar have stronger ones so I might do a strength test this weekend…
 

coops

New elf
Joined
Jul 1, 2023
Messages
12
Have a look at some clips from my display walkthrough. I'm using a combination of 4mm and 6mm solar cable I was able to obtain cheaply to run 24VDC everywhere, then drop to 5V at each smart receiver.
For new additions this year, I'm giving these DC/DC converters a go so that I can dissipate heat better (not that I ran into any issues with the boxes used in the video) : https://www.aliexpress.com/item/32794799601.html

As for mounting to the gutters, I've found magnets to work very well (at least for two years in a row so far) - see ~7mins into the video.


That's a clean setup love it!

Not to hijack the thread, would love to hear how you have wired up your icicle 5v as they're unreal.
 

Johnnyboy

Full time elf
Joined
Jan 2, 2023
Messages
155
Location
Perth
Have a look at some clips from my display walkthrough. I'm using a combination of 4mm and 6mm solar cable I was able to obtain cheaply to run 24VDC everywhere, then drop to 5V at each smart receiver.
For new additions this year, I'm giving these DC/DC converters a go so that I can dissipate heat better (not that I ran into any issues with the boxes used in the video) : https://www.aliexpress.com/item/32794799601.html

As for mounting to the gutters, I've found magnets to work very well (at least for two years in a row so far) - see ~7mins into the video.


Very clean setup!
Love the control box in the garage, nicely done
 

Kent

Apprentice elf
Generous elf
Joined
Nov 21, 2020
Messages
71
That's a clean setup love it!

Not to hijack the thread, would love to hear how you have wired up your icicle 5v as they're unreal.
See attached picture.
There is a 24V -> 5V DC/DC and smart receiver at (1), (2), (3). At each, I use two of the four ports to go in each direction heading away from the smart receiver. Power is connected at the start and end of each arrow.
Longest single run is across the front of the garage. This is 406 pixels. Greatest number of pixels on a single port is 504, starting at (2) and heading to the left.
 

Attachments

  • KR icicles.png
    KR icicles.png
    7 MB · Views: 24
Top