Window Frame running anti clockwise

Cabrinha

New elf
Joined
Jan 3, 2015
Messages
18
Location
New South Wales
Hi, Looking for some help with xLights please. I just added additional lights around my front door as a window frame model to this years display. Because of the location the wiring and the start channel 1 starts at the bottom right so the strip runs anti clockwise. How do I get the single strand effect to start from the bottom left i.e at the end of the string so the effect runs clockwise instead of anti clockwise? All my other window frame models run clockwise except this one.
 

Conrad

New elf
Joined
Nov 17, 2021
Messages
27
I will try to answer this with my limited xlights knowledge

In xlights in the layout tab click on the string and on the left hand side there will be a bunch of options. Go to starting location and which ever one is selected select the other one ie if blue is selected change it to green and vice versa.
 

Iain

Full time elf
Joined
Nov 13, 2018
Messages
242
Location
Darwin
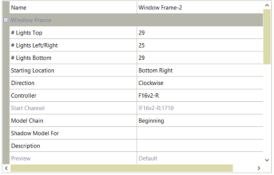
You can specify the starting location and direction of a window frame: 1701211092022.png
 

thewanderingpine

Full time elf
Joined
Mar 13, 2021
Messages
318
You might also need to look at render styles. The default one might just start at 1
#1 and go to the end. But something like per-preview should fix that.
 

merryoncherry

Senior elf
Joined
Apr 2, 2022
Messages
645
Location
Cherry St., Hudson MA USA
Yeah but the physical model doesn't get wired that way, so you shouldn't tell xLights that it is. Per preview is not a good choice, or a single strand effect will sweep left/right/whatever instead of along the string.

Unfortunately, the best solution I know of is to create a submodel, which is a bit of a PITA but will work perfectly. Go create a submodel, add all nodes in one strand, and reverse it. Then put that submodel in all your groups instead of the main model; also if you apply effects at the model/submodel level instead of the group, be sure to put them on the new submodel and not the main one.
 

Cabrinha

New elf
Joined
Jan 3, 2015
Messages
18
Location
New South Wales
You can specify the starting location and direction of a window frame: View attachment 24618
This is where I was trying to change but it doesn't make any difference to the physical output. I have starting location bottom right since that is node 1 and goes up I assume that means wiring direction, then the Direction is that where you want the effect to start?
 

Skymaster

Crazy elf
Global moderator
Generous elf
Joined
Dec 19, 2021
Messages
1,071
Location
Western Sydney
This is where I was trying to change but it doesn't make any difference to the physical output. I have starting location bottom right since that is node 1 and goes up I assume that means wiring direction, then the Direction is that where you want the effect to start?
You need this to match your wiring direction, or other weird issues will happen. Whilst it may fix one effect (single strand) it'll cause issues on pretty much every other one.
I second @merryoncherry 's advice of just reversing the nodes on a submodel and using that.
 

Iain

Full time elf
Joined
Nov 13, 2018
Messages
242
Location
Darwin
This is where I was trying to change but it doesn't make any difference to the physical output. I have starting location bottom right since that is node 1 and goes up I assume that means wiring direction, then the Direction is that where you want the effect to start?
I'm not sure if you mean the settings or the wiring, but in any case the two should match. If your first node is bottom right, then xLights should be set to bottom right. If your wiring then goes up-left-down-right, then that's anticlockwise.

After you've done this, re-render your whole sequence before viewing the lights.
 

Cabrinha

New elf
Joined
Jan 3, 2015
Messages
18
Location
New South Wales
Thanks @merryoncherry, I created the Sub-model as suggested and I think its sorted now as it looks correct outside. On the main model I left starting location at bottom right and direction set to anti clockwise since both the node layout and wiring layout look correct when set this way (I hope this is right).

My next question is do I have to open all my sequences and save them again for it take effect?
 

merryoncherry

Senior elf
Joined
Apr 2, 2022
Messages
645
Location
Cherry St., Hudson MA USA
My next question is do I have to open all my sequences and save them again for it take effect?
At a minimum, yes, you will have to re-render your sequences... if all you did was change what submodel is in your groups. This may be pressing render+save on each sequence, but there is also batch render (as a menu item, or various programmatic ways). If you make a lot of mistakes, like I do, the sooner you find your way to batch render, the sooner you make a trusted friend.

On the other hand, if you have been applying effects directly to the frame, you have to mess with the sequence a bit, since you actually put the effect on a different row. Right click the model, and cut effects. Double click the model to expand it out to see the submodels. Right click the submodel to add layers if needed, and paste model effects. (Don't select + copy + paste, as that can lose the timings.)
 
Top