Roof Pixel Attachments

PeterJ

New elf
Joined
Nov 8, 2020
Messages
8
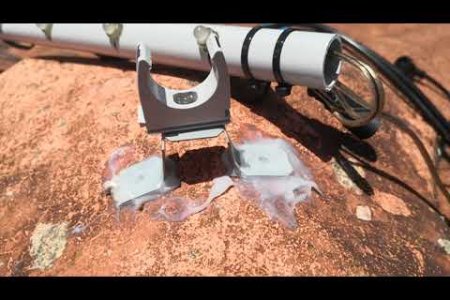
Hi all trying a couple of different securing methods for pixels on my roof.
First is cable tide to the top of a plaster corner straight down flat, but when on the steel roof it would have a the effect of becoming the same temp in 45 degree heat, the roof would be double that.
Or the second where i have cut notches and put the pixels in, less contact to the pixel.
I guess with both i could put a plastic washer between them to insulate from the extreme heat of the roof.light 1.PNGlight 2.PNGlight 3.PNG
 

Notenoughlights

400,000+ twinkly lights
Joined
Oct 16, 2016
Messages
639
Location
Christchurch, New Zealand
I have little to no issues with cable laying directly on a roof in sunlight all day long, it doesn't get as hot here but on some days it can, and the cables are just fine, You could use magnets between the roof and the plaster corner to hold it down and off the roof a little to give it a bit of an air gap to cool down
 

JCooper

New elf
Joined
Jul 1, 2019
Messages
21
Have you thought about using boscoyo chromatrim or similar ? It would still work with the rhs and a couple of zip ties. Just seems like a lot of work zip tieing every pixel.
 

EddieV

New elf
Joined
Sep 28, 2021
Messages
11
I purchased this trunking from Bunnings https://www.bunnings.com.au/deta-25-x-16mm-trunking_p4330856 I then drilled holes along its length with a 4m length of trunking taking 50 leds perfectly. I pushed the LEDs out through the holes and the plastic is the right thickness to catch on the holders. I then used magnets stuck inside the trunking to fix to the underside of my gutters which makes for very quick removal if you dont want to leave them up all year.

Any that i could not use magnets on i have used velcro which has worked well enough.
 

The Hobo

New elf
Joined
Nov 1, 2022
Messages
9
I purchased this trunking from Bunnings https://www.bunnings.com.au/deta-25-x-16mm-trunking_p4330856 I then drilled holes along its length with a 4m length of trunking taking 50 leds perfectly. I pushed the LEDs out through the holes and the plastic is the right thickness to catch on the holders. I then used magnets stuck inside the trunking to fix to the underside of my gutters which makes for very quick removal if you dont want to leave them up all year.

Any that i could not use magnets on i have used velcro which has worked well enough.
Any pics of this set up?
 

JacksonHo

New elf
Joined
Oct 17, 2022
Messages
38
I cable tied each pixel to some builders strapping and then screwed the length of the run to conduit. After this I got a few conduit half saddles and put them where the metal sheet screws were on my roof and fed the conduit through that. Seems to be holding currently in these high winds.
 

EddieV

New elf
Joined
Sep 28, 2021
Messages
11
Any pics of this set up?


As i said, i can easily fit some magnets i got from ebay inside and also run an additional power injection wire in there

I then 3d printed some straight joiners and also some corner joiners
 

Attachments

  • 20221114_224210[9283].jpg
    20221114_224210[9283].jpg
    43.4 KB · Views: 32

roy.debruin

New elf
Joined
Nov 4, 2015
Messages
22
Location
Australia
Questions if I may ask? When gluing the magnet inside the trunking …
1. Did you use the magnetic roll for the entire trunk length or in cut strips?
2. If I understand correctly, gluing the magnet inside is still strong enough to hold with the bullets installed … I’m guessing this may answer my first question above as in continuous all the way is stronger
3. What width magnetic is best, 15 or 20mm?

sorry they may seem lame questions but I’d like to get it right first time based on your experience. I do love the idea though
 

Skymaster

Crazy elf
Global moderator
Generous elf
Joined
Dec 19, 2021
Messages
1,042
Location
Western Sydney
I drilled conduit and made special brackets that are siliconed to the tile.
 

jerimiah83b

New elf
Joined
Dec 19, 2017
Messages
8
I drilled conduit and made special brackets that are siliconed to the tile.
How did you go about drilling the conduit? I'm thinking about this option for my roof in 2023.
 

Skymaster

Crazy elf
Global moderator
Generous elf
Joined
Dec 19, 2021
Messages
1,042
Location
Western Sydney
Used a drill press, a little jig I made to prevent the conduit from rotating as it was being drilled, and alot of patience.

The jig was a piece of timber with two runners spaced 25mm apart to hold the conduit tightly. Kind of like an upside down Pi letter - π
At one end, a 12mm dowel was sticking up about 40mm.

  • Spacing all marked prior.
  • First hole drilled with 12mm step bit all the way through the top and out the bottom.
  • Rotate and enlarge bottom hole to 12mm
  • Place that hole the dowel on my jig.
  • Then with a 4mm bit, drill holes through all the marked places in the conduit and through the back-side of the conduit. Trick is to ensure you're dead-top so that you are centered nicely.
  • Then with a step bit, enlarge the front to 12mm
  • Flip the conduit on the dowel, and enlarge the back to about 16mm or so, except for the very last hole, which is only to 12mm.
  • Move the jig onto the last hole, and repeat the process.
  • Once all done, go back and enlarge the back of the dowel holes to 16mm.
It took me a little bit to get into the swing of it, but once I knew what I was doing, I could knock them out pretty quick.
I just got a pretty cheap press from Total Tools. Cost me about $160 off memory.
All in all I ended up drilling about 720 pixels worth with this method.

The reason for using the 4mm bit first was to get the holes lined up. The larger (28mm) step bit was too big to reach to the bottom end of the conduit without making the hole too large in the top. And the small (12mm) step bit wouldn't get to the 12mm size until I was well through the far side, which didn't work with a timber jig. It took longer this way, but it worked fro me.

One point to note - duty cycle on the cheap press- 15 minutes running. Then leave it for half an hour or so to cool down.
 
Top