(Archive) Crimping quick-connects (spade lugs)

  • Thread starter LightEnthusiast_LOR
  • Start date
L

LightEnthusiast_LOR

Guest
Originally posted on February 7, 2009

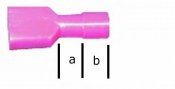
I decided I would start experimenting with the power boards, I bought some of the Bunnings red insulated quick connects. I have cut the plug and stripped back the white plastic casing for the wires and then stripped 1cm from all the wires. Is this a good amount to take off ?

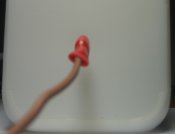
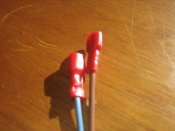
I'm starting with the active wire, I read that I should twist it around so the wires are in a spiral. When I put the wire in the connector it seems that 1cm is good the plastic starts on the wire just after the part where it is crimped

I'm talking about the connectors for the PC boards.
There is the slightest bit of wire that goes past the bit that's crimped is this ok or do I want more wire or less? Does that matter or do i just want to make sure that there is a good strong connection to the connector and the wire shouldn't come out of the insulated cover for the connector?

Cheers

LE
 
D

davidt_LOR

Guest
G'day LE,
Yes twist the wires together to make a spiral and 1cm should be fine.

Try not to have any of the bare wire exposed past the end of the insulation. I normally tin the end of the wire, with a bit of solder, so that if any strands break they won't fall and possibly short circuit anything.

Cheers,

Davidt, Ballarat
 
L

LightEnthusiast_LOR

Guest
Thanks David.

Stupid question, do I crimp only at the end to make sure the wire is secure and not going to fall out or do i work my way up crimping the whole part where the wire goes?

I'm going to try and just crimp the end of the connectors, which should hold the wires firmly in. If I have to crimp the actual 'barrel' of the connector please tell me.
 
D

Dave_LOR

Guest
Hi LE,
Looking at the picture below, I expose about 5mm of wire to go into the section marked 'A' with the shielding inserting into 'B'.
I usually crimp twice on the area marked as 'A', and another on the area marked 'B'.
[attachimg=1]
Hope it helps.

Cheers
Dave K(Windsor NSW)
www.manningchristmas.com.au
 

Attachments

  • crimp-plug.jpg
    crimp-plug.jpg
    6.8 KB · Views: 92
L

LightEnthusiast_LOR

Guest
Thanks Dave, that makes a lot more sense now.
I've been doing some tinning of the tips of the wires and Gee the plastic insulation does get hot, it takes a lot of heat on those wires for the solder to go on. A bit of the plastic insulation even melted onto the wire but that should be ok. I also have a wire that didn't fully go round when I twisted all of them around into a spiral. Will it be fine to apply a bit of solder to to make sure it doesn't break off?
I haven't ever done soldering (except on the Christmas light wires) or electrical work like this and there are a few stupid questions.

Saturday I plan to tin all the tips of the wires, attach the lugs and get everything prepared for the Feb sale. Can't wait.
Would tinning the whole wire be an option? it seems that it would make the connection a lot more secure, or is this not such a good idea?

Once again thanks everyone for the on going support.

LE
 
S

Shane_Chiddy_LOR

Guest
Hi LE
You do not need to tin (solder) the end or the length of wire, the crimp lug is designed to make a good connection without solder.

Shane Chiddy
Camden, NSW
 
L

LightEnthusiast_LOR

Guest
Easy enough ok.

Shall I still twist the wire or is it unnecessary?
 
S

Shane_Chiddy_LOR

Guest
Yes, twisting is good. It stops the wires getting all messy and not going in the lug, ensuring a good connection.
 
L

LightEnthusiast_LOR

Guest
Picked up all my supplies and tried crimping the first one. Didn't feel right, the end of the spade lug crimped fine but when I tried to crimp the middle it required a bigger squeeze it also looks misshaped. Feels secure but I'm not completely sure.

Oh and can i confirm that the: INSUL FEMALE BLAEDS 2.5-3mm are the right ones for this job?
 

Attachments

  • IMG_2208.JPG
    IMG_2208.JPG
    24.7 KB · Views: 9
D

Dave_LOR

Guest
Hi LE,
Referring back to my pic earlier, the 'A' section is the metal section of the crimp which is the critical join, and should be much harder to squeeze then the 'B' section, which is just insulation.
As long as all the bare wire goes into the inner diameter of the 'A' section and isn't flopping around, it is the right size.

Cheers
Dave K (Windsor NSW)
www.manningchristmas.com.au
 
L

LightEnthusiast_LOR

Guest
9 powerboards done and they are a lot better the lug is nice and flat now and I'm going to scrap the first one.

One thing I didn't get at Bunnings are the rings for the earth wires. I'm not sure of how big the earth stud is in the CTB16PC's plastic box. Looking at the manual it only looks a few millimetres in length so I will go and get the smallest one.

Is there anything else that can be done to ensure the connection safety or is it just the task of making sure its all secure by crimping it again?
 
D

davidt_LOR

Guest
G'day LE,
Glad to see you are making progress.

Once they are crimped properly you shouldn't need to touch them again.

The only other thing to ensure is that any tension on the power leads isn't transferred through to the crimped lug. I normally use a couple of cable ties around all of the cables, on the inside of the box just as the wires pass through the entry gland, to act as a strain relief.

Cheers,

Davidt, Ballarat
 
L

LightEnthusiast_LOR

Guest
Hi David
I thought that the PC enclosures had strain relief brackets, or was I wrong?

LE
 
D

davidt_LOR

Guest
G'day LE,
Sorry I didn't realise you were using the PC enclosure. Yes they do and that will be fine.

Cheers,

Davidt
 
L

LightEnthusiast_LOR

Guest
My progress report:
29/32 Power boards have spade lugs on them. none of them have the grounding wring yet. Need to buy 14 more spade lugs and 68 grounding wrings. Also forget to get some extension cords for the inputs. One thing I would have done differently was the amount I twisted the wires before crimping them. I was holding them in the middle and twisting them a bit so lots of the time the wires were coming out of the twist a bit inside the spade lug. I just discovered then by holding them at the top and giving them 2-3 firm twist they are much tighter and the twist will remain.

Apart from that I am very happy with it all.

I hope to have it all done by Saturday ( Not going to have much time next week) then the wait to the February sale. I just hope that the stock levels will be high and i get in on time!

Cheers

LE
 

Attachments

  • IMG_2211.JPG
    IMG_2211.JPG
    54.3 KB · Views: 11
Top