First attempt at leaping arches

Dreamin

Full time elf
Joined
Dec 28, 2016
Messages
382
Location
Sunshine Coast
Hi Everyone.

I bought a house load of lights and the previous owner had some window frames with strips that I can't use. I have no windows visible from the road. I thought I would convert them to leaping arches. I looked at all the materials people are using, and can't find air seeder hose anywhere for sub $300 delivered! :( So off to Bunnings I went.

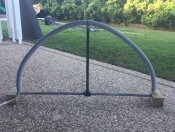
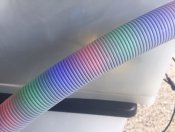
I couldn't find PEX in white, and had no way of getting 4m of conduit home in my car! So I stumbled across this grey water drainage hose. It ribbed, but think material and flexible but only $40 so I thought I would give it ago. I'm using the old window frame (electrical duct) as the brace. Just set up a test, with a few blocks of wood either end, and ran the strip through, it's 1m wide, about 1.6 on the arch, and has about 46 lights. The hose bent a bit too much, so I created a 3D printed part to hold it up in the centre, which worked well and you won't see it at night during a display. I can mount another small 3D printed star or similar in the middle so it has a dual purpose. The shape isn't perfect, but I think the hose is maybe slightly short and pulls in a bit.

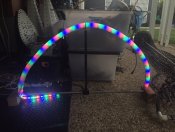
Just thought I would share and see what peoples thoughts were on it. :) Personally I'm happy, they look like little balls inside, and it has a muted effect, but still quite bright. I'm yet to work out how to configure it on my F16v3, Falcon Player and Xlights though! Every time I try to add something new it breaks something else!
 

Attachments

  • IMG_5466.JPG
    IMG_5466.JPG
    173.6 KB · Views: 82
  • IMG_5467.JPG
    IMG_5467.JPG
    86.1 KB · Views: 89
  • IMG_5468.JPG
    IMG_5468.JPG
    114 KB · Views: 82

scamper

Dedicated elf
Joined
Jan 5, 2014
Messages
1,225
Location
collie
Nothing like a bit of Aussie ingenuity to get things done.
I kind of like the look, Maybe try a bit of 5mm steel rod and bend it in an arch and thread it through to give it a more uniform shape.
keep working on your config, By making mistakes you learn. There are heaps of videos in the media section here that can teach you just about anything.
If you have any specific questions, just ask
 

Andrew Lee

New elf
Joined
Dec 3, 2019
Messages
42
Location
New Norfolk.
Good ONYA mate,
Looks great, that seeder hose is a bit exie & I was wondering what else is there.
If ya were to stick it to some ally strip, maybe it could hold the shape & add a bit of rigidity, :unsure: :oops:
 

Dreamin

Full time elf
Joined
Dec 28, 2016
Messages
382
Location
Sunshine Coast
I might give a bit of ally strip a go. Another trip to Bunnings... I should just move in! :p
The strip has to be at the bottom of the hose to give the effect, I tried another poly hose inside with the strip zip tied to it, but the poly hose reduced the light glow effect.
I'll report back and I'll be happy to share the stl files for the parts I've printed once I'm happy with it.
 

Adsy

Full time elf
Joined
Aug 10, 2018
Messages
203
Location
Sheidow Park SA
I have been down a similar path myself and believe it was just too flexible. In my case it was pool hose from you guessed it ? , so I cabled tied it to my Gabion walls to create other props
 

Attachments

  • image.jpeg
    image.jpeg
    66.1 KB · Views: 54
  • image.jpeg
    image.jpeg
    2.6 MB · Views: 55

bob_da_robot

New elf
Joined
Dec 10, 2019
Messages
8
Well done dreamin. I was going to use the seeder hose but its just to expensive at this point so ive put it on the to do later pile.
 

Dreamin

Full time elf
Joined
Dec 28, 2016
Messages
382
Location
Sunshine Coast
I have been down a similar path myself and believe it was just too flexible. In my case it was pool hose from you guessed it ? , so I cabled tied it to my Gabion walls to create other props

They look great, might be another option if I get stuck. I'm happy to play around with it and do something different. :)
 

Dreamin

Full time elf
Joined
Dec 28, 2016
Messages
382
Location
Sunshine Coast
Good ONYA mate,
Looks great, that seeder hose is a bit exie & I was wondering what else is there.
If ya were to stick it to some ally strip, maybe it could hold the shape & add a bit of rigidity, :unsure: :oops:

Sat down the other light and scratch build a part for the arch to hold the ally strip (10mmx3m from Bunnings, cut in half) and the tube and provide an outlet for the pigtail. I also wanted to use the 20mm duct I had form the dismantled frames for the legs and centre brace. First test print and it worked! I’m so chuffed with the results. The ally makes it have a lovely curve, and the hose gives a great muted effect.524006F0-1DC5-49CC-8C40-FB71F0B80874.jpeg
All done. Centre and legs secured by a screw. Ally has a slot to hold it and a screw. Light secured with zip ties and secured to set with a zip tie too, cover slides over and then do the other end. Because it’s flexible it can be pushed back slightly to allow fitting. It has 42 lights on the strip.
FDBDD7A4-00F7-43EA-BD14-0F4BDC485EB7.jpeg
30%
90B65BF3-5255-46C4-8E0F-CEEC54834E06.jpeg
100%
7701E0BF-5E4D-4354-AFED-D70753E738DE.jpeg
Inside these is a trade off on that you have a dark strip but it’s facing down so will never been seen.

Total cost I would say about about $25 per frame for materials and 3D printed parts at cost (not including lights). They are 1m wide and the light part around 1.5m. I’m making 4 more now.

If anyone is interested I can post up the STLs and my shopping list and maybe even a little instruction list.
 

Dreamin

Full time elf
Joined
Dec 28, 2016
Messages
382
Location
Sunshine Coast
STLs for the arches as requested.

Materials all from Bunnings so easy to get all over Australia. You need some 10mm x 3m aluminum strips. I built these with 1.5m so I get 4 our of 2 strips. Usually around near the screws and wood area of Bunnings.
Hose, the hose I used is Holman grey water 34mm 10m hose. It's was less than $40 so about $8 an arch. Get it from the garden hose area.
20mm conduit from the electrical department. $7 or something for 4m. I had left over stuff from window frames so recycled it. :)
Various screws and zip ties to hold the lights to the ally strip, and a well a 3D printer or a mate with one helps. Note if your strip doesn't have the silicone cover you'll need to isolate the ally strip with tape or similar. I left the conduit parts lose at 20.5mm holes and use a screw to secure.
I could supply these 3D printed parts if required, would just charge for materials and my time. Message if your interested and don't have the abiltiy to print them.

Test parts were in PLA, and now my design is finalised, it's printing in 3DFillies PETG 0.2 layer height, 20% infil, at least 2 walls, 5 top bottom, no supports, no brim. If your new to PETG printing I spray with windex on my print bed or it's a pain to remove and can damage the print bed surface.

STLs are downloadable from dropbox. https://www.dropbox.com/sh/kor2hu7e19utjvo/AAAVXNxkr9s_UEwGaPnN4LDYa?dl=0
There is a Arch base end V2 20mm conduit STL for the ends (you need two of these), and i've also provided the arch support base which you can screw in anywhere and have a verticle part attached to the bottom rails (optional). Great for adding a star or snow flake in the arch. If you want to attach it to a bit of wood instead, let me know I have another design ready to go that can have this method. There is a cap for the end of the 20mm pipe to steady the legs (you'll need 4 as yet design is untested for this part only).

Happy Printing. Michael aka Dreamin
 
Top