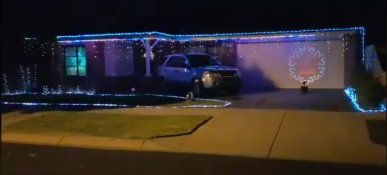
Garage Matrix Builds

Gotcha. Makes perfect sense.
With some hindsight into that design, I would do the strips vertically - might alleviate such issues :)

Having seen someone up the road do a matrix from 12V strip (as in LED strip, 3 LEDs per pixel), I think your design there is pretty decent in comparison. If mounted on something like the fences talked about above, it might be more reasonable.
Yes vertically would be the go and I may do that going forward i was purely thinking of not cutting up any strands and having all my connections at the ends
 
Yes vertically would be the go and I may do that going forward i was purely thinking of not cutting up any strands and having all my connections at the ends

So for someone planning a matrix down the line, you would recommend vertical for appearance over horizontal for longer string without cutting?
 
So for someone planning a matrix down the line, you would recommend vertical for appearance over horizontal for longer string without cutting?
Vertical would allow better tension i believe ,and really you can overlap strings on to neighbouring strands meaning the only pitfall is potentially longer power injection runs. Honestly there are so many variables with this sort of build, appearance means zero at night time and there really isnt a standard as such (ala air seeder hose)
FYI I used 5V for this but you could do 12v if you can get your hands on some server power supplies
 
E8189ACD-FBF7-4327-B54C-DE9A7B12C762.jpeg9E1FB7B1-24F4-460E-8BEB-EF29C37F4C2D.jpegC4D3AF60-B18C-4E80-A4D0-C008C55142EF.jpeg5981B5C4-B658-4887-B46B-43F7C6BDDBDC.jpeg2BE9F94D-015C-4A2C-B824-1E404B436D8E.jpeg
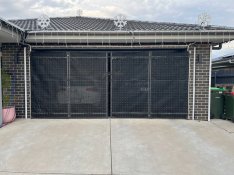
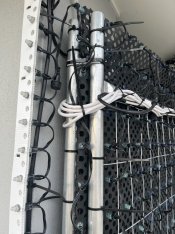
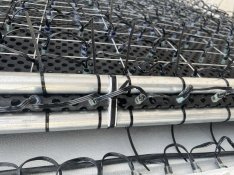
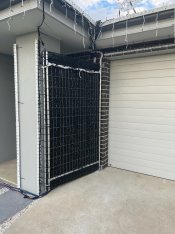
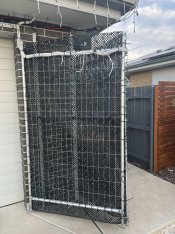
I built mine this year and got the design for mine from https://auschristmaslighting.com/members/30249/ but decided to go with the half panels clipped together using conduit clips (links below) as it was easier for folding away for storage in my shed and also less obtrusive during the day as I am able to fold them closed after each night and clip them to the walls. I used a strap to tighten the two sides together as without it the joins wouldn’t fully straighten out. I found that a node fit in nicely in between the joins between each panel with the spacing I had. You can get the clamps for these panels but I found they didn’t work for my needs as I wanted to be able to fold them after each show so used the conduit clips instead and used zip ties so they wouldn’t unclip. I need to clean it up a bit for next year as the two sides don’t quite line up but otherwise it has worked really well for me this year with no issues.
 
I built mine this year and got the design for mine from https://auschristmaslighting.com/members/30249/ but decided to go with the half panels clipped together using conduit clips (links below) as it was easier for folding away for storage in my shed and also less obtrusive during the day as I am able to fold them closed after each night and clip them to the walls. I used a strap to tighten the two sides together as without it the joins wouldn’t fully straighten out. I found that a node fit in nicely in between the joins between each panel with the spacing I had. You can get the clamps for these panels but I found they didn’t work for my needs as I wanted to be able to fold them after each show so used the conduit clips instead and used zip ties so they wouldn’t unclip. I need to clean it up a bit for next year as the two sides don’t quite line up but otherwise it has worked really well for me this year with no issues.
This seems like a very simple and convenient way of achieving a matrix in a working garage, but I'm not too keen on drilling into my rendered walls.
Is the spacing 3 inches?? do you have a video of the matrix in action??
 
View attachment 21957View attachment 21958View attachment 21959View attachment 21960View attachment 21961
I built mine this year and got the design for mine from https://auschristmaslighting.com/members/30249/ but decided to go with the half panels clipped together using conduit clips (links below) as it was easier for folding away for storage in my shed and also less obtrusive during the day as I am able to fold them closed after each night and clip them to the walls. I used a strap to tighten the two sides together as without it the joins wouldn’t fully straighten out. I found that a node fit in nicely in between the joins between each panel with the spacing I had. You can get the clamps for these panels but I found they didn’t work for my needs as I wanted to be able to fold them after each show so used the conduit clips instead and used zip ties so they wouldn’t unclip. I need to clean it up a bit for next year as the two sides don’t quite line up but otherwise it has worked really well for me this year with no issues.
Looks fantastic, im no where near this level yet but its a future endeavour.
Is the white cables power injection? i was trying to see if you chained the strings to save on cables and the amount of power injections required.

What I am more interested in is your roof lines, how did you mount your roof line to concrete tiles? I have the same Concrete rendered bridge and i could get a diamond drill head, but looking for any other alternatives to mounting other than drilling... wasnt sure silicon or other things would cut it.
 
wasnt sure silicon or other things would cut it.
On my place, I've made these brackets sort of top-hat shaped - which sit on the ridge capping. They are just the make-a-bracket stuff, 5 segments, bent with pliers. These have been siliconed in place. Then on each top-hat is a conduit clip, which the drilled-and-pushed 25mm conduit is clicked into. Had no issues with any of it moving. One clip every metre or so.
The plan is to unclip the conduit and leave the brackets up permanently.
If by chance you happen to have a pic, now or in the near future would love to see it.
 
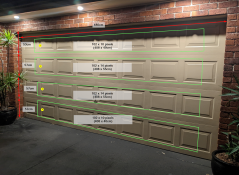
In my case, I'm looking to cover a segmented panel lift door as per the following photo.
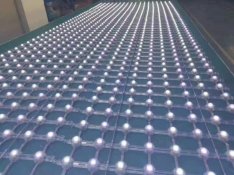
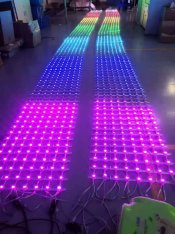
When initially investigating this last year, I was looking to buy 4x custom made mesh and attach it to the door using magnets, allowing normal use of the door.
I sized it up such that it'd look like one continuous matrix when the door was closed. The killer was the price, coming in at ~$0.60 USD per pixel excluding shipping.

I also didn't have a reference for what resolution I'd like, so mocked up some images at 50mm, 40mm, 30mm spacing. I think I'm going to target 40mm spacing.

2022-01-19 23_52_25-Edit photo - Google Photos p40.pnggarage matrix options.png7.jpg20mm-led-768x1024.jpg
 
This seems like a very simple and convenient way of achieving a matrix in a working garage, but I'm not too keen on drilling into my rendered walls.
Is the spacing 3 inches?? do you have a video of the matrix in action??
Yep I used three inch spacing. I wasn’t looking to do videos or images on the matrix, just effects. Sometime down the track I might increase to 2 inch spacing but for now I’m happy with it. I’ve got a little medley of the display here
View: https://youtu.be/wrO-sp0mDSc
 
Last edited:
Looks fantastic, im no where near this level yet but its a future endeavour.
Is the white cables power injection? i was trying to see if you chained the strings to save on cables and the amount of power injections required.

What I am more interested in is your roof lines, how did you mount your roof line to concrete tiles? I have the same Concrete rendered bridge and i could get a diamond drill head, but looking for any other alternatives to mounting other than drilling... wasnt sure silicon or other things would cut it.
The white cables are data and power, I have 8 runs of 112 pixels on each side running to differential receivers, 4 receivers in total. It is only 3 inch spacing so no need for power injection. I have a video with the matrix here
View: https://youtu.be/wrO-sp0mDSc


With the roof lines, I used zip tie mounts siliconed to to the ridges. You have to peel the backing off the mounts first though to make them stick (a heat gun makes quick work of it). Been going three years now and has been working fine. Each year I have to replace a few as they come off but it’s not a big issue. Could use a more permanent solution like liquid nails but I like the idea of being able to take them off down the track.
 
When I get on the roof to take the lines down, I'll get some snaps of how it's all set up. Might have a spare bracket lying around and if so I'll take photos sooner :)
Appreciate it, thats my January job now to install the roofline pixels ready for next year. I just have the fascia done at the moment as a perm install. Came up nice considering i had 2 days before xmas to do it. Thank you department of education for making us work right through to before xmas.... no spare time to shop let alone setup xmas lights.
 

Attachments

  • xmas lights.jpg
    xmas lights.jpg
    190.5 KB · Views: 19
Back
Top