
Mike
CLAP infected!
I thought I would write a how to on Standard arches seeing as there are none on the site. It covers the basic Arch wrapped in standard LED string lights. These have an overall length of about 2.8-2.9m and a diameter (spread) of around 1.6m from memory. This lets me have 10 controllable sections on each arch. As a general rule most people like a minimum of 8 sections on each arch. This makes the “jump” nice and smooth.
This is not the hidden wiring method some do. Reason being is I like to see what condition the wires are in and it also makes it easier to replace a section if needed.
Note: this how to is written using the BigW lights but can be adapted for any strings you would like, but section lengths may vary. Also if you use a thicker pipe your section length will vary as well. See this link on modifying BigW LEDshttp://auschristmaslighting.com/forums/index.php/topic,362.0.html
You will need:
Strings of lights (400 BigW LED strings are used in these arches)
½” Electrical conduit , normally comes in a 4.2m length
Cable ties
Conduit cutter (or hacksaw) can be bought at Bunnings for about $15 and leaves a nice clean cut. Also good for cutting ropelight to length.

A wire stripper
Soldering Iron
Extra wire for the extensions (18AWG speaker wire works well)
Marker pens and Tape measure
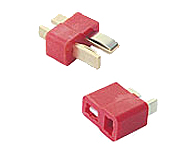
Connectors ( I use the Deans style plugs , but use what you like)
We also get discount on these with Hobby Unicorn. See http://auschristmaslighting.com/forums/index.php/topic,548.0.html
Heat shrink
I start off by unravelling the lights and cut them into 40 LED sections (roughly 4m) you should get 5 sections out of a pack of 200 lights. Then I put them all in an empty box just to keep them in a kind of neat tidy manner.
Next is to set up something to work off. I use the outdoor chairs, but you could use anything you can rest the pipe on.

What I like to do is give myself some extra space from the floor to avoid condensation etc and keep the lights off the floor. I measure 100mm from the end of the pipe and mark it. This is where the first section will begin. You can use a different measurement here if you like. I also start at the non flared end so I can use the off cuts for something else.

Take your first set of lights and cable tie them fairly tight to the pipe on the mark you have just made. Make sure you leave enough of a tail so you can strip the wires and connect them to the extensions. Generally I cable tie just before the first LED. I do like to put the resistor as the first connecting LED but it does not really matter if you do it the other way round.

To start wrapping all you need to do is wind, wind, wind, wind. Make sure you are getting a good even wrap that is firm, not real tight or you make break wires or solder joints. Keep laying it next to each other, there should be no real big gaps that you can see the pipe through. The section of 40 LEDs come in at about 260mm each give or take a cm each way depending on how tight the wrap is. The trick is to keep this length fairly consistent. Rest the pipe on the chairs or bench that you have set up. This will get tedious and the pipe will get heavy and start to sag. I Like to take the off cut of pipe from a previous arch and push the flared end on to the start of the pipe I am wrapping. This enables me to rest that on another chair to support it a bit more.
Once you get to the end of the first section, cable tie just after the last LED so it does not unravel. Then it’s time to start the next section. Start the same as the first and try to keep the tail of the lights in line with the first section. This makes it easier and neater when connecting the extensions.

Repeat the above steps until you reach the desired number of sections. In this case its 10.

Once you have a completely wrapped pipe cut to length with the cutter 100mm (use a different spacing if you like). Measure the complete length and keep this the same throughout the arches or they will end up different sizes. You can use the off cut as a template for further cutting so you have a quick way to measure it.
Continued next post........
This is not the hidden wiring method some do. Reason being is I like to see what condition the wires are in and it also makes it easier to replace a section if needed.
Note: this how to is written using the BigW lights but can be adapted for any strings you would like, but section lengths may vary. Also if you use a thicker pipe your section length will vary as well. See this link on modifying BigW LEDshttp://auschristmaslighting.com/forums/index.php/topic,362.0.html
You will need:
Strings of lights (400 BigW LED strings are used in these arches)
½” Electrical conduit , normally comes in a 4.2m length
Cable ties
Conduit cutter (or hacksaw) can be bought at Bunnings for about $15 and leaves a nice clean cut. Also good for cutting ropelight to length.
A wire stripper
Soldering Iron
Extra wire for the extensions (18AWG speaker wire works well)
Marker pens and Tape measure
Connectors ( I use the Deans style plugs , but use what you like)
We also get discount on these with Hobby Unicorn. See http://auschristmaslighting.com/forums/index.php/topic,548.0.html
Heat shrink
I start off by unravelling the lights and cut them into 40 LED sections (roughly 4m) you should get 5 sections out of a pack of 200 lights. Then I put them all in an empty box just to keep them in a kind of neat tidy manner.
Next is to set up something to work off. I use the outdoor chairs, but you could use anything you can rest the pipe on.
What I like to do is give myself some extra space from the floor to avoid condensation etc and keep the lights off the floor. I measure 100mm from the end of the pipe and mark it. This is where the first section will begin. You can use a different measurement here if you like. I also start at the non flared end so I can use the off cuts for something else.
Take your first set of lights and cable tie them fairly tight to the pipe on the mark you have just made. Make sure you leave enough of a tail so you can strip the wires and connect them to the extensions. Generally I cable tie just before the first LED. I do like to put the resistor as the first connecting LED but it does not really matter if you do it the other way round.
To start wrapping all you need to do is wind, wind, wind, wind. Make sure you are getting a good even wrap that is firm, not real tight or you make break wires or solder joints. Keep laying it next to each other, there should be no real big gaps that you can see the pipe through. The section of 40 LEDs come in at about 260mm each give or take a cm each way depending on how tight the wrap is. The trick is to keep this length fairly consistent. Rest the pipe on the chairs or bench that you have set up. This will get tedious and the pipe will get heavy and start to sag. I Like to take the off cut of pipe from a previous arch and push the flared end on to the start of the pipe I am wrapping. This enables me to rest that on another chair to support it a bit more.
Once you get to the end of the first section, cable tie just after the last LED so it does not unravel. Then it’s time to start the next section. Start the same as the first and try to keep the tail of the lights in line with the first section. This makes it easier and neater when connecting the extensions.
Repeat the above steps until you reach the desired number of sections. In this case its 10.
Once you have a completely wrapped pipe cut to length with the cutter 100mm (use a different spacing if you like). Measure the complete length and keep this the same throughout the arches or they will end up different sizes. You can use the off cut as a template for further cutting so you have a quick way to measure it.
Continued next post........


")