Hang on that's 699 lol. Thought it said 599.This is one option for "plug & play" as it is the controller and power supply already built in 1 unit. You pay for this convenience though.
You still need to add lights, cabling and other show control items, plus the props themselves that you'd attach lights to.
If you want to have control over pixel lighting (control every colour of every light) then there really aren't many pre-packaged options. This hobby is very much built around the DIY solution.
Off the shelf Christmas lighting is already catered for via the lights of Kmart, Big W, Bunnings and specialty Christmas decorating shops (which again you'll pay dearly for in the latter case)
Navigation
Install the app
How to install the app on iOS
Follow along with the video below to see how to install our site as a web app on your home screen.
Note: This feature may not be available in some browsers.
More options
-
2026 Mini Christmas Light Expos - RSVP Now
Melbourne Mini: 4 July | Sydney Mini: 4-5 July | Brisbane Mini: 26 July -

You are using an out of date browser. It may not display this or other websites correctly.
You should upgrade or use an alternative browser.
You should upgrade or use an alternative browser.
Is there a "Begginers Basic Light Kit"?
- Thread starter Joshaaye
- Start date
Not many run on 100% I have same controller and prefer 10% but the recommended is 30 and can run 300 per port.Just started this year too. Went with that exact controller and have some pointers to consider:
-yes it is ready made to withstand qld elements; but
- it locks you into using 1 type of pixel across all 16/32 outputs (ws2811 etc);
- it limits you to 170 pixels per output compared to thousands on the hansen he123 or falcon 16/48;
- it comes pre-installed with 4amp fuses so can't run 170 pixels on an output at full 100% white out of the box; and
- while the 4th line on each output (clock line) can be reconfigured to be an additional data line expanding to 32 * 170 pixels, the power is again a limiting factor if you aren't DIY capable.
You really are paying for convenience, so as long as you are aware and accept its limitations, its a good entry level controller.
You will generally pay a premium for ready to run that could limit your creativity (and add cost) in later years. If I started over I would have bought the Hansen he123 mk2 with a beaglebone green and housed the controller myself. Not a knock on the quality of Advatek's pixlite, just more comfortable building my own now.
What pigtails come with it? Is it xconnect or rays?Just started this year too. Went with that exact controller and have some pointers to consider:
-yes it is ready made to withstand qld elements; but
- it locks you into using 1 type of pixel across all 16/32 outputs (ws2811 etc);
- it limits you to 170 pixels per output compared to thousands on the hansen he123 or falcon 16/48;
- it comes pre-installed with 4amp fuses so can't run 170 pixels on an output at full 100% white out of the box; and
- while the 4th line on each output (clock line) can be reconfigured to be an additional data line expanding to 32 * 170 pixels, the power is again a limiting factor if you aren't DIY capable.
You really are paying for convenience, so as long as you are aware and accept its limitations, its a good entry level controller.
You will generally pay a premium for ready to run that could limit your creativity (and add cost) in later years. If I started over I would have bought the Hansen he123 mk2 with a beaglebone green and housed the controller myself. Not a knock on the quality of Advatek's pixlite, just more comfortable building my own now.
On the Pixlite P&P the 16 outputs are proprietary 4 core male glands on the side of the box. Would need to source the matching pigtails/connectors from Advatek or their manufacturer/importer. https://www.advateklights.com/female-pigtails
Teej710
New elf
- Joined
- Dec 25, 2020
- Messages
- 4
Hi,
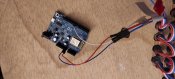
I'm very new to this too and I was looking for a similar basic setup, so I could try using addressable pixel light strings, controller software etc. etc. I put the following basic kit together very cheaply, using Amazon & Ebay.
wemos D1 R1 ESP8266 board 5 GBP
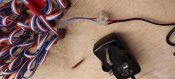
12v 2 amp CCTV power supply 7 GBP
WS2811 50 LED pixel string 17 GBP
I visited the ESPixelstick website GitHub - forkineye/ESPixelStick: Firmware for the ESPixelStick and downloaded the ESPixelstick v3.2 firmware zip file.
Unzipped it into a folder. Plugged the wemos D1 R1 into my laptop, which created a COM Port, then ran the ESPSFlashTool.jar program, in the ESPixelStick folder. Added my network SSID & password, a hostname for my wemos D1 to use, then left everything else as default (see screenshot1). Pressed Upload to program the wemos DI with the ESPixelstick firmware.
I then connected to the new wemos D1 pixel controller website via the hostname i gave it or the IP address associated to it (see screenshot2), using a web browser, to check it works.
I disconnected the wemos D1 from my laptop and attached it to the pixel string via the 3 pin connector,. +ve (pstring) to Vin Pin (wemos), data (pstring) to TX1/GPIO2 pin (wemos) and -ve (pstring) to Gnd pin (wemos). Finally, I connected the 12v +ve & -ve power supply to the separate power tails on the pixel string.
The 12v power supply powered both the ws2811 pixel string and the wemos D! ESPixelString controller. Then using the effects tab on the controller webpage (see screenshot3) , I then tested the whole basic display.
Finally, I downloaded the latest xlights software and defined the wemos controller in it (see screenshot4). I've used this simply setup to build several different test props/models, as well as face mouth movement sequences in xlights.
Since this initial setup, I've connected and controlled a second ws2811 12v 50pcs pixel string (channels 151-300), directly to first string (channels 1-150), using the setup described above. All working perfectly
A basic kit for less than 30 GBP.
Hope this helps. Teej


I'm very new to this too and I was looking for a similar basic setup, so I could try using addressable pixel light strings, controller software etc. etc. I put the following basic kit together very cheaply, using Amazon & Ebay.
wemos D1 R1 ESP8266 board 5 GBP
12v 2 amp CCTV power supply 7 GBP
WS2811 50 LED pixel string 17 GBP
I visited the ESPixelstick website GitHub - forkineye/ESPixelStick: Firmware for the ESPixelStick and downloaded the ESPixelstick v3.2 firmware zip file.
Unzipped it into a folder. Plugged the wemos D1 R1 into my laptop, which created a COM Port, then ran the ESPSFlashTool.jar program, in the ESPixelStick folder. Added my network SSID & password, a hostname for my wemos D1 to use, then left everything else as default (see screenshot1). Pressed Upload to program the wemos DI with the ESPixelstick firmware.
I then connected to the new wemos D1 pixel controller website via the hostname i gave it or the IP address associated to it (see screenshot2), using a web browser, to check it works.
I disconnected the wemos D1 from my laptop and attached it to the pixel string via the 3 pin connector,. +ve (pstring) to Vin Pin (wemos), data (pstring) to TX1/GPIO2 pin (wemos) and -ve (pstring) to Gnd pin (wemos). Finally, I connected the 12v +ve & -ve power supply to the separate power tails on the pixel string.
The 12v power supply powered both the ws2811 pixel string and the wemos D! ESPixelString controller. Then using the effects tab on the controller webpage (see screenshot3) , I then tested the whole basic display.
Finally, I downloaded the latest xlights software and defined the wemos controller in it (see screenshot4). I've used this simply setup to build several different test props/models, as well as face mouth movement sequences in xlights.
Since this initial setup, I've connected and controlled a second ws2811 12v 50pcs pixel string (channels 151-300), directly to first string (channels 1-150), using the setup described above. All working perfectly
A basic kit for less than 30 GBP.
Hope this helps. Teej
Attachments
Last edited:
Sebastien6221
New elf
- Joined
- Dec 31, 2020
- Messages
- 6
I'm thinking about the falcon f16v3 ready to run. Once I'm comfortable with the programming and everything, then I may try building my own setups. I'm just hoping for not much power injection as each output is 1024 pixels.