Chad
New elf
As part of my first display I was looking for a small, easy, and cheap way to fill a particular space.
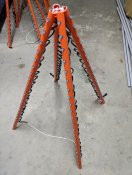
I decided on four pyramid trees, which I wanted to share some build details for any new to the hobby and looking for ideas.
It has 84 nodes per tree, so when two are put together it maximises a single universe.
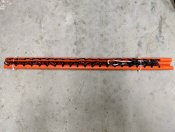
Cut 1 x 4m long, 20mm rigid conduit into four equal lengths. I went with the rigid conduit (rather than medium, grey) so there is less chance of deformation (sagging) in the summer heat, and I thought orange would look nicer during the day.
Drill holes spaced as desired. Note, I didn't put the top node too close to the end so I could zip-tie, and a larger space at the bottom node for a little clearance from the ground.

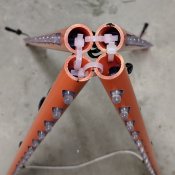
Put some smaller holes at the top so you can zip-tie them together.
Note the orientation of the nodes. These trees would not be seen from directly behind, so I orientated them facing forwards and outwards. This gave me 180 degree viewing.
For storage, these won't quite fold up due to the back leg node wiring facing each other. I may need to cut that back zip-tie to do this, but no big deal.
The input is on the back-left leg and output on the back-right. This makes connecting multiple trees together easy.

And here's the result.
For next year, I'm considering a small 20-node star on top, but I'm not yet sure if that will detract from the clean geometric shape. Thoughts?

I decided on four pyramid trees, which I wanted to share some build details for any new to the hobby and looking for ideas.
It has 84 nodes per tree, so when two are put together it maximises a single universe.
Cut 1 x 4m long, 20mm rigid conduit into four equal lengths. I went with the rigid conduit (rather than medium, grey) so there is less chance of deformation (sagging) in the summer heat, and I thought orange would look nicer during the day.
Drill holes spaced as desired. Note, I didn't put the top node too close to the end so I could zip-tie, and a larger space at the bottom node for a little clearance from the ground.

Put some smaller holes at the top so you can zip-tie them together.
Note the orientation of the nodes. These trees would not be seen from directly behind, so I orientated them facing forwards and outwards. This gave me 180 degree viewing.
For storage, these won't quite fold up due to the back leg node wiring facing each other. I may need to cut that back zip-tie to do this, but no big deal.
The input is on the back-left leg and output on the back-right. This makes connecting multiple trees together easy.

And here's the result.
For next year, I'm considering a small 20-node star on top, but I'm not yet sure if that will detract from the clean geometric shape. Thoughts?


