My P10 panels

gerry said:
Now that I have this working , I was wondering how to connect the 8 panels to 2 ports of the Octo ie 4 and 4 .

It turned out to be quite simple .

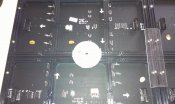
For the 4 * 4 matrix layout (in portrait mode) , I had the bottom two with the vertical arrows (on the back of the panel) pointed upwards and for the top two , I had the panels 'upside down' ie with the vertical arrows (on the back of the panel) pointed downwards . The BBB config then needs to reflect the orientation.

Connected this to Port 1 of the Octoscroller
Repeated the same for Port 2 for the next set of 4 panels.

I will post a picture of the panel layout and BBB config setup this evening and update when I have all panels together.
 
great to follow your progress on this Gerry. as i will have some panels coming in the next few months
 
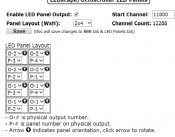
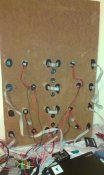
Attached are a few picture of my setup and Falcon Player BBB config.

I currently have 8 panels and have connected 4 panels in series to each output if the octoscroller.
(As Phil, said there are simpler configurations where each row is connected to one output).

I made a board out of plywood. If I had to do it again , I would try and use a 'see through' plastic as it is easier to mark where the holes should be , but I had the plywood in my garage.
I made a template out of paper on one panel with holes for the ribbons and cables. Marked 8 sets of them on the board and drilled holes using a holesaw. Note that for my config, each 2nd row row of panels is upside down.

I then spray painted the front of the board black.

When I went to mount the panels , I found that the some of the holes were slightly off. So of to Bunnings to get a jigsaw and I extended the holes. I drilled holes for 3mm screws , and screwed the screws via the back into the panels
Not being very good at it , it took me a while to align them - hence the plastic would have been much quicker.

The FP BBB config is always done as if looking at the panels from the front. So looking at the panels from the front, I have Output one from the BBB coming into the bottom right to P1. it them moves to the left , then up and back to the right.
Similarly for the next 4 , where output 2 comes in from the right to row 3.

The lowest row has the vertical arrow of the panels (back) pointed upwards. The second lowest is upside down and so has the arrows pointed downwards.
Similarly , row 3 from the bottom has the arrows pointed up and row 4 from the bottom has them pointed down.

I am using xLights to sequence and this is defined as a horizontal matrix of 64 * 64 pixels , starting from the top left most corner. This is irrespective of the physical setup which is handled in the Falcon player.

So far am just chucking effects on to see what they look like on the matrix.

I may add another two rows of panels on the top of what I have, so have left place on the plywood.

Link to another short video with 8 panels. The actual panels are much brighter.

https://www.dropbox.com/s/xyzeoqi8f6pohor/VIDEO0064.mp4?dl=0
 

Attachments

  • BBB_PanelSetup.jpg
    BBB_PanelSetup.jpg
    90.5 KB · Views: 100
  • IMAG0125.jpg
    IMAG0125.jpg
    733.3 KB · Views: 133
  • IMAG0126.jpg
    IMAG0126.jpg
    822.1 KB · Views: 124
Hello,

Over the last few weeks , I have setup my config (FP on a BBB) for my P10 panels , then tried a few things , then moved it to a standalone show network and then used a master (Pi FPP) run the same sequence on the FP BBB to drive the panels . progressively moving to my final setup.

I had a few questions on different definitions and a fair bit of trial and error and so have attached a document of my setup and definitions and a few steps that I went through.

Hope this is of use.
 

Attachments

  • MyP10PanelSetup_v1.pdf
    2.9 MB · Views: 218
hi Gerry, the ribbon connectors, did you buy as the size used or cut down some longer ones.
If you cut down, easy or hard to reuse existing connectors or did you use new ones ,
cheers Boof63
 
Hi Boof,

The panels came with ribbons but they were tiny and okay for connecting between two panels that were side by side.
They did not even reach between two panels that were one on top of another.

Mind u , I did not get mine from Ray , cause he did not reply to me for a week despite daily emails , so I got it from someone else that was linked to (can provide link) and she had shipped it out in a day .

I asked her to include some longer flat cables (to connect the panel(s) to the octoscoller , which she did for $1 each but they were not enough (because of the above).

However , to my delight I found that it was extremely easy to make them (even for me). So I went to Jaycar which sells the ribbon by the metre (was not expensive) and also the end connectors and all I needed was a tiny vice to clamp them (as per the video on you tube). Any they worked with no problems :)

I did not try to see if the connectors could be reused from the existing unused ones - did not think of it.
 
Boof63 said:
If you cut down, easy or hard to reuse existing connectors or did you use new ones ,


Those connectors do not come apart easily. They are not really designed to. While I have done it, it always damaged some part of the latching mechanism. Be glad they're cheap.
 
Back
Top