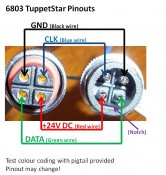
Following on from David's thread I got hold of some of the (now infamous) LPD6803 24V Tuppetstars from Ray (here)
Got them delivered, rushed to plug them in and test.... but maybe a bit too fast!!!
So here’s what I’ve learned so far....
Lesson 1: It is possible to connect the polarised connectors on these stars in a manner counter to their correct polarisation.....
Lesson 2: The 6803 chip appears somewhat intolerant to 24Vdc connected to its signal inputs.... (which tends to happen as a consequence of learning lesson 1.)
Lesson 3: I am not a fast learner.. It took the destruction of 3 stars to learn the above lessons.
So, the cost of shipping from China being what it is, I thought I should try to redeem myself by assessing the internal damage and attempting a fix. The cover of the star is glued onto the back case.. so I tried to cut it away with a dremel.
Lesson 4: Cutting the star open is not the best way to achieve this objective (!)
Lesson 5: Undo the 5 screws, place a flat bladed screw driver between the screw hole in the case and the cover and you can lever the cover off (glue and all).
[attachimg=1]
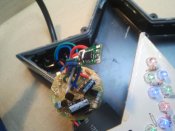
Inside is the LED board and the ‘brain’ including a 6803 (dip) chip.
Lesson 6: with a bit of work, it is possible to repair the TuppetStar with a slightly modified bionic LPD6803 pixel transplanted to replace the DIP chip.
I took a 6803 pixel, removed the encapsulation, the led and the smd led resistors. Converted the setup from constant current to voltage switch (with a jumper wire). Desoldered the cooked chip on the controller. Attached the modified pixel board to the controller (where it drives transistors to switch the star leds)
[attachimg=2]
Normal service has now resumed, using only parts available to the rgb pixel enthusiast!
Got them delivered, rushed to plug them in and test.... but maybe a bit too fast!!!
So here’s what I’ve learned so far....
Lesson 1: It is possible to connect the polarised connectors on these stars in a manner counter to their correct polarisation.....
Lesson 2: The 6803 chip appears somewhat intolerant to 24Vdc connected to its signal inputs.... (which tends to happen as a consequence of learning lesson 1.)
Lesson 3: I am not a fast learner.. It took the destruction of 3 stars to learn the above lessons.
So, the cost of shipping from China being what it is, I thought I should try to redeem myself by assessing the internal damage and attempting a fix. The cover of the star is glued onto the back case.. so I tried to cut it away with a dremel.
Lesson 4: Cutting the star open is not the best way to achieve this objective (!)
Lesson 5: Undo the 5 screws, place a flat bladed screw driver between the screw hole in the case and the cover and you can lever the cover off (glue and all).
[attachimg=1]
Inside is the LED board and the ‘brain’ including a 6803 (dip) chip.
Lesson 6: with a bit of work, it is possible to repair the TuppetStar with a slightly modified bionic LPD6803 pixel transplanted to replace the DIP chip.
I took a 6803 pixel, removed the encapsulation, the led and the smd led resistors. Converted the setup from constant current to voltage switch (with a jumper wire). Desoldered the cooked chip on the controller. Attached the modified pixel board to the controller (where it drives transistors to switch the star leds)
[attachimg=2]
Normal service has now resumed, using only parts available to the rgb pixel enthusiast!
")