- Thread starter
- #106
Navigation
Install the app
How to install the app on iOS
Follow along with the video below to see how to install our site as a web app on your home screen.
Note: This feature may not be available in some browsers.
More options
You are using an out of date browser. It may not display this or other websites correctly.
You should upgrade or use an alternative browser.
You should upgrade or use an alternative browser.
What are you changing this year? Elements you are building or installing for 2023
- Thread starter ryanschristmaslights
- Start date
K
KiwiPhil
Guest
Still a work in progress, they're all up but just need to be powered/data'd now. Seed pixel icicles.
26.5 meters of circuit boards up around the guttering of the house with 2450 leds (245 drops of 10)
View: https://www.youtube.com/watch?v=OI4nC8bkF-8
oh nice, are these the 4 wire version with the data return? Would be keen on seeing a repair on them if one of them fail ! ( not wishing you any pixel failures though
Notenoughlights
500,000+ twinkly lights
A repair will be me plugging in a new strand of 10 to the RJ9 plug and throwing away the broken strandoh nice, are these the 4 wire version with the data return? Would be keen on seeing a repair on them if one of them fail ! ( not wishing you any pixel failures though)
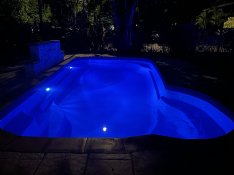
I haven't finished any display part recently, so I thought I'd have some fun on the weekend and finished "v2" of my LED-retrofitted pool lights.
These are controlled by a Shelly PM (for Google home integration), which powers a power supply and 4 channel DMX controller. If there's no DMX master it just switches "all on", but as soon as I plug in the cable from the falcon, it switches to DMX control.
I'll post a video when the whole thing is working but for now you'll just have to imagine them flashing in sync to the music!

Notenoughlights
500,000+ twinkly lights
I've put all the seed pixels up, wired them in to the controller and sorted out all the power injection, and then all the numbers in xlights/FPP to actually make them do something.. Final result (they're running at 2% brightness to avoid annoying the neighbourhood as it's nearly midnight)
View: https://www.youtube.com/watch?v=TpwTXxszxcI
And one from earlier in the evening
View: https://www.youtube.com/watch?v=SrBJamyfbS0
View: https://www.youtube.com/watch?v=TpwTXxszxcI
And one from earlier in the evening
View: https://www.youtube.com/watch?v=SrBJamyfbS0
Whitey-
Apprentice elf
This year's vision is finally starting to materialise. I finished pushing this matrix panel weeks ago and I have another 2 to go to cover the right fence panel and then cut in half to do both bottom halves.
Also testing out the gutter matrix. I was a little worried it might hang down to low but there's plenty of clearance.
This now means I can continue pushing pixels over my leave.
Lovely. So they'll be 2x 48x36 once done? Do you have any video of them in the dark? Curious how that resolution comes out, as I'm contemplating maybe a home made matrix just to advertise a radio station.
Kingfisher
Apprentice elf
- Joined
- Mar 6, 2021
- Messages
- 62
Soooooo over the past few weeks I've been busy... Very busy.
I've tackled half of my broken things pile (mostly just fixing bad wire connectors or things I broke while taking it all down.
Removed all the pixels from my pixel tree strips, replaced them with new ones (the original where cheap and nasty and where starting to fail). Cleaned up the strips, making them a touch shorter. Actually made power injection Ts that use the same waterproof connectors the pixel strings use, just potted them in some resin to make them nice and waterproof (hopefully). I've also completely rebuild it's controller, making it neater and easier to connect up (no more screwing wires down) and lastly I'm looking at a possible topper for it but I haven't made my mind up yet.
Removed all the cheap and not waterproofed and badly wired, seed pixels that remember their address from the ratton shapes I have. I will be replacing with newer seed pixels that don't remember their address. I've already created T connectors that include a mini DC-DC converter to take 12v down to 5v. Again I've potted them in resin to waterproof the connections and converter. My thoughts in using the converters is that I shouldn't have to be concerned about power injection along its run.
I decided to add 210 new fixtures this year to help fill in some dark space I've had in the garden, that being the entire garden. So i've been very busy 3d printing alot of pixel spot cases that I slightly modified. The bambu has been working overtime for me on this one. Over 10kg of black filament pushed through so far.
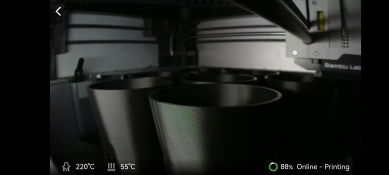
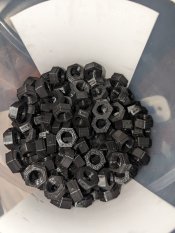
About 210 of these spots need to be printed so that is, 210 spot cases, 420 nuts, 420 bolts, 210 brackets and 210 pixel plates.
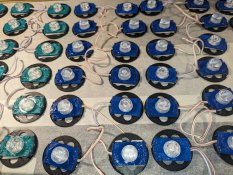
Each spot is getting fitted with a 12v dumb led. 30 of them are RGB the rest are single colour, and to keep them all down and make them a little more water-resistant I'm using silicone around them
Then so that I don't have to drive far too many things into the ground or garden or zip tie them to things I've been cutting small wooden blocks and using liquid nail to glue the brackets to the wood.
Then to control all of them I have 6 30ch low voltage dmx dimmer boards that I need to wire up into some tubs, along with 30 6ch breakout cables with connectors on the ends to make it nice and easy to setup.
Overall I'm like 40% done with this project, and the worst part is adding the extra wire and connectors. A few good pushes in the coming days and I should have it mostly done. Maybe I'll forgo the 7 pin connectors on the brakeout cables this year.
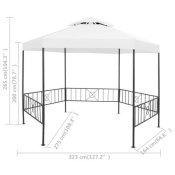
I added a gazebo to the immersive area, and have put a bunch of basic fairy lights on to it, I'll be keeping the main roof off of it but the mini roof to provide a little bit of protection to the mirror ball (idk why I'm adding a mirror ball but I've had one for ever and don't use it so I'm using it) and will be changing the image on the photo wall as well.
The last big change is the way people interact with the display. The first year I used a custom keyboard that was based off a Arduino pro micro. It kinda worked but wasn't programmed well and had constant issues as well as no ability to provide feedback. Last year I attempted to solve this but for whatever reason I just couldn't get it to work. This year I questioned why I was using a custom keyboard and why not just use a keyboard in a case? So that's what I did, I used cheap numpads put inside a case so it looks like just one big button, then added a USB to RJ45 converters into each case. These then run to 2 powered USB hubs, that will then run to the computer. I've planned to add a light into the button connected to a dmx relay board so when a button is pressed the lights turn off or flash off, but I'm waiting on the LEDs to get to me, so if they don't show up oh well, something to change next year.
There's a few other smaller things I've changed, and the display won't be done untill the 1st of December. The majority of it won't go up until after the 18th of November.
I've tackled half of my broken things pile (mostly just fixing bad wire connectors or things I broke while taking it all down.
Removed all the pixels from my pixel tree strips, replaced them with new ones (the original where cheap and nasty and where starting to fail). Cleaned up the strips, making them a touch shorter. Actually made power injection Ts that use the same waterproof connectors the pixel strings use, just potted them in some resin to make them nice and waterproof (hopefully). I've also completely rebuild it's controller, making it neater and easier to connect up (no more screwing wires down) and lastly I'm looking at a possible topper for it but I haven't made my mind up yet.
Removed all the cheap and not waterproofed and badly wired, seed pixels that remember their address from the ratton shapes I have. I will be replacing with newer seed pixels that don't remember their address. I've already created T connectors that include a mini DC-DC converter to take 12v down to 5v. Again I've potted them in resin to waterproof the connections and converter. My thoughts in using the converters is that I shouldn't have to be concerned about power injection along its run.
I decided to add 210 new fixtures this year to help fill in some dark space I've had in the garden, that being the entire garden. So i've been very busy 3d printing alot of pixel spot cases that I slightly modified. The bambu has been working overtime for me on this one. Over 10kg of black filament pushed through so far.


About 210 of these spots need to be printed so that is, 210 spot cases, 420 nuts, 420 bolts, 210 brackets and 210 pixel plates.
Each spot is getting fitted with a 12v dumb led. 30 of them are RGB the rest are single colour, and to keep them all down and make them a little more water-resistant I'm using silicone around them

Then so that I don't have to drive far too many things into the ground or garden or zip tie them to things I've been cutting small wooden blocks and using liquid nail to glue the brackets to the wood.
Then to control all of them I have 6 30ch low voltage dmx dimmer boards that I need to wire up into some tubs, along with 30 6ch breakout cables with connectors on the ends to make it nice and easy to setup.
Overall I'm like 40% done with this project, and the worst part is adding the extra wire and connectors. A few good pushes in the coming days and I should have it mostly done. Maybe I'll forgo the 7 pin connectors on the brakeout cables this year.
I added a gazebo to the immersive area, and have put a bunch of basic fairy lights on to it, I'll be keeping the main roof off of it but the mini roof to provide a little bit of protection to the mirror ball (idk why I'm adding a mirror ball but I've had one for ever and don't use it so I'm using it) and will be changing the image on the photo wall as well.

The last big change is the way people interact with the display. The first year I used a custom keyboard that was based off a Arduino pro micro. It kinda worked but wasn't programmed well and had constant issues as well as no ability to provide feedback. Last year I attempted to solve this but for whatever reason I just couldn't get it to work. This year I questioned why I was using a custom keyboard and why not just use a keyboard in a case? So that's what I did, I used cheap numpads put inside a case so it looks like just one big button, then added a USB to RJ45 converters into each case. These then run to 2 powered USB hubs, that will then run to the computer. I've planned to add a light into the button connected to a dmx relay board so when a button is pressed the lights turn off or flash off, but I'm waiting on the LEDs to get to me, so if they don't show up oh well, something to change next year.
There's a few other smaller things I've changed, and the display won't be done untill the 1st of December. The majority of it won't go up until after the 18th of November.
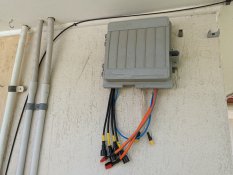
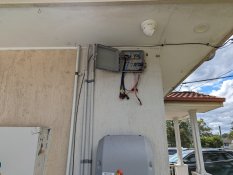
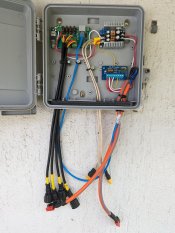
I've had this Optus Coax demarcation box on the side of the house, unused for a long time. The original cable into the house was removed when the solar was installed.
Optus HFC network was decommissioned years ago after NBN bought it, as well as the Telstra network, and then decided not to use it at all.
So I removed the isolator and lead in coax, clipping it at the point of attachment. I've been meaning to get them to remove it from the house to the pole, but one thing at a time.
All in all, however, it makes a really good differential receiver housing. It's the smaller CG1000 box, which has loads of room for a receiver, DC converter and crowbar circuit.
It'll be driving my gutter lines and maybe a few other bits near that corner of the house.


- Thread starter
- #114
Sadly my area still has HFC for NBN (however drop-out prone it is...).
Progress... first light up test of pixels out in the front yard bushes:
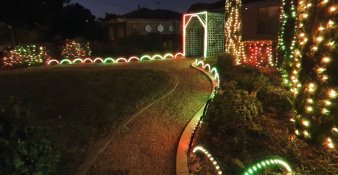
I was expecting the bush in the far left of photo to be problematic because the cable run from controller to first pixel is long at around 14 metres. But surprising it worked just fine, so no line buffer required (....yet....). Still more cabling needed before I can light up more bushes in the rear area of the photo (below the unlit coro baubles).
Progress... first light up test of pixels out in the front yard bushes:

I was expecting the bush in the far left of photo to be problematic because the cable run from controller to first pixel is long at around 14 metres. But surprising it worked just fine, so no line buffer required (....yet....). Still more cabling needed before I can light up more bushes in the rear area of the photo (below the unlit coro baubles).
- Joined
- Jun 26, 2021
- Messages
- 625
Well, Friday and Saturday were spent building two controller boxes.
Friday, built this is a smart receiver box with a Srx2 and a SRx1 to control part of my second floor.
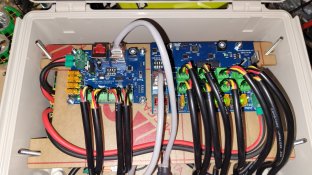
Saturday, built my 3rd Falcon controller box to control and runt he second floor of my house. Plus with the left over time I installed both of the controllers and managed to get 905 of the second floor running. I was too tired to figure out the last bit and gave up.
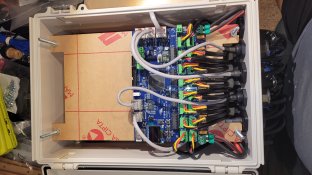
This morning I took the time to work out the last remaining configuration issue and my entire second floor is running properly now. I'll take some pictures when it gets darker out.
Pro Tip: Be careful when mixing design elements from different vendors as they take extra effort to make work together. I used the inserts from Jdeation and the drilling template from Wired Watts. Luckily, they aligned decently and I was able to put everything together.
Bonus Tip: Make sure you have all the parts to put together a controller before you start drilling holes that you might not be able to fill. I was lucky and ended up using 2 different network ports in my build.
Extra Bonus Tip: When using a drilling template, make sure you drill to the size of your parts and not just follow the template blindly. Some of your parts might not match the template holes.
Friday, built this is a smart receiver box with a Srx2 and a SRx1 to control part of my second floor.

Saturday, built my 3rd Falcon controller box to control and runt he second floor of my house. Plus with the left over time I installed both of the controllers and managed to get 905 of the second floor running. I was too tired to figure out the last bit and gave up.

This morning I took the time to work out the last remaining configuration issue and my entire second floor is running properly now. I'll take some pictures when it gets darker out.
Pro Tip: Be careful when mixing design elements from different vendors as they take extra effort to make work together. I used the inserts from Jdeation and the drilling template from Wired Watts. Luckily, they aligned decently and I was able to put everything together.
Bonus Tip: Make sure you have all the parts to put together a controller before you start drilling holes that you might not be able to fill. I was lucky and ended up using 2 different network ports in my build.
Extra Bonus Tip: When using a drilling template, make sure you drill to the size of your parts and not just follow the template blindly. Some of your parts might not match the template holes.
- Thread starter
- #116
Who has been setting up this weekend?  Me, but what about you? Are things going to plan?
My newly pixelised mega tree is up now, a change on last year when the mega tree still had older 'super strings' (multiple shop-bought LED strings of different colours twisted around each other).
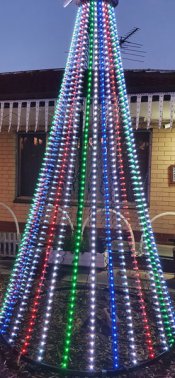
This year it is an 18 strand tree (16 + 2 extra to make it a bit more than 180 degrees), however next year I might increase the density ... we shall see. Each strand is 60 pixels. At least the topper was built to support 24 strands at 180 degrees without needing to be modified. I have reused the old tree's pole, base ring and guy wires. With driveways either side, the guy wires have to be anchored in the ground inside the base. I hope that will be enough to support the upgraded tree particularly with the new star being more susceptible to wind.
Between testing the mega tree strings inside and connecting them up outside I ran into a flickering pixel issue with certain strings only, regardless of which controller output was used. It turned out to be a controller misconfiguration, even though the same controller was used for these prior tests without any flicker at the time.
So how are your displays coming along?
My newly pixelised mega tree is up now, a change on last year when the mega tree still had older 'super strings' (multiple shop-bought LED strings of different colours twisted around each other).

This year it is an 18 strand tree (16 + 2 extra to make it a bit more than 180 degrees), however next year I might increase the density ... we shall see. Each strand is 60 pixels. At least the topper was built to support 24 strands at 180 degrees without needing to be modified. I have reused the old tree's pole, base ring and guy wires. With driveways either side, the guy wires have to be anchored in the ground inside the base. I hope that will be enough to support the upgraded tree particularly with the new star being more susceptible to wind.
Between testing the mega tree strings inside and connecting them up outside I ran into a flickering pixel issue with certain strings only, regardless of which controller output was used. It turned out to be a controller misconfiguration, even though the same controller was used for these prior tests without any flicker at the time.
So how are your displays coming along?
- Joined
- Jun 26, 2021
- Messages
- 625
Recorded all my Halloween sequences this week. Built 5 triple Arches this week that have 150 pixels each but I did not take any pictures of them and started taking down the Halloween show this weekend and swapping over to Christmas. Cut up all the EMT to put together 4 mini-trees. A lot of prepping small things to get ready for putting stuff up.
Still building. I have two snowflakes, three mini tree, stars, and a couple thousand verticals and horizontals still to push.Who has been setting up this weekend?
then I’ve got to start laying it out around the yard.
I picked up some extra thick, three core extension cable from the tip shop on the weekend. $10 for about 50 m!
- Joined
- Jun 26, 2021
- Messages
- 625
Finally got all Halloween packed away and the mancave cleaned up a little to give me some space back.
After weeks of searching and 3rd order later, I finally found the connector forks I use for my PSUs (Jaycar for those playing at home) and have now wired up the PSUs in the first half of my garage matrix enclosure. Just need to add the PI connectors and its pretty much good to go.
Now to repeat for the 2nd half (receiver and PSUs, not controller)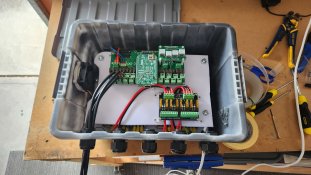


