What are you changing this year? Elements you are building or installing for 2023

orlandoal

Angry Elf!
Joined
Feb 15, 2022
Messages
46
Location
Orlando, Florida
Adding six additional 24" snow flakes this year, along with garage and gutter outlines, if time permits I am also thinking of adding some singing bulbs into the mix. I already have a singing tree, so not a whole lot of additional work incorporating those thankfully.

I will add the garage and gutter outlines into the Halloween show initially and then into the xmas shows with the new flakes. I really want to add a 8 or 10 foot mega tree, but might be pushing my luck getting that one built and tested. Luckily the sequences I already use have the mega trees programmed, I just do not currently use them.
 

Kingfisher

Apprentice elf
Joined
Mar 6, 2021
Messages
52
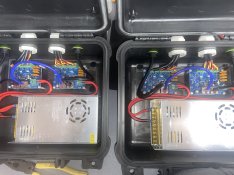
I've made some decent progress on new controllers. These ones are just missing a few things, some printed parts, vent holes and liquid nail. I use cheep kmart tubs as they do the trick, keep costs down and stack neatly.

2 * DMX2-24 + 31v power supply
PXL_20230820_145946339.jpg

He123 differential receiver (12v)
PXL_20230820_145838161.jpgPXL_20230820_145807154.jpg

He123 with a BBB
PXL_20230820_145630582.jpg
 

Kingfisher

Apprentice elf
Joined
Mar 6, 2021
Messages
52
Looks like you've labelled the differential output ports wrong, they groups of four should be in increasing order left-right across the expansion board.
The silkscreen on the PCB shows the 1-16, so add either 16 for the right, or 32 for the left board.
Right right, now I know what I've done wrong... I'll fix it. Thinking about it might have been the same reason some things didn't work for me last year... Thanks mate!
 

bmh255

New elf
Generous elf
Joined
Dec 8, 2020
Messages
29
This week for me since I’m adding outlines to the house. Some remote boxes. Next week rebuild the main box.
 

Attachments

  • IMG_3747.jpeg
    IMG_3747.jpeg
    832 KB · Views: 36

christmasdave

Full time elf
Joined
Dec 10, 2020
Messages
107
Location
NSW South Coast
I’ve been working on putting 2 arch’s together with a Rosa (my first ever HD prop!) in the middle.
still a few things to work out to stabilise the arch’s but I’m happy with progress.
img_4485-jpeg.23493
 

Attachments

  • IMG_4485.jpeg
    IMG_4485.jpeg
    1 MB · Views: 283

Domestos

Apprentice elf
Joined
Jun 11, 2020
Messages
86
Location
Brisbane
IKEA A$100 MiniTree.

Three years ago I built 4 of these trees, and apart from the odd pixel dying here and there, they have been going very strong. (Last year I added the Snowflakes on top) These mini-trees have withstand the harsh Brisbane Sun, and can be taken apart for easy storage.
1_Resized.jpg
The Parts:
  • The base is an IKEA Gladom serving tray, made from steel, and already painted. $25.00
  • The top is an IKEA Forenlig Plant Pot 9cm diameter. $2.50
  • 15mm X 900mm Galvanised steep pipe. $12.35 (Bunnings)
  • Two Galvanised 15mm Flanges. $9.60 (Bunnings)
  • 4 6mm Short Bolts and nuts (I had plenty of these laying around on previous builds)
  • Plastic Strip to mount the Pixels (850mm / length, I went with 6 legs) (I worked this out to be about $11.00 worth of mounting strip assuming you pay $110 for 50 meters - available here)
  • Pixels (I went with 15 pixels per leg, = 90 in total) About $50 for the pixels.
All in all, abut $100 to $110 per tree, depending on your pixel costs.

The Build:
  • I began by getting the centre point of the tray, and traced the flange's 4 holes.
Gladom_reszed.jpg
  • Next I drilled 8mm holes, and fastened the flange with 6mm short bolts and nuts (I had a ton of these, so didn't include them in the price)
  • I fitted the pipe to the base flange, and added the top flange.
2_Resized.jpg
  • I poped the top plant pot on the top flange (this is a nice snug fit, and gives the whole tree a good stable feel.
3_Resized.jpg
  • I placed the mounting strip on the top Plant Pot, and eyebolled where the first leg would go, and drilled a hole, and fitted the strip with a cable tie. I repeated this 5 more times, and the end result was that 50% of the pot diameter was used for the 6 legs.
  • The base diameter is 45cm, and that gives you a circumference of about 141cm. I rounded that down to 70cm (as I am only building a 180 minitree), and divided it by 6 giving me a total space of 11.66cm. In my original build, I worked with 11.5cm spacing, but for the 4 new trees, I am going to go down to 10cm. This will give the two side legs more of a front view.
  • Once all the measurements was done, I drilled the 6 holes and fitted the mounting strip to the bottom with cable ties.
  • Finally I fitted the pixels.
4 More "STRONG" mini trees.
 

Indigogyre

Journeyman Elf
Generous elf
Joined
Jun 26, 2021
Messages
433
I’ve been working on putting 2 arch’s together with a Rosa (my first ever HD prop!) in the middle.
still a few things to work out to stabilise the arch’s but I’m happy with progress.
img_4485-jpeg.23493
That's very creative to configure them that way. How are you going to model it? I can think of many variations for models and sub-models.
 

christmasdave

Full time elf
Joined
Dec 10, 2020
Messages
107
Location
NSW South Coast
That's very creative to configure them that way. How are you going to model it? I can think of many variations for models and sub-models.
I’ve actually probably been a bit lazy with the modelling 😝 
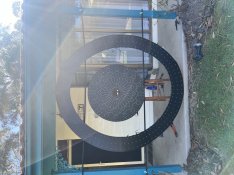
just 2 arch’s with the bottom one flipped and treating as 2 seperate.
It started as more a ‘I wonder if this will work’. It looks good in xLights and even though I’m sequencing as seperate, they look like one model, which is nice. If I do get more time I’ll model them properly, which as you say will definitely allow for more customisation.
 

Skymaster

Crazy elf
Global moderator
Generous elf
Joined
Dec 19, 2021
Messages
1,073
Location
Western Sydney
Today's work:

Built four mini spiral trees, 50 bullets wrapped on some tomato cages that my Mrs picked up from ALDI for 8 bucks each this week.

An unexpected addition, no idea where I'll put them yet, probably ask the neighbour if I can put them on his side of the fence between our driveways. He has a about half a metre garden there which is just weeds 🤣
PXL_20230917_051832436.jpgPXL_20230917_051846554.jpg


The other part of the morning was trying out two different mounts for my solar panel seed matrix. One uses a full 2m length of 100mm mesh, the other just uses a single square with the seeds supporting themselves.
The latter seems to be the best option so that there's no metal sitting on the panels directly. Looks better from the street too during the day.

The second and fifth panels here have the test matrixes on. 11x18 for a total of 198 pixels each.
PXL_20230916_230712561.jpg

This is the wire mesh mounting
PXL_20230916_230431377.jpg

And this is the pixel wire only method
PXL_20230916_230353163.jpg

In both cases, a square of mesh is wrapped around the panel to provide the attachment. Excuse the bird skeleton, let's just say that's my only Halloween decoration for the year 🤣
PXL_20230916_230326619.jpg
 
Top