2023 Journey - First display for JohnnyBoy

Some solid work there. Good effort!

I'm assuming that you intend to do some more power work on the icicles? You're getting some pretty decent voltage drop and yellow/red LEDs at the end of the string.
I did on my second case build with the smart receivers. F48 was first build and I agree the 240v side really should reflect the cable colours.
As I’m replacing the timer it’s an easy thing to change when I do that.
The current bane of my existence, holes holes and more holes!

On the to do list
2456 12mm holes
2456 18mm holes on the back

All at 1inch spacing. Do i need it? no, but it should look cool!

Getting there but boy it takes some time. I'm onto a good system and can typically drill about 400holes/hr provided the marking has been completed. Markup up the hole locations takes about a hour for 8 lengths of pipe. I was originally doing 2 lengths at a time, but the time required for 2 vs 8 is very similar and using a set square lines up everything nicely.

I'm using a stepped drill bit as i didn't like how a forstner bit worked. Really enjoyed using the stepped bits. Very smooth and fast.

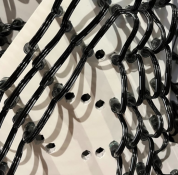
I made up a little jig to keep the conduit from rolling around. Two bits of wood with a 2cm gap in the middle....high tech i know!
View attachment 22842

One Length done....
View attachment 22843
OMG !! I am a total newbie at this and here I was thinking it would be "it might be easy".... I am mind blown at what you are doing but thank you for posting those progress reports and photos... it is helping me to plan my own efforts.. though I am not so intensive in setting up as per your layouts, my effort for this year will be (if I can work it out), just a mega tree and maybe a few leaping arches... I am transitioning from a large static lights display and this year (hopefully) will be a combo.
 
Some solid work there. Good effort!

I'm assuming that you intend to do some more power work on the icicles? You're getting some pretty decent voltage drop and yellow/red LEDs at the end of the string.
Thanks! im really enjoying the journey so far, just really underestimated the time it would take for basically everything!

The photo was in the middle of a playing sequence that had different colours on the pixels, i just had to hook it up to make the pixels dance! The pixels shown are the first 200ish pixels, you can see the sneaky cable running around the corner. I did have all 585 pixels connected and running with no power injection, it looked ok to my untrained eyes but 40% is quite low and i wasn't hitting it with 100% whites.

You are right though, i am planning quite a bit of power injection throughout my display. If you have a look at my markup drawings i've written Power Injection at suitable intervals on all pixel runs. For the 585pixels on the icicles i will be using PI at pixel 200 & 500 so max of 150pixels between PI points. Should do the job nicely!
 
OMG !! I am a total newbie at this and here I was thinking it would be "it might be easy".... I am mind blown at what you are doing but thank you for posting those progress reports and photos... it is helping me to plan my own efforts.. though I am not so intensive in setting up as per your layouts, my effort for this year will be (if I can work it out), just a mega tree and maybe a few leaping arches... I am transitioning from a large static lights display and this year (hopefully) will be a combo.
I am just as much as a newbie as well, only a few months in the game but I have a tendency to over do pretty much everything on the planning, research and documentation side of things regardless of what I'm doing. Can you tell I'm a project manager!

I have benefited a great deal from the forums from reading other peoples builds, so wanted to share my own to assist. Plus I have already had some great feedback that will improve my display. Hopefully by updating this post regularly i can get feedback before i do something stupid or it cost me a lot of time and money.

I feel your pain on the mega tree. I've bought all the stuff, but physically building it is still going to be a challenge even with all my research! Still don't know when i'll start on that...
 
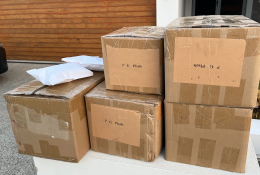
About three weeks ago i took delivery of all the coro props from Extreme Lighting Displays, 4 giant boxes! Boy do the props look much smaller online!

So with some standard 100count pixel strings I had on hand, it was time to get pixel pushing. My thumb almost instantly got a blister from the pixel pliers. I think by the time I'm done I will have blisters on top of blisters on top of blisters!

Lightitup had delivered the 100count strings but I couldn't really finish the props without the custom length pixels that were stuck on the slow boat.

Most annoying bit? doing the half twist on every single pixel so the wires are straight. I now straighten the full string before starting to push pixels, a bit less painful that way. I know it doesn't make any difference but my OCD wont allow me to do it any other way! Straight wires, just as god intended!
1682694614938.png

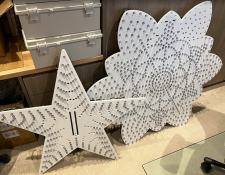
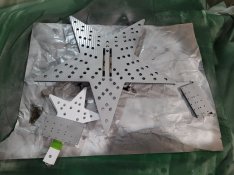
The Props!
270pixel star - 70more to go
750pixel showstopper flake - 50more to go
1682693310146.png

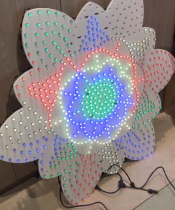
With some flashy flashy running (screen shot from a video so quality is a bit rubbish)
1682694693373.png

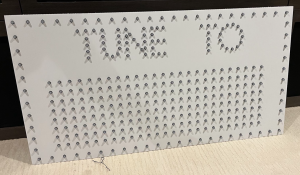
Tune to sign (my house has a lot of cable twist ties these days....)
1682693321937.png

Custom Strings!!!
The most exciting bit was getting a text message today that the custom length pixels were ready for collection. Super handy that my work is just down the road from Lightitup. Quick drive during lunch and i am now 8000 pixels better off! My thumb is starting to tingle just thinking about it. My home office is now mighty full!
1682694224225.png
 
About three weeks ago i took delivery of all the coro props from Extreme Lighting Displays, 4 giant boxes! Boy do the props look much smaller online!

So with some standard 100count pixel strings I had on hand, it was time to get pixel pushing. My thumb almost instantly got a blister from the pixel pliers. I think by the time I'm done I will have blisters on top of blisters on top of blisters!

Lightitup had delivered the 100count strings but I couldn't really finish the props without the custom length pixels that were stuck on the slow boat.

Most annoying bit? doing the half twist on every single pixel so the wires are straight. I now straighten the full string before starting to push pixels, a bit less painful that way. I know it doesn't make any difference but my OCD wont allow me to do it any other way! Straight wires, just as god intended!
View attachment 22851

The Props!
270pixel star - 70more to go
750pixel showstopper flake - 50more to go
View attachment 22848

With some flashy flashy running (screen shot from a video so quality is a bit rubbish)
View attachment 22852

Tune to sign (my house has a lot of cable twist ties these days....)
View attachment 22849

Custom Strings!!!
The most exciting bit was getting a text message today that the custom length pixels were ready for collection. Super handy that my work is just down the road from Lightitup. Quick drive during lunch and i am now 8000 pixels better off! My thumb is starting to tingle just thinking about it. My home office is now mighty full!
View attachment 22850
Great Thread John!!...glad we could be of assistance in your first Pixel Journey in supplying pixels, power, supplies and all other gear you got from us..!!...you have done a great job....we appreciate your support now to push those custom strings!!...all the best! 😅 your fingers will be well weathered after all those!...but it will be all worth it in the end!!
 
I originally planned on making my own network cables and after making 5 or so, they were just so chunky that it wasn't going to all fit. I ordered a bunch of these small patch cables and they are fantastic! super flexible and very very thin.

So whereabouts do you get them from ?

I've found the regular ones become a bit chunky in the boxes, so think replacing the ones I have with these will make the inside of my boxes look a lot nicer.
 
Last edited:
Most annoying bit? doing the half twist on every single pixel so the wires are straight. I now straighten the full string before starting to push pixels, a bit less painful that way. I know it doesn't make any difference but my OCD wont allow me to do it any other way! Straight wires, just as god intended!
I too ensure the wires are straight cos my OCD can't deal! Especially being all black wires so it makes it a little easier to trace which wire is which for splicing.
Great work on the progress thread, really making me feel like I need to get a wriggle on myself!
 
Most annoying bit? doing the half twist on every single pixel so the wires are straight. I now straighten the full string before starting to push pixels, a bit less painful that way. I know it doesn't make any difference but my OCD wont allow me to do it any other way! Straight wires, just as god intended!

The Props!
270pixel star - 70more to go
750pixel showstopper flake - 50more to go
View attachment 22848

Your progress looks awesome! For blisters I started wearing mechanic gloves when pushing pixels by hand to help ease blisters and sore digits.

Now, I'm going to stir the pot a little and present evil thoughts.

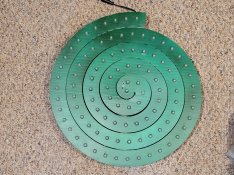
sometimes white props look cooler when painted! :)PaintedStar.jpg

PaintedSpiral.jpg

Glad you are having fun and enjoying yourself even through the tough pixel pushing times.
 
Your progress looks awesome! For blisters I started wearing mechanic gloves when pushing pixels by hand to help ease blisters and sore digits.

Now, I'm going to stir the pot a little and present evil thoughts.

sometimes white props look cooler when painted! :)

Glad you are having fun and enjoying yourself even through the tough pixel pushing times.

Not evil at all. I painted my singing trees green, and I've seen some amazing jobs on singing characters, etc.
 
Your progress looks awesome! For blisters I started wearing mechanic gloves when pushing pixels by hand to help ease blisters and sore digits.

Now, I'm going to stir the pot a little and present evil thoughts.

sometimes white props look cooler when painted! :)View attachment 22875

View attachment 22876

Glad you are having fun and enjoying yourself even through the tough pixel pushing times.
Nope…. Not looking…..nope
La la la (fingers in my ears trying to drown it out)
 
Push Button Speaker Build!
Been busy the last few weeks waiting for all the parts to arrive to put together a push button speaker button. I got a lot of the help from this YouTube video
View: https://www.youtube.com/watch?v=l-fVvqQ4RgQ
it's well worth the watch and answers a lot of questions I had about the build. Lots of other questions (mainly about programming the relay (Mode P1.2 is the one you want) were answered by doc google.

I couldn't find the exact parts in the above video but managed to get close. If anyone is interested, the push button is a retro arcade button! I don't know how waterproof it is, so I bought a bunch of them and will swap them out as needed. I figure I can always put a little hood or something on the sign when I get around to it, that's future me's problem.

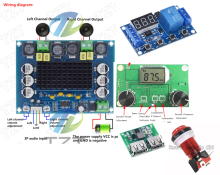
Parts list
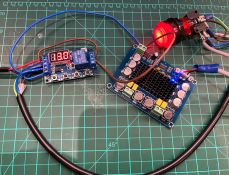
DC 12V 24V 120W*2 TPA3116 D2 Dual Channel digital Power audio amplifier board
12Vto 5V DC-DC Step Down Charger Power Module Dual USB Output Buck Voltage Board 3A
DC 6-30V Support Micro USB 5V LED Display Automation Cycle Delay Timer Control Off Switch Delay Time Relay 6V 9V 12V 24V
FM Radio Receiver Module Frequency Modulation Stereo Receiving PCB Circuit Board With Silencing LCD Display 3-5V LCD Module
33mm Arcade Push Button Led Momentary illiminated Transparent Buttons with Micro Switch
1684161730591.png

Firstly I put together a test set up in the most dodgy way possible with all the electrical tape and miss-matched wiring colours. It only took me two blown fusses to figure it all out! A win in my book.

12V power is delivered by a 2pin power injection wire that will come directly off my little power distribution boxes, meaning no need for dedicated power supply in the box.
1684161401784.png

Once i figured out the amp and timer, it was trying to intergrade a FM receiver so i could have an all-in-one solution. Just give the box power and connect up some speakers. Instant party! I tried to use side cutters to remove one of the USB headers.......it did not go as planned, luckily there are two ports and I could use the other one. I ended up just soldering to the back of it, it worked much better that way. The two outside pins are + & - for those that are interested.

I have discovered that I am not the best as soldering.... I can't tin very well, and I seem to just add more solder until it sticks together.......Hopefully as I progress through this hobby my skills will improve. A better soldering iron would probably help.

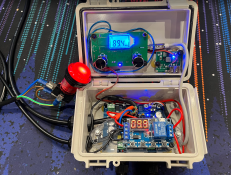
Last thing that didn't really work in my favour is putting it all in this very small box. Bud Box NBF32004 - 150 x 100 x 70. It's all I had laying around and didn't want to buy another one. It fits but I had to get creative with mounting and there might be a few stray holes in the acrylic from failed mounting attempts.

But it's done! Another item ticked off the to do list! Checked it all worked with the FM Transmitter from Light-It-Up and worked a treat! Got a set of large floor stand speakers from the local Buy Nothing Page for free and ready to rock.

Very impressed with the sound level this little amplifier puts out as well!

If anyone is interested in a wiring diagram let me know!
1684162262989.png

Next job is to finish drilling the last of the holes in the electrical conduit and start pixel pushing. Hopefully can get back to that in the next few weeks!
 
Back
Top