While you were making a jig a simple dowel or similar at the exact spacing for the hole would have alleviated the need for so much marking.Markup up the hole locations takes about a hour for 8 lengths of pipe. I was originally doing 2 lengths at a time, but the time required for 2 vs 8 is very similar and using a set square lines up everything nicely.
I made up a little jig to keep the conduit from rolling around. Two bits of wood with a 2cm gap in the middle....high tech i know!
Navigation
Install the app
How to install the app on iOS
Follow along with the video below to see how to install our site as a web app on your home screen.
Note: This feature may not be available in some browsers.
More options
You are using an out of date browser. It may not display this or other websites correctly.
You should upgrade or use an alternative browser.
You should upgrade or use an alternative browser.
2023 Journey - First display for JohnnyBoy
bpratt
Senior elf
I don't suppose you have some url's for what you've bought, in particular the fm receiver and amplifier part of it.... I'm assuming aliexpress ?
paullyxmas76
Full time elf
If you look on Page 1 of this thread...you will see the FULL list of where JohnnyBoy got all his gear from....he is local from us...was able to pickup alot of his gear he bought from usI don't suppose you have some url's for what you've bought, in particular the fm receiver and amplifier part of it.... I'm assuming aliexpress ?
bpratt
Senior elf
I just took a look, but alas no links to those particular items from.... yep, says aliexpress, but I'm hoping to get links to those items (fm receiver and amplifier)If you look on Page 1 of this thread...you will see the FULL list of where JohnnyBoy got all his gear from....he is local from us...was able to pickup alot of his gear he bought from us
- Thread starter
- #35
Sure, i included the full name description in the post, so you can just write that into AliExpress to get a range of suppliers selling the same boards. Here are the direct links i used.I don't suppose you have some url's for what you've bought, in particular the fm receiver and amplifier part of it.... I'm assuming aliexpress ?
DC 12V 24V 120W*2 TPA3116 D2 Dual Channel digital Power audio amplifier board

5.67AU $ 12% OFF|GREATZT DC 12V 24V 120W*2 TPA3116 D2 Dual Channel digital Power audio amplifier board good|Integrated Circuits| - AliExpress
Smarter Shopping, Better Living! Aliexpress.com
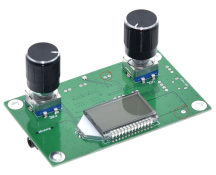
FM Radio Receiver Module Frequency Modulation Stereo Receiving PCB Circuit Board With Silencing LCD Display 3-5V LCD Module

Fm Radio Receiver Module Frequency Modulation Stereo Receiving Pcb Circuit Board With Silencing Lcd Display 3-5v Lcd Module - Integrated Circuits - AliExpress
Smarter Shopping, Better Living! Aliexpress.com
Lots of different AliExpress vendors sell the same boards, just pick one with decent shipping options and reviews and you should be fine. One things i wish i known prior. The FM receiver requires soldering on very small power and antenna connectors (see below markup image), i thought the board was powered by the usb connection, this actually a sound card interface! Also, if you are not comfortable soldering something this small, look at a different board. Finally, make sure you can power the thing with 5v, not 12v.
bpratt
Senior elf
thanks for that.... was looking at buying a car radio, but found nearly all of them have issues if you don't provide power to them 24/7, they go in to a security mode that requires a code or certain keypresses.
The cheap ones you get off ebay don't have security codes required.thanks for that.... was looking at buying a car radio, but found nearly all of them have issues if you don't provide power to them 24/7, they go in to a security mode that requires a code or certain keypresses.
I bought a couple recently to replace my old radio in my work ute, I wanted bluetooth so just bought a complete new radio.
They are cheap as chips and work fine. I paid $40 for one with bluetooth, you can probably get them cheaper without.
Not sure what that security feature is. I’ve got a boom box that lives outside at my farm and it runs a computer power supply, car radio head unit and 7x10 speakers. When no one is at the farm, the power is off and even when I’m there, it’s off when not in use. The only setback is every time you power it up, you’ve gotta tune to a radio station as there is no memory once power is gone.was looking at buying a car radio, but found nearly all of them have issues if you don't provide power to them 24/7,
bpratt
Senior elf
Some require a pin code to be entered in to them, others go in to a demo mode, which needs you to manually press buttons to go in to radio mode.Not sure what that security feature is. I’ve got a boom box that lives outside at my farm and it runs a computer power supply, car radio head unit and 7x10 speakers. When no one is at the farm, the power is off and even when I’m there, it’s off when not in use. The only setback is every time you power it up, you’ve gotta tune to a radio station as there is no memory once power is gone.
Then of course you have the ones like that which need you to tune it back in.
There are also ones like I had on my old car from 2004, which are expecting to see the instrumentation - namely the odo, so that they can tie the fact it's running in the same model car. It would refuse to run without that communication.
If you have a car stereo that requires power to keep the security code away, there will always be two 12V in wires. One will keep stations in memory and is used for security, which you can permanently connect to a battery or small 12V source. The other is the “ignition” 12V wire that you can turn on and off at any time, for any amount of time. This one will turn the radio amp and screen off, but it should come back on to the same place.
Wiring both these properly should give you the best of both worlds.
Wiring both these properly should give you the best of both worlds.
bpratt
Senior elf
the plan was turning off power completely, i.e. not have a psu running just to keep the radio ready to go. 
Yeah I know but hopefully the advice is good for others reading too...the plan was turning off power completely, i.e. not have a psu running just to keep the radio ready to go.
In your case an old 12V car/motorbike/NBN battery should be plenty for the standby power though, then you can still turn off the 240 completely. Just need something to keep it trickle charged when your 240 comes back on (nothing expensive is necessary as it won't be drawing much).
- Thread starter
- #44
Progress update - the last week
Mega Tree Strips!
I've had a few days off work due to some minor surgery that required me to take it easy with quite a lot of time spent on the couch. So while i have been meaning to get back to drilling the remaining conduit pieces for the roof and house outline, its not something i could tackle at the moment. So what better way to use my couch time that to push a bunch of pixels into strips!
After the recent delivery of custom 150 pixel length strips from Light-It-up, (super handy having all the custom length strips in labeled boxes and bags, with no need to dig through 8,000 custom length pixels to find the right one!) I had everything i needed to complete the mega tree strips. One nice thing with these pixels is they have power injection wires at the start/end of the strings. So i sussed out what i needed where, and soldered on some 2-pin pigtails to make PI easy. For the PI wires at the top of the tree, these were cut off, electrical tape around the end, and followed up with some heat-shrink to keep it all together nicely. I didn't remember to get of a photo of PI injection points unfortunately.
Strain Relief
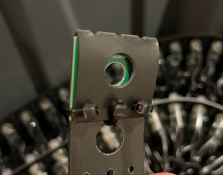
At each end of the pixel strips i used some pixel strip relief mounts from Hanson Electronics fixed with a few cable ties. Super cheap insurance at $0.30ea to know that its very unlikely the strip would break when fixed to my SS hooks on the mega tree topper. I really am beginning to understand just how many cable ties are required in this hobby. For the 32 strands i put together, that's nearly 200 cable ties used! Crazy.
OCD
As usual, my OCD doesn't allow me to push pixels without first removing the half twist that comes from the factory at every pixel. I only ever did a few strings at a time to prevent tangles but boy does it take some time. Thankfully i could could do two things and once and provide a nice warm mattress while straitening wires!

Push those Pixels!
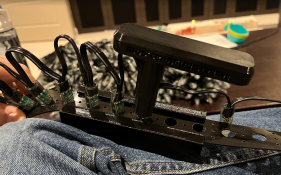
One thing that made the whole process that much easier was the use of 3D printed strip holder and pixel palm pusher. It was super comfortable to use, and could push pixels laying back in the couch in a comfortable way. If i had to do this by hand or with pixel pliers i think i would have gone mad. 4800pixels is a lot to push in 4days!
Didn't get any blisters or body pains so a real win, using your palm to push is way better than your thumb. I found the free plans on Printable and thingverse. Below links for those that are interested. As i don't have a 3D printer (yet), i just sent it to a local company ShapeNerd and hand them printed in a few days, money well spent.
Strip pusher https://www.printables.com/en/model/196789-ws2811-megatree-strip-pixel-pusher-block
Palm pusher. https://www.thingiverse.com/thing:5447403/comments
The Test
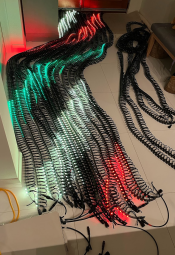
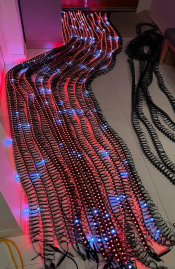
Trying to find a suitable place inside the house at 11pm at night to test the completed pixels was harder than i though. Entry way into the house was the best i could manage being close enough to the computer room to output from xlights without a crazy long Ethernet cable. I set up 16 of the strips on one distribution board and ran out of room for the other 16strips on the second distribution board. I completed strips were tested so no real need to run them all other than for fun.
It was a quick and dirty test but i loved it.
12v resister pixels @30%, 600pixels per outlet, no PI. Surprisingly, i didn't notice any flicker or degradation at the end of the strings. In any case i will be providing PI at 300 & 600 to ensure consistent performance.
Boy was it cool to see them all flashing as expected and making the room dance.
Storage
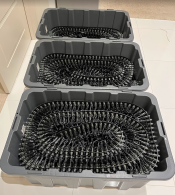
I boxed them all up ready for action at the end of the year. Really love these Bunnings boxes. I'll put them up into the roof space on the weekend to get them out of the house. I have way to many Christmas things all around the house at the moment.
Future Projects
I took delivery of some Power-con connectors as well as some Shelley WiFi relays so will be updating my controller boxes as well as building 3 more distribution boxes. Who would have thought i would be updating brand new controller boxes before i have even used them! Always seeing better ways of doing everything and spending more money in the process!
I've also been working on the Mega Tree design. I think i have it mostly figured out, but still some tinkering to do. Once i think i have it sorted, i'll get everyone's feedback to see if i'm on the right track. I'm a little limited with only having spots for 2 guy wires at the back of the mega tree, hopefully my design works!
Mega Tree Strips!
I've had a few days off work due to some minor surgery that required me to take it easy with quite a lot of time spent on the couch. So while i have been meaning to get back to drilling the remaining conduit pieces for the roof and house outline, its not something i could tackle at the moment. So what better way to use my couch time that to push a bunch of pixels into strips!
After the recent delivery of custom 150 pixel length strips from Light-It-up, (super handy having all the custom length strips in labeled boxes and bags, with no need to dig through 8,000 custom length pixels to find the right one!) I had everything i needed to complete the mega tree strips. One nice thing with these pixels is they have power injection wires at the start/end of the strings. So i sussed out what i needed where, and soldered on some 2-pin pigtails to make PI easy. For the PI wires at the top of the tree, these were cut off, electrical tape around the end, and followed up with some heat-shrink to keep it all together nicely. I didn't remember to get of a photo of PI injection points unfortunately.
Strain Relief
At each end of the pixel strips i used some pixel strip relief mounts from Hanson Electronics fixed with a few cable ties. Super cheap insurance at $0.30ea to know that its very unlikely the strip would break when fixed to my SS hooks on the mega tree topper. I really am beginning to understand just how many cable ties are required in this hobby. For the 32 strands i put together, that's nearly 200 cable ties used! Crazy.

OCD
As usual, my OCD doesn't allow me to push pixels without first removing the half twist that comes from the factory at every pixel. I only ever did a few strings at a time to prevent tangles but boy does it take some time. Thankfully i could could do two things and once and provide a nice warm mattress while straitening wires!

Push those Pixels!
One thing that made the whole process that much easier was the use of 3D printed strip holder and pixel palm pusher. It was super comfortable to use, and could push pixels laying back in the couch in a comfortable way. If i had to do this by hand or with pixel pliers i think i would have gone mad. 4800pixels is a lot to push in 4days!
Didn't get any blisters or body pains so a real win, using your palm to push is way better than your thumb. I found the free plans on Printable and thingverse. Below links for those that are interested. As i don't have a 3D printer (yet), i just sent it to a local company ShapeNerd and hand them printed in a few days, money well spent.
Strip pusher https://www.printables.com/en/model/196789-ws2811-megatree-strip-pixel-pusher-block
Palm pusher. https://www.thingiverse.com/thing:5447403/comments

The Test
Trying to find a suitable place inside the house at 11pm at night to test the completed pixels was harder than i though. Entry way into the house was the best i could manage being close enough to the computer room to output from xlights without a crazy long Ethernet cable. I set up 16 of the strips on one distribution board and ran out of room for the other 16strips on the second distribution board. I completed strips were tested so no real need to run them all other than for fun.
It was a quick and dirty test but i loved it.
12v resister pixels @30%, 600pixels per outlet, no PI. Surprisingly, i didn't notice any flicker or degradation at the end of the strings. In any case i will be providing PI at 300 & 600 to ensure consistent performance.
Boy was it cool to see them all flashing as expected and making the room dance.


Storage
I boxed them all up ready for action at the end of the year. Really love these Bunnings boxes. I'll put them up into the roof space on the weekend to get them out of the house. I have way to many Christmas things all around the house at the moment.

Future Projects
I took delivery of some Power-con connectors as well as some Shelley WiFi relays so will be updating my controller boxes as well as building 3 more distribution boxes. Who would have thought i would be updating brand new controller boxes before i have even used them! Always seeing better ways of doing everything and spending more money in the process!
I've also been working on the Mega Tree design. I think i have it mostly figured out, but still some tinkering to do. Once i think i have it sorted, i'll get everyone's feedback to see if i'm on the right track. I'm a little limited with only having spots for 2 guy wires at the back of the mega tree, hopefully my design works!
- Thread starter
- #45
Canes and mini
Progress has been a little slow the last few weeks since completing the mega tree strips due to some work deadlines, so only managed a few bits and pieces but progress is progress!
Canes
Once again i am supper happy i went with custom string lengths. I've got 99 pixels, but solder ain't one!
After the joy of using custom lengths, the props where i have needed to cut/join are a real pain, wish i took a little more time to make everything custom. I will know more for future years.
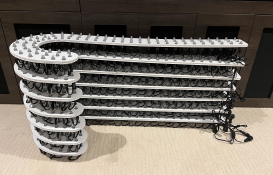
7 canes done and done (7@99pixels)
Perth Mini
Being my first year, i was over the moon being able to attend my first mini. Some really interesting discussions with a great bunch of people. The presentations on xLights & FPP were very helpful in opening my eyes to what is possible and understanding how the program works. Thanks again for putting it together and imparting your knowledge.
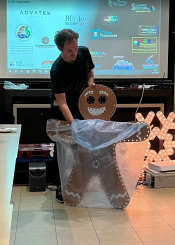
I couldn't believe the generosity of all the sponsors, they really laid out the goods! What caught my eye was the Impression Gingerbread Man from Christmas Props Australia. So much so i took a photo of it during the mini, and was fortunate enough to be able to pick the prop as my prize!! Very excited to add some colour to my display. How cool does it look!
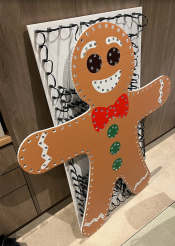
I also managed to score a sequence from Blinky Sequences. I'm yet to pick a sequence, but Love is a Compass looks like a winner.

That's all for this update, hopefully some more progress in a few weeks! Control boxes or drilling conduits......
Progress has been a little slow the last few weeks since completing the mega tree strips due to some work deadlines, so only managed a few bits and pieces but progress is progress!
Canes
Once again i am supper happy i went with custom string lengths. I've got 99 pixels, but solder ain't one!
After the joy of using custom lengths, the props where i have needed to cut/join are a real pain, wish i took a little more time to make everything custom. I will know more for future years.
7 canes done and done (7@99pixels)

Perth Mini
Being my first year, i was over the moon being able to attend my first mini. Some really interesting discussions with a great bunch of people. The presentations on xLights & FPP were very helpful in opening my eyes to what is possible and understanding how the program works. Thanks again for putting it together and imparting your knowledge.
I couldn't believe the generosity of all the sponsors, they really laid out the goods! What caught my eye was the Impression Gingerbread Man from Christmas Props Australia. So much so i took a photo of it during the mini, and was fortunate enough to be able to pick the prop as my prize!! Very excited to add some colour to my display. How cool does it look!


I also managed to score a sequence from Blinky Sequences. I'm yet to pick a sequence, but Love is a Compass looks like a winner.

That's all for this update, hopefully some more progress in a few weeks! Control boxes or drilling conduits......
Last edited:

