2024 Journey - JohnnyBoy's 2nd year fun

Johnnyboy

Full time elf
Joined
Jan 2, 2023
Messages
194
Location
Perth
New thread time!

After the overwhelming demand (all three of you!) its new thread time to document the 2024 show!

For those that haven’t read the 2023 thread go check it out! https://auschristmaslighting.com/threads/2023-journey-first-display-for-johnnyboy.15380/
Its been a really good resource for me personally to go back to see photos of how i did things and descriptions etc. Hopefully you have also found it to be a good resource and a fun read.

Now to bring everyone up to speed for things done in 2024, this first post is a bit of a duplication so feel free to skip to the second post for long time readers.


2024 So it begins!
Here we go again!

2023 burn out
With a full-on year getting the first show under my belt I can honestly say I was over Christmas lights by boxing day. The year had been so filled with Christmas everything that a break was definitely in order. So, the lights came down over two days on the 26th and 27th of December and it was really nice to have the front of my house looking a little less festive for a while. My wife did remark that our house now looked super boring without the lights and I tended to agree. But not having to be out the front every night was quite nice.

So for the magical period of 27th December to 10th of January I didn’t even think about lights…..but on the 10th :DDDDDDD We are back baby!

2024 layout
The two things I knew for absolute certain I wanted was add to my display was a big HoHoHo matrix on the garage and larger spinners on the columns. The rest was just playing around to see what I liked and what wouldn’t break the bank to much. There are some really nice props out there and was super close to trading in my mini trees for the new 400pixel showstopper trees. Very very cool!

Roof snowflakes
I explored repositioning the roof snowflakes quite a bit and was almost sold on running them up the each of the roof ridge lines. Ultimately, I really loved the equal spacing on all my roof sections in my 2023 layout and decided to just spread out the spacing a bit. When I first planned the 2023 layout I was worried they would block the ridge lights too much, but after watching the display, I don’t think it will be detract from the display at all.

Ridge props
I was quite keen on adding either some stars or large flake to the roof apexes, and while I would still like to do it, I didn’t want to go as crazy this year with so many new props. Alas these will need to wait to a future year. So very cool HD props that would fill those spots nicely in future years!

New HD prop!
For my 2023 layout I was so in love with the Showstopper Snowflake with its 750pixels of pure shinny goodness it was a tuff act to follow. Knowing I wanted to add something, but also knowing I love symmetry, I settled on one just of the Showstopper Spinner to be mounted on the portico roof section between the arch (hopefully!). The sub models are crazy and looking forward to getting into the sequencing detail with both HD props working together. There were quite a few other HD contenders but it seems showstopper stuff just draws me in!

Matrix!
The garage was the main dead spot of 2023 and it urgently needed to be filled with the most amount of pixels I could possibly fit in it! I had a few things that influenced the size/spacing with the main one being the ability to open and close the garage door without moving the matrix. The other consideration was that I wanted a max of 1inch spacing, less if I could!

Those two things ruled out standard bullet pixels and really only left seed style pixels. The concern with seeds is that the wires are so small and repairing such a small thing would be tedious to say the least! Thankfully my main man Paul from LightItUp had preorders for WS2818 12v 4wire seed pixels with redundant backup wire. Sold! Paul was super generous and gave me a 100ct roll of standard 3wire seeds so I could play around with them to figure out how I would tackle spacing/mounting/joining.

I knew I was going down the custom string length route yet again, and trying to figure out exact length was much trickier than I thought it would be. I got to work on a shreadsheet to find exact drop length based on ideal spacing around garage door etc. I also had to consider overall port usage as well as max pixels/port. I could have gone up to 780string length but as this would limit the type of controllers I could use (at 40fps) I decided to go with the 560pixel/port option with 2x280 strings at 30mm spacing making up each port. This gives me the most flexibly if I decide to move controllers around etc. Crunching the numbers in excel, it looks like the Matrix will either be 19 or 20 ports worth of 560pixels meaning 10,640/11,200 new pixels for just the matrix!
1708440041028.png


The Rest
The rest of the changes are quite small but should hopefully add something.
  • Roof line on the back roof section. For the 2023 layout I had my 4 main sections of roof ridges with pixels but not the very back middle/highest one. Adding lights here will add some extra height and make the whole house effects pop a little more. No plans for flakes/props on this back section for now, but who knows what 2025 will bring!
  • Some larger spinners on the columns on either side of the garage as the ones I had are quite small one. I have tentatively put my old ones on the letter box but not sold on having them at all. Will just have to see how the year progresses
  • Front Garden and letterbox outlines. I originally planned to outline the driveway as well but as these are basically back/front, it would really likely render as the one colour all the time and didn’t feel it was needed. The letterbox was my main aim as this is where I have my push button and donation signs etc. Have some extra strings in xLights as I am not quite shore how they will all be connected but wanted to have the models there to move around/resize as needed
  • Flood Lights! I’ve preordered 8 of them and plan to have them at various locations around the house. Again, a work in progress and I’ll finalise the positioning in the next few months. After seeing how effective they were in other displays it needed to be done.
So here is existing going through the thought process till the 2024 layout. This year the only thing I have custom length ordered is the seed pixels the rest is up for change if I get a better idea. Would love to get everyone’s ideas/improvements on the 2024 layout!
1708440051859.png


Light it Up Samples
Paul really is such a help to this hobby and super generous with both his time and products. I sent Paul a quick message asking if he had any small offcuts of seed pixels so I could have a play around with them and get a feel for size/durably etc. The next day I was driving past Paul’s house and he had a full goodie bag full of things for me to have a look at.
  • WS2815 12V dual data line strips
  • WA2811 12V 3wire seed pixels – 10cm spacing
  • GS8208 12V 4wire bullets with 4wire xConnect
  • Another GS8208 (I think!) 4 wire bullet with a smaller 4wire connector
After cutting off the 4wire connectors and soldering up some regular 3wire xConnect it was testing time! While I was really impressed with the 4wire bullets and may go that way in future years, with my 2023 season having zero failures, I wasn’t too fussed on the backup data for this pixel type. What I really wanted to see was what the size/look/brightness/mounting was like for seed pixels. Whilst the sample wasn’t a 4wire seed, the 3 wire really gave me an appreciation of what they would be like to work with.

I printed out some seed mounting clips from SFL Designs to see how they would work. The clips have been designed around 5cm seed spacing so they wont quite work with the 3cm I have planned but with a little modification on TinkerCAD they will be perfect! I then made up a conduit frame to mount them all on to see how they went. Very very impressed, they are really bright, and for the matrix 30% brightness should be more than enough. I was surprised how warm they got at full power compared to bullets/strips, thankfully they are basically cool at 30%.
1708440091769.png


Close up of the SFL Designs seed pixel clip direct from the website
https://sfl-designs.com/?store-page=Seed-Pixel-Pipe-Matrix-p605153582
1708440299339.png


Preorder
Soooooo for 2023 I had just over 14,000 pixels, and this year it's a slight increase with 18,000 pixels including the seeds on the way…….woops! Of those 18,000 I have 3-4k spare for purposed unknown. I’m sure I can find something to do with them!
1708440185114.png


On the shopping list for 2024
Back on page one of this monster thread I put a list of all the things I planned to buy and 2024 will be no different. The big difference is not needing to research every little thing and having established stores/vendors where I can buy all these things with minimal fuss. In fact I’ve ordered basically everything other than sequences, new controller, controller boxes and the 3 props I’m adding. It’s a very different feeling this year being more knowledgeable and less worried about how it will all go together. (I still only have a passing understanding of the networking and xLights side of things! Hopefully this year I improve on that side!). Thankfully its a much shorter list that last year and a lot less $$. I estimate around the $6,500 AUD range (as of 20/02/2024) for the 2024 additions.

Green – Ordered,
Yellow – To be ordered
1708440198201.png


As go through the year i would love to hear your feedback or suggestions. I've learnt so much from peoples posts, comments and suggestions. I don't think i would have progressed as far as i have without this wonderful forum.

Till post 2!
 
Controller time!

Shopping for a new Controller

In 2023 I was rocking the Falcon F48 controller. I’m am really happy with this controller and really like the idea being able to hook up an extra network cable to it be able to control and extra 2800 pixels up to 100m away. So with 14,000 pixels in 2023, and potentially an extra 18,000 pixels (see future pre-order post!) in 2024 running 32,000 pixels from the one controller might be asking too much (Fun fact, the Falcon F48 can run 32,000 pixels but that’s maxing out every port and I just don’t have the setup for that. Would be cool to see someone push a controller to its limit).

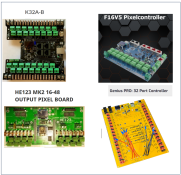
The main thing I was looking for in a controller is for it to run the new garage matrix (11k pixels) in the most economical way possible, the other requirement was it needed to have at least 20ports. I had a look at all the main players Falcon, Kulp, Hanson and Genius. The other thing I considered is how the processing is done on the controller, Falcon and Genius have on board processors, so nothing additional is needed to run the controller. Kulp & Hanson do it a slightly different way with requiring needing an external processor that clips into the controller board such as the Beagle Bone Green/Black.
1716868023068.png

Differential Controllers
At first I considered another differential controller like my current Falcon F48, as it’s something I know, understand and like. As the controller could be right next to the garage door/matrix, it didn’t really make sense to need a bunch of receivers in addition to the controller so this type of controller wasn’t considered.

This left the more traditional controllers with pixel outputs on the board, thought it ultimately came down to what I had on hand to save costs where I could. As part of trouble shooting pixel flickering on my 2023 setup, I purchased a Pi 4 as it was suggested on the xLights Zoom Room that my BBG might not have the processing chops to run 14k pixels. So it made sense to convert the Pi to the show player, and the BBG to controller duty. Wanting to reuse the BBG left only the Kulp and Hanson.

Ultimately I went with the Kulp K32A-B at $150USD + $50USD shipping, all in was $316 AUD delivered. There were a few deciding factors that made the Kulp32 the winner in my situation.
  • I could reuse my BeagleBoneGreen. I would then make my Pi 4 as the show player or just use the Kulp BBG to run everything.
  • Ability to drive 800pix/port
  • Having 4 differential ports to drive another 16ports through differential receivers.
  • Built in FM transmitter
  • 2 DMX ports
  • No requirement to acquire $50USD FPP licence
  • I could also use this controller with the BBG as the show player if I wanted and on sell the Pi
The biggest feature over the Hanson was the 4 included differential ports. I will be using 2 right away so it was a big benefit, otherwise the Hanson is better value from a cost point of view. Once my new boxes arrive i'll start on the controller box build!
1716868086139.png

Matrix Wiring
With the controller delivered I now needed to find a way to wire it up in the lightest way possible so that the garage door would still work and be accessible while the show was running. It still in the planning phase but i’m feeling more and more confident it will work.

Standard approach would be to run an extension cable to each string of pixels, and then additional cables for PI as needed. For the Matrix I am going to use 560pix/string with custom 280 seed pixel runs to enable easy PI in the middle and end. With 18strings of 560pix, it would mean 18x 3core extensions from controller and 36 2 core PI points all on the garage door! Quite a lot of weight and cable expense.

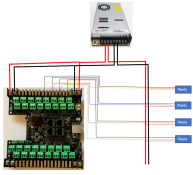
The idea I had was to run a power bus along the length of the garage door and just tap into it at regular intervals for power. I will be using some thick 4mm2 power cable that I have been previously using for my PI boxes. The one question I wasn’t sure about was how to get the data to the pixels and what size cable to use. Linked thread was the discussion about how to get that to work.

https://auschristmaslighting.com/threads/controller-wiring-using-power-bus-line.16032/#post-137519

In Summary it was raised that there might be voltage drop/rise on the negative line and that could influence the signal from the controller. A simple bit of insurance is to run an extra ground line from controller to the pixels. To run the pixels, I plan to use some network cable pairs to act as data and ground. Meaning 4 pairs per network cable, and 4 network cables to get me the 16strings of data/earth for the full matrix.

This is the planned wiring for channels, with the other 12 channels to be similar.
1716868183064.png
Prop Orders!
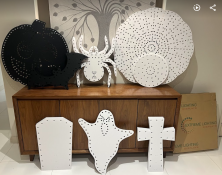
I started out this year thinking I was being quite reasonable with just the one new HD prop and two new small spinners. Fine, easy, reasonable! Well Extreme Lighting Displays did an 10% off sale and I knew I needed to get my order in ASAP. What wasn’t expected was some conversations with my wife about Halloween…….it was always something I thought about doing, but not for a few years. Well, it looks like I am doing Halloween! The following has been ordered and delivered!
  • Showstopper Spinner
  • 2 x Smal Spinners
  • 12 x Spiders
  • 8 x Tombstones
  • 4 x bats
  • 1 x ghost
  • 1 x singing Pumpkin
Yeah, i found something to do with them hahaha
JohnnyBoy
Preorder
Soooooo for 2023 I had just over 14,000 pixels, and this year it's a slight increase with 18,000 pixels including the seeds on the way…….woops! Of those 18,000 I have 3-4k spare for purposed unknown. I’m sure I can find something to do with them!
So much for custom pixel strings! This year I’ll be going old school and needing to make a metric tonne of strings for all the new props! I've also started playing around with seeds in coro props, so might be hooking up the ground props with seeds to see how they go!
1716868366847.png

WLED Controller
For Christmas last year, my dad got me a SmartAlec lighting control SAL32-Pixel (https://shop.smartaleclights.com.au/index.php?route=product/product&product_id=157) but haven’t had a chance to play with it until now. The reason I went with this controller over a bunch of other similar style controllers is that it is 5/12v compatible and included network port should I ever want to hard wire it or use it as a standalone xLights controller. The other main factor was its aussie made, big plus and like to support local vendors when it makes sense to do so.

The main reason why I got this controller was to act as a fancy pixel tester I could have on my desk that I can run patterns through or hook up to xLights for a quick and dirty output via network port. Plus I am planning on dominating the office Christmas decorating competition this year!

Controller Mount and Box
In all my previous controller boxes I’ve relied on acrylic sheets custom cut to fit the BUD boxes I had. This time I wanted to explore the 3D printed mounts as I’ve seen so many great examples out in the wild.

I found a bunch of designs on the various 3D stl websites but unfortunately I couldn’t find anything that had the same hole spacing as the SAL-32 controller. I haven’t done a great deal of 3D modelling with only a few small tweaks using TinkerCAD. It took way to long to get to something that would work at all, at a guess I would say about 5hrs for this first version. It works really well but very bulky for such a small controller. Second attempt will have a smaller footprint with the same functionality. It has sufficient space between mounting plate and the controller for some good airflow. One day i might even get around to printing it and using it! For now the one i have will be ok

Fun Fact: the mounting holes on the LRS350 vs LRS600 power supplies are 10mm longer on the 600w PS! Bugger!

As the intended use was mostly a glorified pixel tester, I didn’t want to go too extravagant with the box, but at the same time I wanted it safe to have on the desk with two small children around. Enter the $4 7L Kmart box! Perfect size, and then went to town with box hardware I had on hand. Cable glands, RJ45 passthrough and Truecon style power connector. Awesome little box!
1716869079191.png


Controller not working
By this point (ie before you have mounted everything and put it in the controller box), most people would have turned it on a confirmed it works…….ooops, must have missed that step!

So turned everything on and red light is on the controller but no network connection and not showing up on the WLED wifi. I spent a few hours researching on the WELD forums but couldn’t figure it out. I thought that maybe the software had gone bad and was planning to reinstall it, however this board doesn’t have a usb port. I then sent an email to SmartAlecLighting and outline the problem and how I had everything connected.

Alec got back to me right away and was a simple yet annoying answer, the controller is setup for 5V not 12V. On the website it states that it’s both 5/12v compatible so I thought it would be a simple case of removing the voltage jumper or flicking a switch. Unfortunately, it wasn’t that easy and required the soldering of a voltage regulator onto the board. Thankfully Alec sent it over free of charge but would suggest an option be added on the website to purchase the regulator or that one is required for 12v.

While waiting for the voltage regulator I hooked up a smaller 5V power supply to test it out and thankfully loading up the board with 12v didn’t damage it!
1716868943705.png
Red circled area is where you solder the small 3pin voltage regulator and remove the pre-installed jumper

Figuring out WLED and Pinouts
Unfortunately there isn’t any information on the SmartAlec website that lists how the pins are connected to drive each of the 4 outputs. Its not super difficult to figure out, just needed to change the GPIO until the lights started working. So if you purchase one in the future, here is the pin out to save you some time.

Smartalec SAL32
Output 1GPIO 2
Output 2GPIO 12
Output 3GPIO 14
Output 4GPIO 15

Thankfully the software is reasonably straight forward, and as i am more or less just waiting a rainbow chase its very easy to do this in a few minutes.

Next up
I've got a few things in the works but quite a lot of it needs my pre-order from LightitUpLED's, thankfully I've heard that part of it might have already arrived! Fingers crossed the slow boat moves a little quicker for the rest!
  • Matrix Layout, wiring and mounting ideas
  • Modifying layout drawing for wiring everything up. Inc making allowances for Halloween props.
  • Mini topic prep including side by side pixel comparison display
  • Attending the Perth Mini!
  • Shelley Smart switches, more than just lights!
Let me know if you have questions or want more detail!
 
Last edited:
Another good write-up as usual!!
Lots going on - looking forwrad to seeing the end result.

The biggest feature over the Hanson was the 4 included differential ports. I will be using 2 right away so it was a big benefit, otherwise the Hanson is better value from a cost point of view.
Just to clear this one up - the Hanson board can do differential by adding the right expansion board to sit on the header.
To get the same as the Kulp (32 local + 16 differential)

HE123mk2 = $120
HE123PX2i = $35
HE123TX = $22
Total = $177 + license = Around $250 AUD.

The biggest difference is that you can load each pixel port up to it's full 7.5A capacity with 4x ports per 30A input, rather than 8 ports per 30A input.
 
Another good write-up as usual!!
Lots going on - looking forwrad to seeing the end result.


Just to clear this one up - the Hanson board can do differential by adding the right expansion board to sit on the header.
To get the same as the Kulp (32 local + 16 differential)

HE123mk2 = $120
HE123PX2i = $35
HE123TX = $22
Total = $177 + license = Around $250 AUD.

The biggest difference is that you can load each pixel port up to it's full 7.5A capacity with 4x ports per 30A input, rather than 8 ports per 30A input.
Didn't even realise Hanson had that option! Will need to pay more attention to the products in future. Thanks for clearing it up
 
Boy, does time fly when you're having fun! It's been a busy few months since the last update, and things are progressing ever so slowly but surely. Hopefully, everything will be ready by Halloween. As usual I'm a few posts behind, I'll catchup hopefully soon!

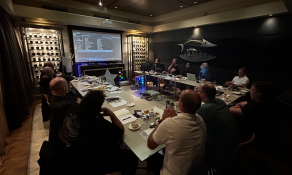
Perth Mini! With how much I enjoyed my first mini last year, I had high expectations for 2024, and it didn’t disappoint. Lots of really good information, with a particular standout being Pierre’s presentation on AI—some spooky stuff! I can see the hobby evolving year by year with how technology is progressing. Hopefully, one day it will be as simple as giving xLights some prompts and snap, out pops a polished sequence to your own tastes...maybe in a few years !

Last year, I gave a presentation on a press-to-play push button setup (https://auschristmaslighting.com/th...er-as-presented-at-the-perth-2023-mini.15467/). Stay tuned to that thread as I’m 90% complete with an overall design that is cleaner, more user-friendly, and eliminates that nasty pop sound when the relay trips. This year, I gave an overview of my first-year lessons learned, which is basically a condensed version of my first-year thread with a few extra bits thrown in. As it’s quite the read to go over the full thread, I’ve created a new post that is just lessons learned. I’ve used screenshots of the PowerPoint presentation, but it might be helpful to new people getting into the hobby! Check it out (https://auschristmaslighting.com/th...esented-at-2024-perth-mini.16115/#post-138259).
1720340336664.png

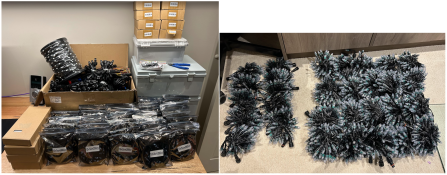
Pre-Order Arrived! I got a message from Paul from Lightitup-LED’s a few weeks before the mini saying most of my pre-order had arrived and that he would bring it up to the Perth Mini. I was super tempted to drive down and pick it up right away, but I used all my willpower to hold off until the mini. What awaited me were 3 boxes of goodness! It was a very good day as I also got my mini order from Hanson Electronics as well! No excuses now to start onto the new 2024 stuff and get things wired up!

The balance of the pre-order from Lightitup-LEDs arrived just a few weeks ago, and I finally have everything I need for 2024! (Likely many Bunnings trips still required!)
1720340372411.png
My obsession with custom length/configured pixels has gone a step further this year with getting power injection xConnect cables on all my custom length strings. This is going to be a massive cost/weight saver as I will no longer need to use power injection tees! Very excited about this one and so happy it could be accommodated by Paul’s manufacturers. The additional cost was negligible and well worth it.

On seeds the PI comes out of the standard Xconnect end, and on the bullets it comes out of the pixel. Not sure what I prefer best as both do the job nicely. It's a manufacturing limitation, so I don't believe you can choose.
1720340403772.png

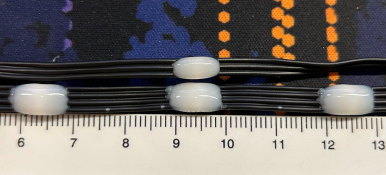
Seed Weirdness After the excitement of getting the seed pre-order, I had to start testing them out to see how they performed in terms of brightness, size, wiring, etc. The first thing I noticed was that the first and last seed on my custom length 280-pixel strings didn’t light up. I thought that maybe this had something to do with me using a 3-4 wire adapter, but I confirmed this when hooking a second 280-pixel string to the first. Again, the first and last seed didn’t light up. I was really hoping that I didn’t have 45 strings of 278 seeds rather than 280, as it would have messed up my matrix!

To do a little more investigation, I jumped onto xLights and created 2x280 strings on the same port and then created some sub-models that light up Pix 1, 280, 281 & 560. Using this, I can see that only the second and second last seed on each string light up, but not the first/last on each string. What I can only guess is that due to the very close 30mm spacing of seeds, during the manufacturing process that puts the little glob of resin over each LED cluster, the spacing is so tight that an extra glob of resin is put in place at the start/end over just the wire and not a pixel. So in my case, I have 282 blobs of resin and 280 pixels! No issue, I’m just glad I discovered this before connecting 12k seed pixels to a matrix and then finding I’m 1 pixel out! If anyone has ordered custom length seeds, it would be worth checking before mounting to your props.
1720340458809.png

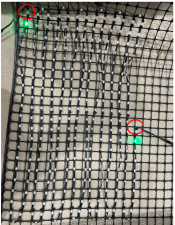
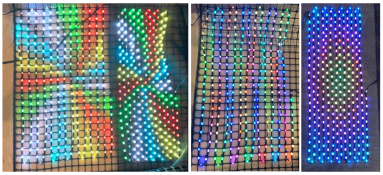
Matrix Layout Ideas I’m not sure where I saw this mentioned, or even if it was Christmas lighting based, but I read that using a diamond pixel layout rather than a square grid would give better effective resolution for moving images and text. The basis of using a diamond or offset layout is that it effectively doubles the available vertical and horizontal pixels but at a reduced resolution. The benefits of this are most noticeable on effects running up/down or left/right (especially text) and detrimental on diagonal movements. So, after finding out about it, I thought I better build a trial matrix to see what looks the best to my eyes. To accomplish this, I trialled the two proposed materials I was thinking about using for the matrix backing: pet mesh (thick flyscreen) and garden trellis (25mm hole spacing).

I got the spacing a little off using pet mesh, so it’s not a true 1:1 scale but gives a good idea. Not really sure how to upload a video, but for my eyes, the diamond layout gives better clarity, especially for text. I’ve decided garden trellis is much easier to work with, so I will be buying more and making another sample with a diamond layout for final comparison.
1720340601059.png

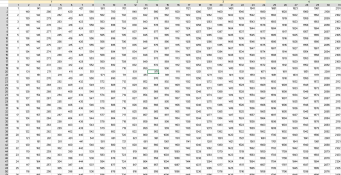
Unfortunately, xLights doesn’t have a built-in diamond matrix layout, so I had to get my Excel on and create a custom model. Excel is basically my life, so this was a quick exercise to complete. As you can’t edit the layout of the standard matrix, I needed to add a new prop as a matrix and re-add it to all my subgroups (there is probably a simpler way of doing the same thing, but I don’t know it).
1720340613784.png

Next up is finishing off my pushbutton box upgrade, Kulp Controller build, prop painting and trying to find the perfect 4wire seed print file for Coro (tried about 10 different versions so far!)
 
Awesome detailed write up as always Johnnyboy, these will be great for everyone to follow along and will likely answer many newbie questions along the way.
Also, shoutout to the Kmart 7L tubs!! I've been using them for years out in the yard, usually covered in a coro box disguised as a present. That said one of my projects this year is phasing some of these out in favour of some larger IP rated cases.
 
I bought a bunch of 100 count seeds from Ray Wu earlier in the year, and each string had 102 "blobs". I thought the same thing at first, why are there 102 pixels on this string?!? Ray commented this back to me....

"the first one and last one are actually not real pixels, they are just a milky glue(no LED inside),we just use it for sealing the soldering points.
so only have 100 Pixels a string."


I got the 2.5cm spacing (1 inch) so I can see with the tight spacing, this is necessary. I would guess you do not get this with larger spaced seed strings.
 
Awesome detailed write up as always Johnnyboy, these will be great for everyone to follow along and will likely answer many newbie questions along the way.
Also, shoutout to the Kmart 7L tubs!! I've been using them for years out in the yard, usually covered in a coro box disguised as a present. That said one of my projects this year is phasing some of these out in favour of some larger IP rated cases.
Kmart is amazing, always something worth buying in that place. Today it was a kids costume! My little 7L tub hopefully shouldn't see any weather events, i made it really for my work Christmas decorating. Our office takes decorating our cubical very seriously lol.

I bought a bunch of 100 count seeds from Ray Wu earlier in the year, and each string had 102 "blobs". I thought the same thing at first, why are there 102 pixels on this string?!? Ray commented this back to me....

"the first one and last one are actually not real pixels, they are just a milky glue(no LED inside),we just use it for sealing the soldering points.
so only have 100 Pixels a string."


I got the 2.5cm spacing (1 inch) so I can see with the tight spacing, this is necessary. I would guess you do not get this with larger spaced seed strings.
Good to have you confirm as well with the smaller spaced seeds. Very odd, but provided you know about it when setting up your props it's easy to manage.

I think your right with the larger spaced seeds. Would be no need.
 
Sigh, once again I’m a bit behind on updating this forum post. I’ve been busy with various projects and just need to carve out some time to write everything up. Hopefully, I can squeeze in a few posts over the next few weeks.

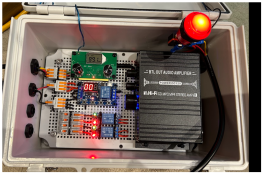
Push Button Speaker Box Audio Upgrade
I won’t dive into too many details here, but I’ve been refining the design to eliminate that annoying ‘pop’ sound when the relay triggers. If you’re curious about the specifics, check it out here.
Push button speaker box built - 2024 Update Post
1723529444280.png

Up Next: The Kulp Controller Build
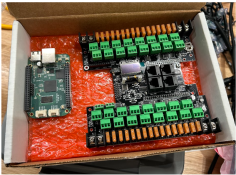
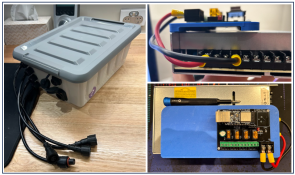
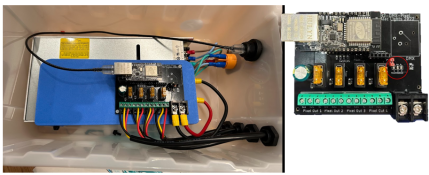
I was quite excited after picking up my controller box order from the Perth Mini (shoutout to Hanson Electronics!) This was my first time putting together a box putting into practice all the lessons I learned from last year, and let me tell you, the process was a breeze—much easier and faster than I remembered.

The box I used is this one from Hanson Electronics: Box 390x290x160, which is almost identical to my previous boxes (BudBox 32026). Thankfully, my old templates from JDeation (oh, how I miss that site!) still fit perfectly. I even found my template from last year lying on the garage bench! Good luck or does my garage need a tidy up? You decide :p

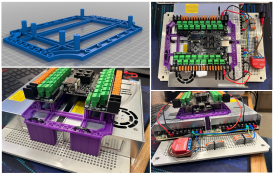
Since I didn’t have a pre-cut clear acrylic sheet from Extreme Lighting Displays (sigh......another company that’s gone!), I turned to Dr. Google for 3D printed mounting solutions. Luckily, I found a great option right away: Kulp K32-BUD-32022 Mount. It perfect for the controller but as it was designed for a smaller controller box and 1200W HP power supplies I needed some design some spacers. Onto TinkerCAD to design some spacer mounts to fit the Hanson box’s base plate and it was done. Not perfect but does the job. Fun fact: If you buy a Bud 32026, the bottom plate isn’t included! These Hanson boxes have the bottom plate and that really makes them great value. I used up some purple PETG filament for this project and am really pleased with the result. I’m a bit bummed that I ran out of purple filament, though—it would have looked awesome with the Baldrick board I got from Hanson. Maybe another filament order is needed….
1723529491817.png

I was a big fan of the Shelly 1PM Plus smart relays last year, so I picked up a few more this year. They make turning your show on and off a breeze, whether through timers or manual control for testing. I have grand plans of using some Shelly 2PM devices to control my roller shutters when I get the time.

For those worried about the size of the wire from power supply to the controller, don’t worry too much. I am only connecting the negative and positive to each output. The pixels connected to this controller are powered exclusively by power injection. The thicker wires with fuses will handle the pixel power.

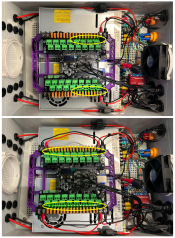
Once everything was hooked up (minus the pixel output wires), I wanted to test it. I initially powered only one end of the board, which only illuminated the first 16 outlets (check out those little green lights!). After making a few extensions, I got all 32 lights working.
1723529606881.png

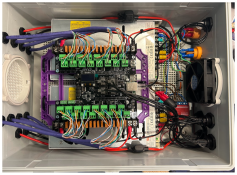
For the pixel outputs, I used some purple CAT6 cable I had lying around. I didn’t realize I had so much purple until now—I might have a problem. Anyway, I chose a random pair for each data and negative connection:
  • Output 1 – Orange
  • Output 2 – Green
  • Output 3 – Blue
  • Output 4 – Brown
And I repeated this pattern 8 times. I terminated the outside connections with regular RF45 crimped connections. I considered using RJ45 passthrough connectors on the box but didn’t have 8 spare ones, and since the box will stay in my garage, it won’t get wet. I’ve left enough space in the passthrough glands if I decide to switch later. I used standard T-568B wiring for the RJ45 connectors. It shouldn’t matter too much, but sticking to a standard is usually a good idea.
1723529644723.png

I’ve played around with the setup a bit, and it seems to be working fine. The only thing I didn’t anticipate was the manual on/off switch position. Previously, it was mounted in a hole in the top acrylic panel, but now it’s just hanging loose. I might design and 3D print a new mount for it if I feel motivated. For now, it doesn’t really impact functionality, as everything is controlled via the Shelly regardless of the switch's position. The switch was just for convenience when testing on the bench. My guess is I’ll do nothing because everything is controlled via the Shelly regardless of switch position.

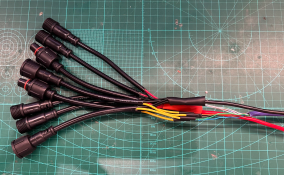
To connect the pixels to the Ethernet cables, I made a test wiring loom. It looks like a tangled mess but should do the job. I’ll need one of these for each of the 5 matrix panels (4x560 seeds with PI at the start and end). Each loom has 4x 3-core standard pigtails and 4x 2-core PI pigtails for power injection. I’ve successfully run 280 seeds at 50% without PI, so I’m not too worried about running them at 20-30%. If needed, I can always add extra 2-core pigtails for more PI. Each loom also includes a data cable with 4 wires going to the data on the 3-core pigtails. I connected the negative line directly; I’m not sure if it makes a difference, but it was simple enough to do and better to be safe. I haven’t heat-shrunk the connections yet— I’ll test thoroughly before finalizing.

Matrix
After my last post, I was torn between a square and diamond layout for the pixels. While the diamond layout worked well for small-scale tests, it didn’t quite pan out as I’d hoped for the full setup. So, back to the square layout it was.

To create my matrix, I’m using 5 of these 900mm x 3000mm trellises from Bunnings: Backyard Farmer 3.0 x 0.9m x 25mm Black Plastic Trellis - Bunnings Australia). The 25mm spacing is ideal for my 30mm pixel spacing, giving slightly better horizontal resolution. Since the xLights model is quite flexible, it’s easy to adjust.

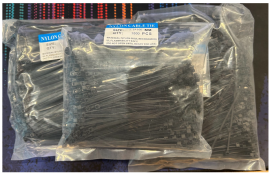
Before starting, I calculated I’d need around 3500 cable ties—yikes! So I ordered 5000 (better safe than sorry). The delivery was quick, and the ties are super light, especially once the excess is trimmed. So far, I’ve used about 1500, with a few more to add to each of the three panels I’ve completed. I still need to trim all the cable ties!
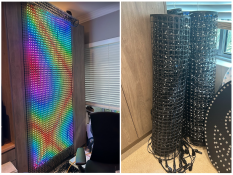
1723529675841.png

Here’s the first of the five panels. I’m pretty pleased with how it turned out. It’s incredibly light and rolls up nicely when not in use. Check out the three panels all rolled up!
1723529695202.png
 
Seeds, Seeds, and More Seeds!
From my experience so far, seeds are fantastic, but mounting them can be a bit of a challenge. For my matrix, cable ties are the clear winner—no need to overthink it. However, when it comes to coro props, especially the larger/thicker/wider 4-wire seeds, things get a bit trickier about what is the best way to do it. The below is my journey to see what works and is the most user friendly.
1723537389813.png

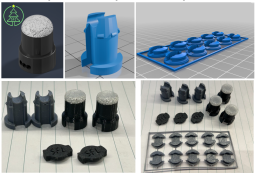
From my googling I found three designs that I liked the look of:
When I first started exploring options, the SLF Designs version wasn’t available, so I focused on the first two to modify to the best of my ability.
1723537416387.png

Seed Insert Coro with Locking Tab
This design showed the most promise because it elevates the seed above the surface of the coro and is thick enough to push right through. However, the circular cutout at the top was initially too small for 4-wire seeds, so I had to modify it through several iterations to get a snug fit that would allow the seed to pushed into place rather than slid in. (the arrows below in red are all the same width so you can see how much I had to modify it)

I printed off a hundred to test them out, and let me tell you, it was a bit of a headache. The seed’s width in the mount was just slightly wider than the 12mm pixel hole. This meant I had to feed the wire through the hole, push the mount through, and then position the pixel into the mount—a slow and tedious process. I also tried pushing it through from the back, but that caused the wires to scrape on the coro, leading to some exposed wire through the sheathing. Not ideal. Once in place, though, they were solid. Another downside was the extra seed cable length needed to go through the coro and back. It worked fine for closely spaced HD props, but for the ones I was using, it would have required splicing in additional cable.
1723537457073.png

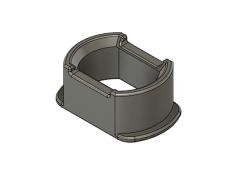
Seed Pixel Socket

This design was initially intended for thinning pixel strips or HDPE-type products like matrix mesh. Using it as designed places the pixel at the back of the prop, shining through the hole—similar to the SLF Designs seed pixel but without the opaque cover. The advantage of this design is that it doesn’t require extra cable length through the coro prop.

o bring the pixel to the front of the prop and minimize cable length, I made several design tweaks. I ended up calling it the “Tie Fighter”! Using two of these—one on the front and one on the back—locks the seed into place with minimal excess cable. Installing them was still a bit of a hassle, though: you had to poke the seed through the coro, install the front Tie Fighter, pull the slack, and then attach the back Tie Fighter mount.
1723537591581.png

SLF Designs – Seed Pixel Popper
Unlike the freely available 3D printable STL options above, the SLF Designs poppers are a purchased item. They come in two parts: a front section and a back clip. Getting the clip in place was challenging at first and required considerable force. I eventually found a technique that worked: placing the front part into a 3D printed pixel pusher to hold it steady while I installed the seed and back plate with my thumb. This method prevented it from moving around. I got pretty quick at it after doing over 900!

Installing the front part of the seed into the coro first, then adding the seed and backplate, was tricky because it moved around too much. The best approach was to get the popper in place before pushing it into the prop.

Pushing these poppers into 10mm xcore coro was a breeze and actually quite fun. If only all pixels were this easy!

I initially had some concerns with the colour of the poppers being black and not reflecting enough light but after reaching out to SLF Designs, Jason showed some photos of prototypes using white filament. The light blead through the white was terrible and think the black is the better choice. I did consider adding some aluminium foil inside to reflect more light, but it didn’t seem worth the effort given how they look without it.
1723537612187.png

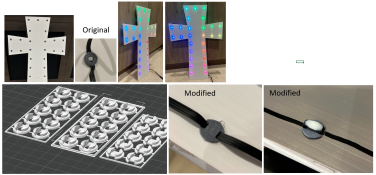
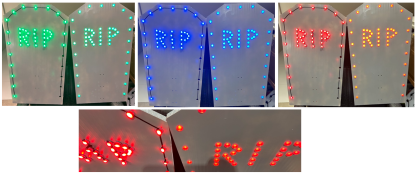
How they look lit up
Below are some photos of my modified Seed Insert with Locking Tab design and the Pixel Popper designs. The separate cross photo above shows the original Seed Pixel Socket. The look of the seed, whether at the back or front of the prop, will be fairly similar, so I haven’t included every variation.

Colour reproduction in the RGB is very similar across the designs, with only red showing slight differences through the Popper. The variation isn’t as pronounced as it seems in the photos—it's more noticeable from different angles. I’m not sure why there’s a colour difference straight on; it might be a camera/phone issue.
1723537650461.png


My Choice
Overall, I found the SLF Designs Poppers to be the best fit for my needs. I love the clean look and how they allow you to use every bit of cable between the seeds. To address the issue of cable length, I’d recommend ordering seeds with a 12cm spacing rather than the 10cm ones I chose. It doesn’t seem like much, but that extra bit of flexibility makes a difference.
 
Last edited:
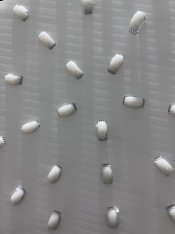
this was about the last design I came up with before giving up, the idea was to hold the base of the pebble to the surface of the prop to stop light bleeding through the coro, the insert was also left hollow so I could use tool to turn the insert for alinement (bit like an allan key)

Pebble insert v3.png


which probably does help many people ? I went back to the drawing board and started to remake most of the props in the CNC to work with seed pebbles

unnamed (1).jpg

although they fit in lock in nicely i still printed a small plug pushed in from the back to hold them firmly in place

unnamed.jpg
 
this was about the last design I came up with before giving up, the idea was to hold the base of the pebble to the surface of the prop to stop light bleeding through the coro, the insert was also left hollow so I could use tool to turn the insert for alinement (bit like an allan key)

View attachment 26691


which probably does help many people ? I went back to the drawing board and started to remake most of the props in the CNC to work with seed pebbles

View attachment 26693

although they fit in lock in nicely i still printed a small plug pushed in from the back to hold them firmly in place

View attachment 26692
Nicely done, having a prop designed for seeds rather than over complicating it by just making it work is the better option by far.

I’ve not done the rabbit hole deep enough for a CNC machine just yet, it does look very good though
 
Hey JohnnyBoy, how did you go about purchasing the SLF poppers? Shipping appears to be crazy to vic. In the realms of $US320
 
is that "Estimated shipping" I just clicked on it out of interest and it returned $258.96 for shipping BUT doesn't even know where I live / never asked
 
Back
Top