Masters Outdoor Weatherproof Boxes

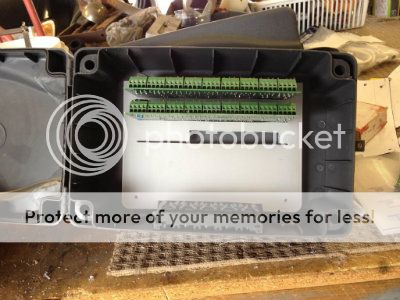
I managed to get a six outlet board in one at an angle. It only has five holes (one in and four out), but in those cases where you need space for transformers, it is possible.


Lanas kids lights said:
Hi just wondering how big of a power board fits in these, as the closet masters is 4 hours way, so I thought I would ask other members what size power board fits in size one, thanks
 
Penguineer, what are you using for the mounting plate/panel?


I was looking at some 3-ply marine plywood which would work out quite cheap...otherwise was going to buy some cheapo chopping boards and cut them up. Nylon would be a bit easier to deal with when mounting with standoffs.
 
anon said:
Penguineer, what are you using for the mounting plate/panel?


I was looking at some 3-ply marine plywood which would work out quite cheap...otherwise was going to buy some cheapo chopping boards and cut them up. Nylon would be a bit easier to deal with when mounting with standoffs.

Not even as fancy as marine ply - just plain old 4mm interior ply from local hardware with a solid coat of spray paint to seal the wood and make it look fancy. There's not going to be any weight after all.....

xmaslights-lor-cmb16d-masters-box-2-800.jpg


Cheers!
 
Point to note:

The 140x200mm mounting spacings are incorrect on the plastic. It's more like 140x197.5mm centre to centre.


I modelled up all my layouts in visio and printed the templates out, the parts matched the template 1:1, but was left scratching my head why my centres didn't match up, with a quick measure confirming the problem.


Measure twice, cut/drill once.
 
just bought 10 of these boxes from Masters in Mornington to put my Ray Wu 27ch boards into them, they still had at least 20 boxes left in the spot I grabbed mine from, possibly more elsewhere but I had already spent enough money so got the boxes I needed and got out before i found something else.
 
Robbo said:
Penguineer:


are you attaching the boards directly to the ply or are you using a spacer of some sort?

Yes, definitely spacers at the back of the board. Just got a couple of packs from Jaycar, but you could probably do a decent job with some suitable length 3mm bolts and some plastic tubing.

Keeps the board off the ply, avoids possibility of complications from anything shorting across the timber/paint?(!!), looks a bit more professional and if a small amount of water does leak into the box the board itself won't be affected. At least, that's the theory......

Cheers!
 
penguineer said:
Yes, definitely spacers at the back of the board. Just got a couple of packs from Jaycar, but you could probably do a decent job with some suitable length 3mm bolts and some plastic tubing.

Keeps the board off the ply, avoids possibility of complications from anything shorting across the timber/paint?(!!), looks a bit more professional and if a small amount of water does leak into the box the board itself won't be affected. At least, that's the theory......

Cheers!

Thanks for that, bought 10 boxes today and may go back tomorrow for more...and stop by jaycar or middy's for some spacers.....and some ply from bunnings.
 
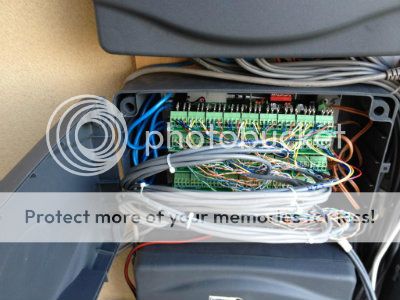
I'm running 4 Ray 27's out of my boxes.
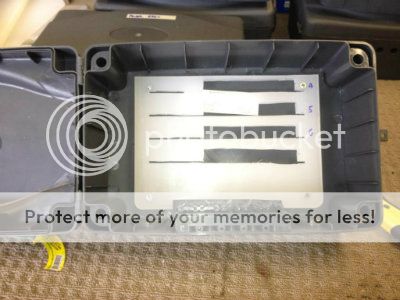
I bought some 5mm Teflon chopping boards from the $2 shop to use as backing boards.
I've slotted them to mount the boards horizontally.

ControlBox1.jpg


ControlBox2.jpg


ControlBox3.jpg
 
ԆцряєсϮ said:
I'm running 4 Ray 27's out of my boxes.
I bought some 5mm Teflon chopping boards from the $2 shop to use as backing boards.
I've slotted them to mount the boards horizontally.


ԆцряєсϮ but how are you getting 36 leads through the holes?
 
Robbo said:
ԆцряєсϮ said:
I'm running 4 Ray 27's out of my boxes.
I bought some 5mm Teflon chopping boards from the $2 shop to use as backing boards.
I've slotted them to mount the boards horizontally.


pictures not coming up for me for some reason ԆцряєсϮ but how are you getting 36 leads through the holes?

Don't know how ԆцряєсϮ has done it, but there are two marked sections at the front/bottom(same side as the waterproof cable entry) for 20mm cable entries - to make these work better you would need to mount the box upright(cable entries at the bottom) and use some 20mm cable glands(electrical aisle at Masters).....

Can see the moulding in my picture at the top of this page, or more clearly in Ewans first piccie in the first post of this thread......

Cheers!
 
Haha, second that! Very impressive.


How are they mounted horizontally and are they easy to take out to unscrew terminals?


Nice work :)
 
Thats what happens when you run out of time :eek: lol


The backing boards are 5 mm thick so Ive slotted them in such a way that they have enough support at each end to keep them horizontal, They also slide in about 15mm deep The slots are a smidge bigger that the thickness of the board which means they slide in nice and firm. Fitting off was easy as I ran all my looms out and then started with the bottom board and worked up.
I just slide each board out to terminate, set dips and then slide it back in. Each boards loom is seperate so if needed I can slide it out to do what ever.
I originally planned on having 2 boards per box with fused terminal strips for each. But then I thought, this is not on display only the lights are so now its just practical so I can fit more in. Main goal was to get it all up and running first, I can work on the cosmetics later.
 
Back
Top