My First Project

We did all the measuring on the weekend. Added it all up and the cost was a bit excessive so we decided to scale everything back a bit for the first year. To cut back on costs, we decided to stay within a single power supply (saving $90) and reducing the number of strings we had to buy to stay within the estimated 30 strings per power supply.

The order has been placed with AVD and should be delivered tomorrow. Outstanding service from David at AVD.

I still can't buy LSP because the site won't let me. We decided to go with Vixen instead.

Still trying to source the 4 core 14/020 cable. I found one roll at my local CNW store. I'm waiting on a call back from some people I sort of know at the Go Electrical down the road. If their price isn't any good, I'll go back to CNW.

Now we can start the real work...and the arguments. :D
 
MarcD said:
Still trying to source the 4 core 14/020 cable. I found one roll at my local CNW store. I'm waiting on a call back from some people I sort of know at the Go Electrical down the road. If their price isn't any good, I'll go back to CNW.

I bought my 4 core cable from Ebay, very cheap and hard to beat for price and you will have plenty spare for next years projects

http://www.ebay.com.au/itm/Security-Cable-4-Core-14-020-305m-Box-White-Alarm-System-Cable-/261050701915?pt=AU_Electronics_Accessories_Wires_Cables&hash=item3cc7d5985b
 
The gear has arrived. Thanks again to David from AVD for the excellent service and fast delivery. I bought a 100 metre roll of 14/020 cable from Go Electrical down the road. Looks like we're good to go.

I've attached a crudely coloured in drawing of where each string of lights will run. There may be some more, it will just depend on how much available power we have left from a single power supply.

Next step is to teach Santa some dance moves to go with this song to add the human element.

All systems go. :)
 

Attachments

  • Lights.jpg
    Lights.jpg
    134.6 KB · Views: 31
After hours of cutting, testing, joining, soldering, and heat shrinking.... all of our strings are done.

Its was 2 full days working with basically virgin strings of lights, cutting them down and joining where required. A few more measurements for where I needed to add extensions for power cable and its all done.

All joints are individually soldered and heat shrinked with clear heat shrink, then all 3 strands are covered and heat shrinked with glue lined heat shrink for added water proofing.

It was about 5pm yesterday afternoon and once I'd run every string down my hallway (and back again a few times for some strings) it was all wired into the DC48 controller and test run.

A couple of glitches where I've wired the blue/yellow channel to join the red/green channel but otherwise everything worked, and worked well. A few runs through with some initial sequences in Vixen and everything looked good.

We're not just finalising what else we can control and how it'll fit into sequences and so on and we'll be right to go.

For now, the hardest of the work is done. It's now just a matter of writing more sequences (the easy, non labour intensive part). Then comes putting it all up... yay for hours crawling around on a hot tin roof.
 
It does give yourself a good feeling of satisfaction when you have the hardware ready as you can now focus on sequencing them
 
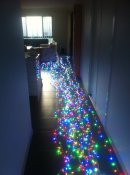
Here's a pic of about half of the strings laid out for testing. The other half were laid out up the hallway. I must say that they look very impressive and Robert did a fantastic job.

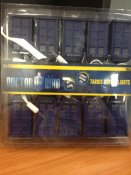
The second pic is of a set of lights one of my employees gave me as a belated birthday gift. She got them from the US so we're replacing the entire light string with a spare one from home. Luckily they just pop open, feed in the new light and clip them back together.
 

Attachments

  • IMG_0048.JPG
    IMG_0048.JPG
    1.8 MB · Views: 39
  • DrWho Lights.jpg
    DrWho Lights.jpg
    77.7 KB · Views: 49
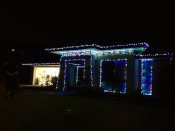
After both of our neighbours asked where our lights were, we decided to bite the bullet and start putting stuff up. We decided to start with the easy stuff. The vertical surfaces like the windows, pillars and guttering. All went smoothly and we even managed to get it hooked up to the controller for a test run. Proper planning makes all the difference. All of the strings and lead wires were exactly the right length.

The result looks pretty good. A lot brighter than we had expected. Next comes the roof. That will probably have to wait a few weeks.
 

Attachments

  • IMG_0053.JPG
    IMG_0053.JPG
    398.1 KB · Views: 53
We thought so too. One unexpected bonus was that this year, instead of having icicle lights hanging off the guttering, we added three strings of lights attached to the three timber bands which run between the roof and the concrete pillars. We didn't stop to think that the eaves are painted white and they really reflect the light. It makes these lights look even brighter than we anticipated.

Bird said:
Lookin good so far
 
I'll second that - definately looking good! Also thanks for documenting your journey - it's inspirational to see how others are progressing down the 'light control' path.
 
Thanks. I actually got into trouble from my wife for posting that photo on Facebook. She said it would ruin the 'TA DA!' moment when they were finished. We said that this is less than half the strings of lights and we still had all the non-controlled stuff like rope light motifs, so the final result would be such a TA DA! moment we'll have to warn the ISS (International Space Station) in advance. :D
 
That's hillarious!!!
Last night our 3yo daughter had her after-kindy care friends over (we share a baby-sitter with another family), so I did a 5 minute test run with the Bunnings rope lights I set up on the weekend. One of the neighbours came out and was worried the planes flying overhead would confuse our driveway for an airport runway :D It had all the kids cracking up thinking how cool it would be if a plane landed on our house.... :eek:
 
Back
Top