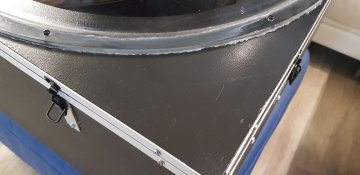
How did these cases turn out for you? I have a few of these and noticed they get quite warm and with the corners how did that impact on the light.
Navigation
Install the app
How to install the app on iOS
Follow along with the video below to see how to install our site as a web app on your home screen.
Note: This feature may not be available in some browsers.
More options
You are using an out of date browser. It may not display this or other websites correctly.
You should upgrade or use an alternative browser.
You should upgrade or use an alternative browser.
Moving Head Spotlights
- Thread starter bdt
- Start date
bpratt
Senior elf
have you got some more details or photos at how you mounted your enclosure to the bottom of your MH please ?
I really need to get something done with mine so I get put it up before I run out of time.
3mm thick plastic or thicker ?
I will post pictures of my moving head enclosure build shortly. As well as some of my reasoning for what I've done, and why. I've pretty much done the same thing DalyC did with his enclosure, with a couple of small tweaks. Here is the link to his enclosure Moving Head Enclosure
I will also post where I found most of the components.
I will also post where I found most of the components.
Ok, so I am finally "ready" to put my moving head Waterproof build out there. All of the components for this build was sourced in Australia, the vast majority of it from good old Bunnings.
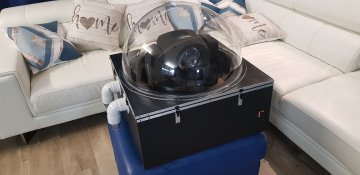
My use case is as follow: I want the lights to shine up into the air, and as such, I am not too concerned about the beam going past the 180 degree horisontal. I also needed to build the case waterproof, yet at the same time ensure enough airflow so the light fixture don't overheat. I also wanted the enclosure to be "mudular" so I can take the box, the light and the top seperately up the ladder onto my roof. (These things are heavy and bulky and I have a double story home).
With that said this is more or less the final product, with the only exception that I still need to cut out the air vents for the heat exhaust, and mount the fans. As you can see, it is quite simply a square box measuring 640mm by 640mm and 270mm. The reason for that dimension is the dome I ordered is a 600mm diameter dome, with 20 mm flange, thus the width 640mm. (If I can redo this build, I would have ordered the 550mm dome with 20mm flange, that way the total width would be just below 600mm. This would have greatly reduced the costs, as you would then be able to purchase pre-cut sheets of 600mm wide from Bunnings. As it turns out, I had to get the larger size sheets, and cut them to size which wasted about 30 to 40 or the sheet.) The domes can be purchased here:
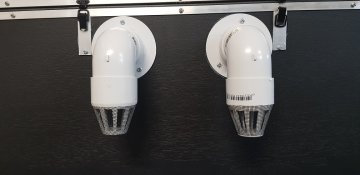
I've used MDF 12mm for the base, Marine Grade playwood 9mm for the sides, and MDF 9mm for the top. All of these can be found on the Bunnings website. I've used 50mm drainage pipe with an air vent for the Air intake. Close up picture below:
On the opposite side will be 2 X 80mm Ventilator Vents and 2 X 80 mm fans. Those can be found here:
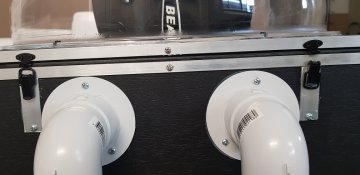
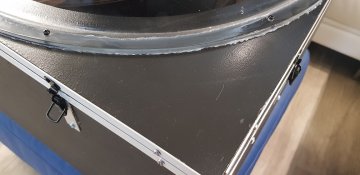
My next challenge was to get a watertight seal between the box, and the top. I've used simple Aluminium Angle screwed and siliconed in place. This way I had a fairly straigh / flat surface to mount the water proof seal. The seal can be bought at Bunnings here:
With the strips in place, and the seal attached, I needed a method to "compress" the top and box to form a tight waterproof seal. I used claps clamps from Amazon. I've spaced them out on two each side and they pull the top down about 5mm to form a close tight seal.
The top part of the build is where I placed the most emphasis. I painted the MDF wood 3 coats, and finished it off with Polyurethane to give it hopefully some extra waterproof / sun protection. I've used M4 screw bolts and Selleys Roof and Gutter Sealant. (I propably could have done a slightly better job at cleaning up the excess silicone, but my focus was to ensure it is water tight, not pretty )
)
Next I've added the the only input, which is a "waterproof" or so they claim Speakon Power connector. I bought a bunch of these from Aliexpress I've toiled with the idea of having DMX in and DMX out added also, but decided to run my DMX wirelessly, so the only cable needed to go to my roof is a power cable. I've ordered the following wireless DMX from Aliexpress.
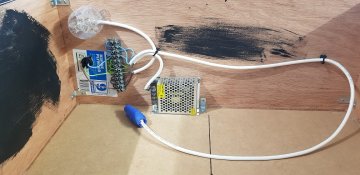
DISCLAIMER: I am not an electrician, and can not take responsibility for anybody copying what I have done. With that out of the way, here is the electricity part of the build. I have 1 power cable coming in, and split into 3 seperate power outlets. One goes to the light, another to the 12V power supply (for the fans), and a third to an outlet. The wireless DMX will be powered by this. (In hindsight, I propably could have used a multiplug adapter, but it is what it is)
And finally I've added some M8 bolts to the middle of the base to secure the lights, so they don't move around when they are on the roof.
I hope this helps and give people some ideas on how to build something for their moving heads.

My use case is as follow: I want the lights to shine up into the air, and as such, I am not too concerned about the beam going past the 180 degree horisontal. I also needed to build the case waterproof, yet at the same time ensure enough airflow so the light fixture don't overheat. I also wanted the enclosure to be "mudular" so I can take the box, the light and the top seperately up the ladder onto my roof. (These things are heavy and bulky and I have a double story home).
With that said this is more or less the final product, with the only exception that I still need to cut out the air vents for the heat exhaust, and mount the fans. As you can see, it is quite simply a square box measuring 640mm by 640mm and 270mm. The reason for that dimension is the dome I ordered is a 600mm diameter dome, with 20 mm flange, thus the width 640mm. (If I can redo this build, I would have ordered the 550mm dome with 20mm flange, that way the total width would be just below 600mm. This would have greatly reduced the costs, as you would then be able to purchase pre-cut sheets of 600mm wide from Bunnings. As it turns out, I had to get the larger size sheets, and cut them to size which wasted about 30 to 40 or the sheet.) The domes can be purchased here:
I've used MDF 12mm for the base, Marine Grade playwood 9mm for the sides, and MDF 9mm for the top. All of these can be found on the Bunnings website. I've used 50mm drainage pipe with an air vent for the Air intake. Close up picture below:

On the opposite side will be 2 X 80mm Ventilator Vents and 2 X 80 mm fans. Those can be found here:
My next challenge was to get a watertight seal between the box, and the top. I've used simple Aluminium Angle screwed and siliconed in place. This way I had a fairly straigh / flat surface to mount the water proof seal. The seal can be bought at Bunnings here:
With the strips in place, and the seal attached, I needed a method to "compress" the top and box to form a tight waterproof seal. I used claps clamps from Amazon. I've spaced them out on two each side and they pull the top down about 5mm to form a close tight seal.

The top part of the build is where I placed the most emphasis. I painted the MDF wood 3 coats, and finished it off with Polyurethane to give it hopefully some extra waterproof / sun protection. I've used M4 screw bolts and Selleys Roof and Gutter Sealant. (I propably could have done a slightly better job at cleaning up the excess silicone, but my focus was to ensure it is water tight, not pretty

Next I've added the the only input, which is a "waterproof" or so they claim Speakon Power connector. I bought a bunch of these from Aliexpress I've toiled with the idea of having DMX in and DMX out added also, but decided to run my DMX wirelessly, so the only cable needed to go to my roof is a power cable. I've ordered the following wireless DMX from Aliexpress.
DISCLAIMER: I am not an electrician, and can not take responsibility for anybody copying what I have done. With that out of the way, here is the electricity part of the build. I have 1 power cable coming in, and split into 3 seperate power outlets. One goes to the light, another to the 12V power supply (for the fans), and a third to an outlet. The wireless DMX will be powered by this. (In hindsight, I propably could have used a multiplug adapter, but it is what it is)

And finally I've added some M8 bolts to the middle of the base to secure the lights, so they don't move around when they are on the roof.
I hope this helps and give people some ideas on how to build something for their moving heads.
Attachments
bpratt
Senior elf
thanks for the write up, great ideas there.
the only catch is that I want mine to point down the hill at the audience from time to time for special impacts, like redlight greenlight... strobe them at the audience for 'gunshots'.
perhaps something silly like the 700 or even 800mm dome, would give a dome height of 350 or 400mm.
the only catch is that I want mine to point down the hill at the audience from time to time for special impacts, like redlight greenlight... strobe them at the audience for 'gunshots'.
perhaps something silly like the 700 or even 800mm dome, would give a dome height of 350 or 400mm.
darylc
404 darylc not found
- Joined
- Dec 8, 2012
- Messages
- 1,281
mount the box/dome sideways?thanks for the write up, great ideas there.
the only catch is that I want mine to point down the hill at the audience from time to time for special impacts, like redlight greenlight... strobe them at the audience for 'gunshots'.
perhaps something silly like the 700 or even 800mm dome, would give a dome height of 350 or 400mm.
Or perhaps use 1 transparent perspex side that face the "front" of house? Only thing is I don't know how the light would look / reflect if it is shone partially through the dome / perspex wall? Larger dome is another option to go, but remember it becomes bulky and heavy real quick.thanks for the write up, great ideas there.
the only catch is that I want mine to point down the hill at the audience from time to time for special impacts, like redlight greenlight... strobe them at the audience for 'gunshots'.
perhaps something silly like the 700 or even 800mm dome, would give a dome height of 350 or 400mm.
bpratt
Senior elf
yeah, that doesn't sound too bad an idea, mount the whole thing on an angle with the dome part tilted downwards, as I will never be pointing it horizontally backwards.mount the box/dome sideways?
bpratt
Senior elf
This is how I've mounted my 'outdoor' MH, and have made up something similar for this Beam 230 MH, which is why it won't be a problem to mount this box setup at an angle, as pointing backwards, it'll always be somewhat 'skyward' aim.
 View: https://www.dropbox.com/s/ae4rtgx2q5jeiic/20211017_154859.jpg?dl=0

bpratt
Senior elf
anyone made up these 'Domestos' cases for these 230w MH's ?
Just wondering if you were able to obtain 80mm fans that sucked more air through them than the ones from da-share.com ?
if so, do you have a url or a location for higher volume 80mm 12v fans ?
Just wondering if you were able to obtain 80mm fans that sucked more air through them than the ones from da-share.com ?
if so, do you have a url or a location for higher volume 80mm 12v fans ?
I changed the 80mm fans to something a bit more beefy... They are noisy but work well. An added bonus is they are super easy to install. The link is here:anyone made up these 'Domestos' cases for these 230w MH's ?
Just wondering if you were able to obtain 80mm fans that sucked more air through them than the ones from da-share.com ?
if so, do you have a url or a location for higher volume 80mm 12v fans ?
- Joined
- Jun 26, 2021
- Messages
- 634
@Domestos This is a great build and I think it's awesome that your shared it.
Just for additional details, what thickness is the dome that you ordered? It might help others make an easier selection.
Lastly, I would not use any sort of MDF outside. Once MDF gets wet and starts to absorb moisture it will swell and start to break up plus unless you use special fasteners they will not hold as well as wood.
I'm not sure if it is available in AU or not but besides marine grade ply there is a product here called MDO, Medium Density Overlay, it's a product designed for outdoor sign usage so is weatherproof but has a pretty smooth surface to it.
Again, I think your build was great.


