Mark's seed pixel mega tree - Smaller and cheaper!

Mark_M

Annoying Elf
Joined
Dec 30, 2018
Messages
961
Location
Christmas Light world
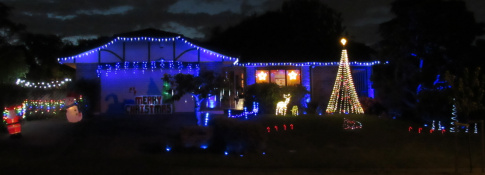
My seed pixel mega tree - Smaller to store and turned out cheaper to make.

Can't be bothered to read? Here's the video:

View: https://www.youtube.com/watch?v=eGL6h4FvXdo


The inspiration
In 2017 I created a mega tree with 'seed lights' purchased from eBay. I choose these lights because the entire LED is covered in epoxy from the reviews of Youtube/BigCliveDotCom. These were much better waterproofed than 5mm standard string lights commonly found at Bunnings.
The seed lights of this tree are still working!
1674301263401.png

Starting pixel lights in 2019: I found out how other people make their mega tree's with mounting strip and bullet/square pixel nodes.
This seemed expensive and the storage of a large tree would be more than my entire display's storage at the time.
In comparison to my dumb seed light tree with all the lights stored in an ice cream container, that's very small for storage!!


Where did I find out about these pixel ones?:
Courtesy of the Youtube channel IntermitTech with his video "QuinLED: Ultimate Addressable Christmas Tree LEDs"
These were enamel copper wire seed lights. I ordered some from BTF and they worked alright. But not very reliable for outdoor use, I have shown these in my Behind the scenes 2021 video.

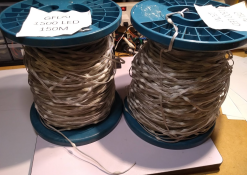
In 2022 GFLAI self promoted their insulated wire seed pixels:
I had to try making a mega tree with these!
1674302302220.png

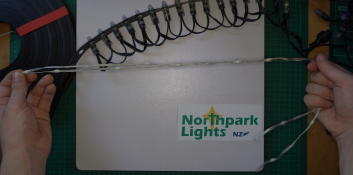
These little lights are fairly robust. It takes a lot of force to break them apart.
1674306730208.png

Following posts is how my tree is built.
 
Last edited:
Making the tree:
The seed pixels from GFLAI are 5v, which meant power injection would be needed. Conveniently in December 2021 the option for 'alternate nodes' was added to tree model in xLights.


'Alternate nodes' allows for the input and output of a string to be at one side. See post #3 further down for how this works.
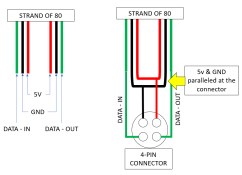
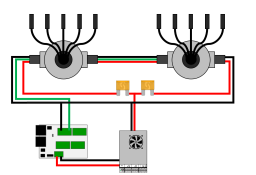
I took advantage of this and used a 4-pin connector on each strand. This meant power injection was a lot easier and there was no connectors at the tree topper to worry about, awesome!

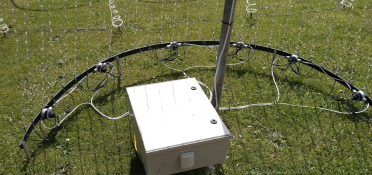
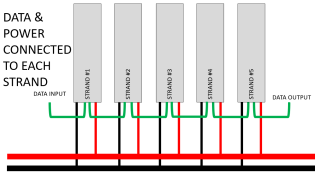
Each junction box on the base ring connects data between strands and provides power to each strand.


The concrete base:
The base is 50mm PVC in concrete below the surface. I slide a galvanised steel pipe into the PVC. A cap is placed over the PVC when the tree is not assembled.
In mid-2022 I dug the hole with a spade, later I poured the concrete.

Spoiler content hidden. Log in to see this content.


The base ring and topper:
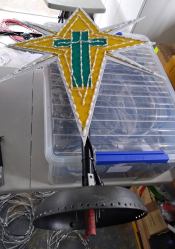
The topper is made from a frying pan, with holes drilled around the edge. Each strand of lights has a small hook crimped onto the end.

1674308173903.png

The base ring is an old aluminium outdoor dining table frame I bent to a larger radius of 2.2m. Small lengths of 20mm conduit is attached to the base ring and pushed into the ground.

1674308221117.png


The electronics box:

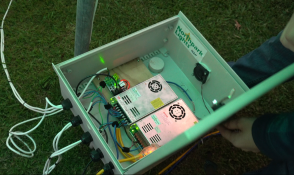
I used a very large ‘TriBox’ branded enclosure. Inside is two 350w 5v power supplies and a Falcon smart differential receiver board (first generation).

1674308257987.png

I run 800 pixels per port on outputs 1, 2 & 3 of the Differential receiver board. Port 4 is connected to the star.
There is a thread on the making of this star: https://auschristmaslighting.com/threads/making-a-seed-pixel-coro-star.14883/


I can setup this tree on my own. I made the hooks for the topper while I was putting up the tree.
Spoiler content hidden. Log in to see this content.
 
Last edited:
  • Like
Reactions: AAH
How does alternate nodes work?

xLights factors that the pixels are not in proper order.
A normal pixel string is usually in sequential order e.g., node 1, 2, 3, 4…… 20.
Instead, xLights knows that a string of alternate nodes is counted from each end of the string as it comes to the middle, e.g., Node 1, 20, 2, 19, 3, 18………… 10.


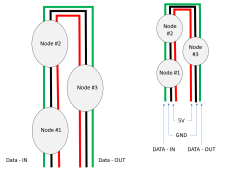
Physical layout of the pixels is a string folded in half.
Imagine taking a string of lights that is 8m long and folding it in half. Now the string is 4m with smaller spacing between pixels and the data input/output at one end.

1677185166962.png

This is where power injection gets clever!
I paralleled the two wires for power at the connector. Effectively this is 'power injected' with power applied to both ends.
1674308484842.png

On my mega tree I use the base ring junction boxes to connect data in/out between all the strands. The junction boxes also connects power to each strand.

1674308512736.png
1674308564571.png

Video of alternate nodes in the context of a bullet/mounting strip mega tree:

View: https://www.youtube.com/watch?v=a7wgHWFVVbQ
 
Last edited:
FAQ from the Facebook post:

Pixels/Price:
  • Where did you buy these from?: GFLAI lighting via email and PayPal. Thread about these mentioned in the first post.
  • What was the price of pixels?: $0.08USD per pixel at the time, however they are now $0.028USD per pixel now.


Did you have any failures?:

Yes. There was some pixels that were bad brand new from the roll.
4 pixels worked but did not have epoxy covering the entire LED/Pixel.
3 Pixels did not pass data properly.

No pixels failed while the tree was in place.


Powering:
  • How many pixels before power injection?: About 60-80 before I notice yellowing. Although best practice would be 50 like a string of 5v bullet nodes.
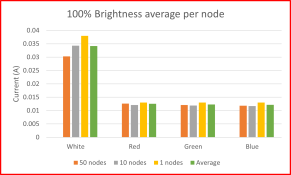
  • What is the current per pixel node?: My testing seems to be about 35mA. Average current per pixel is less with voltage drop of the cable. 1674387284725.png

Are these difficult to repair?
Not different than cutting and splicing with bullet node strings of pixels. The wire is thinner, so 'clickits' and other quick splicing devices might not work. Soldering and heat shrink is still good!!

1674387270302.png

"These look fragile"
If you say so....
Thinner gauge wire of these seed pixels is obviously going to break with sooner under heavy tension than bullet node strings. Bullet strings will break too!

I used no tension wire on the strings in my mega tree. All the lights were under tension from a small elastic band at the base ring.
The tree was subjected to rain and strong winds and it survived fine. I have no clue about it surviving a hurricane.


"Can I buy this off you?"
There was a few people private messaging me this!! The answer is no. I have no time to create this as a kit.
 
Could you post a picture of the internal wiring of your junction box?
I'll have to make up another one to show how it was done. The base ring is currently stored in my houses roof space.


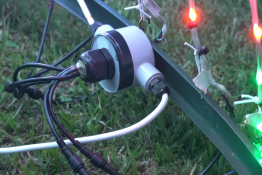
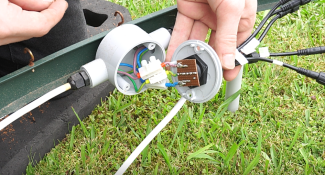
Inside each junction box is a small PCB. I soldered each of the pigtail wires to the PCB.
This made it easy to connect ground & 5v to all pigtails, like a power rail on a breadboard.

Data in/out is also soldered to the PCB, with cuts to the trace between to isolate them.

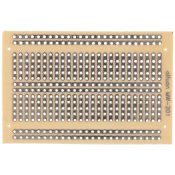
I used a blank PCB with rows of traces, similar to this but all as long rows.
1675077143512.jpeg

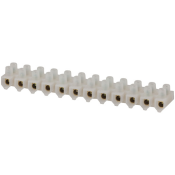
I wanted to use PCB screw terminals to connect to the white flexible cable, but at the time I soldered some wire and used screw terminals.
1675077291988.png
 
Thanks for this detailed post mate. Used alot of your ideas to make my own one. Thanks again!
 
Hi Mark, Was the junction box a standard box or was it 3d printed?
I won't answer for Mark but personally I would not recommend a 3d printed junction box for external use. I'm not sold that a 3d print is totally waterproof and would remain that way during winter weather outside. Personally, I think it would be best to go with some sort of ABS injected junction box or something similar.

I use a lot of 3d printed supports for my props but there is no concern of water intrusion that might hurt electronics inside.
Thanks.
 
It would have been cheaper to run conduit between all of them, but that could lead to issues if one gets water ingress.
Personally I think the cost of a few junction boxes in the grand scheme of things is worth it. I am sure they were nothing compared to the lights etc.
It would also allow for upgrades and as you say repairs if needed.
Nice work on the build.
 
Back
Top